Other Names: – Downward dog, downward facing dog pose.
Position type: – forward bend.
Preparatory Poses: –Uttanasana, Phalakasana.
Follow -up poses: – Sirsasana, Uttanasana.
-Steps And Benefits
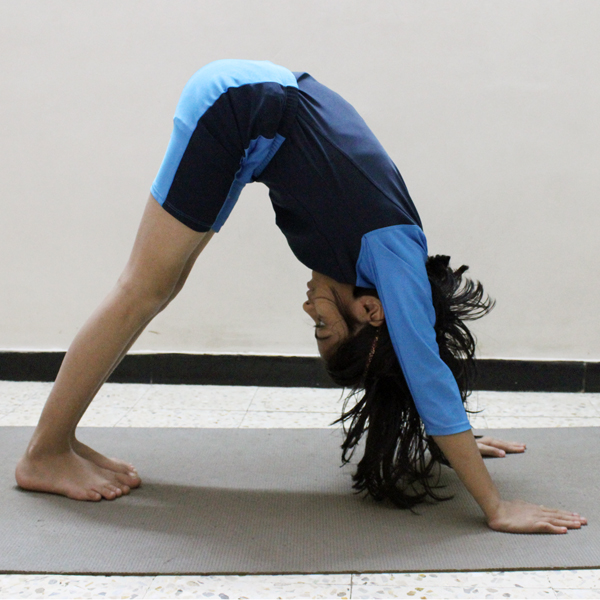
Adho Mukha Svanasana is made from the Sanskrit words; in which meaning of Adho is ‘down’ Mukha means ‘face’ Svana means ‘dog’ and the meaning of asana is seat or posture. This posture is very similar to the position of dog facing downward so this asana named as Adho Mukha Svanasana.
The pose of this Asana is inverted and performed in the long way on a mat in which your hands and feet pushing against the floor. During this process hips are brought up in the air. The body in the long run frames a pyramidal triangular shape. This posture is like the position a pooch takes while extending in the wake of having a rest. The “Descending Facing Dog “or downward facing dog can be practiced as a preliminary stance for the standing postures, or to warm-up the muscles before a session of yoga.
Steps of Adho Mukha Svanasana
To begin this stance or pose, you ought to begin off on your knees and hands. Keep your knees straightforwardly beneath the hips and your hands a little before your shoulders.
Give your palms a chance to be spread out and your forefingers somewhat turned out or parallel.
Exhale and lift your knees away from the floor far.
At first, you can keep your knees somewhat bowed and your heels lifted up from the floor.
At that point, stretch your tailbone far from your pelvis and press it delicately to the pubis.
Now raise your sitting bones against this resistance toward the roof and draw your legs into the crotch.
During exhalation let the highest point of your thighs be pushed back and your heel extended against the ground.
Try to keep your knees straight however not bolted.
Keep your thighs firm and roll the highest point of your thighs inwards. The front of the pelvis ought to be kept tight.
Brace your arms and press your index finger effectively into the floor.
From regions of the forefinger bases try to lift yourself.
This ought to be done from your wrists to the shoulder tops.
Keep your shoulder bones firm. At that point broaden them and convey them to the tailbone.
Your head ought to be between your arms. Abstain from giving it a chance to drop.
Adho Mukha Svanasana is a piece of the conventional surya Namaskar arrangement. It is likewise an exceptionally successful stance just independent from anyone else. You can stay in this stance for a couple of minutes.
For leaving this stance, you ought to twist your knees to the ground, breathe out and stop in Balasana (Child Pose) and rest for a minute then continue this pose for 5 to 6 times.
Tip for beginners
Have a go at twisting your knees, coming up onto the chunks of your feet, conveying the tummy to lay on the thighs and the sit bones up high. At that point sink your heels, fixing the legs keeping the high upward pivot of the sit bones. Additionally take a stab at bowing the arms marginally out to the side, drawing the mid-section towards the thighs.
Benefits of Adho Mukha Svanasana
It stretches and gives strength to your whole body.
Helps in relieving back pain.
It rejuvenates your body.
Useful in headache, fatigue and insomnia.
Tones the body muscles.
Gives strength to your legs, feet, shoulders and arms.
Reduce anxiety and depression.
By this pose your body gets a 360 degree stretch.
NOTE
Don’t perform this posture in case of carpal tunnel syndrome; if you are suffering from diarrhea avoid this pose. During the latter stages of pregnancy don’t do this Asana. In case of high blood pressure or headache you can use block for supporting your head. In case of chronic or recent injury to the arms, hips, shoulders and back avoid this. Before doing any yogic activities consult an expert and your doctor also.
2
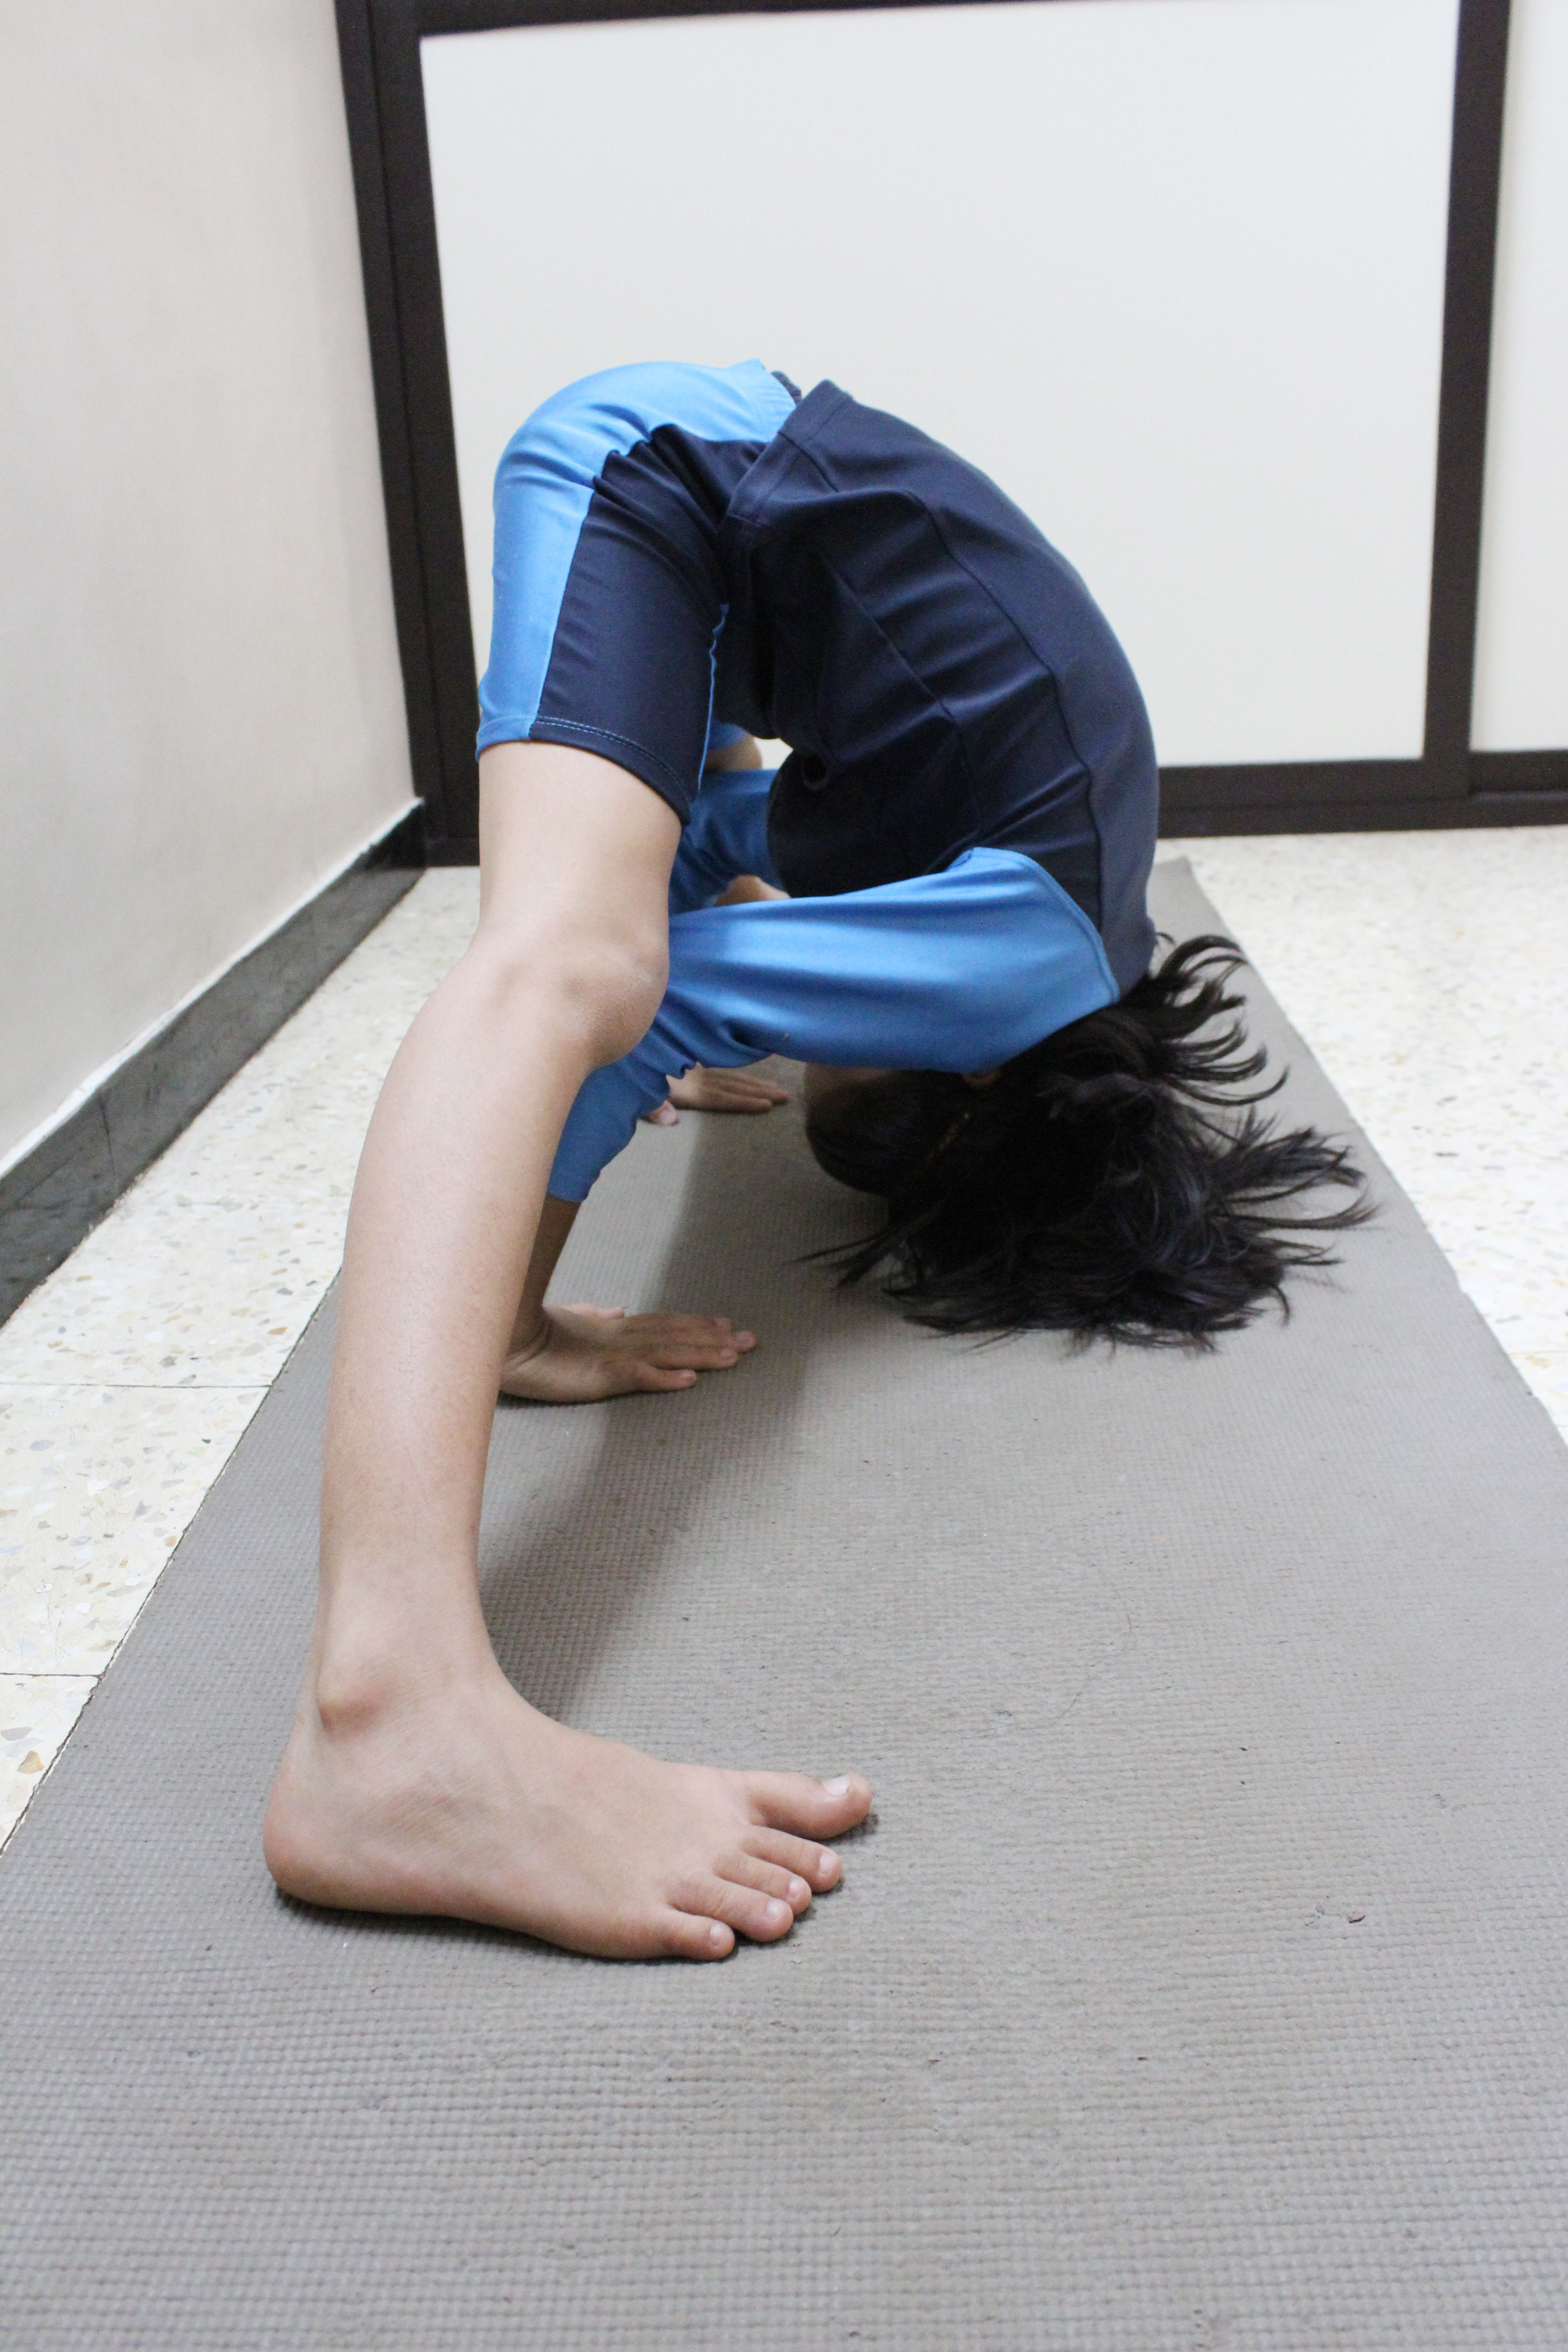
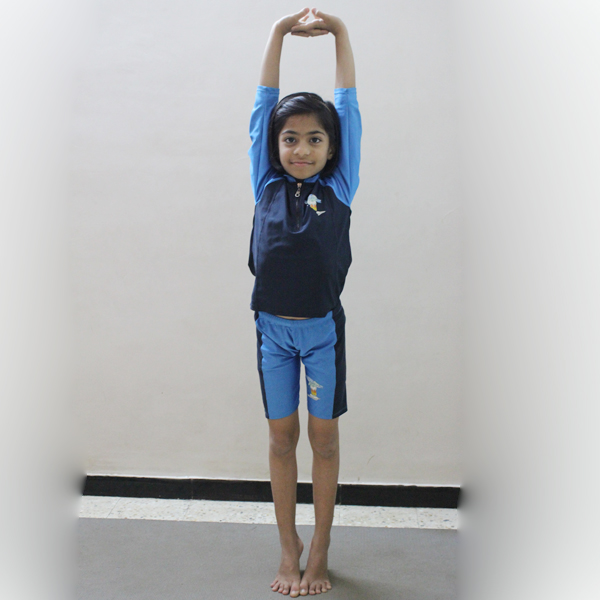
Adho Mukha Vruksasana
Adho Mukha Vruksasana
Adho Mukha Vrksasana
{Handstand Yoga Pose}
Steps and Benefites
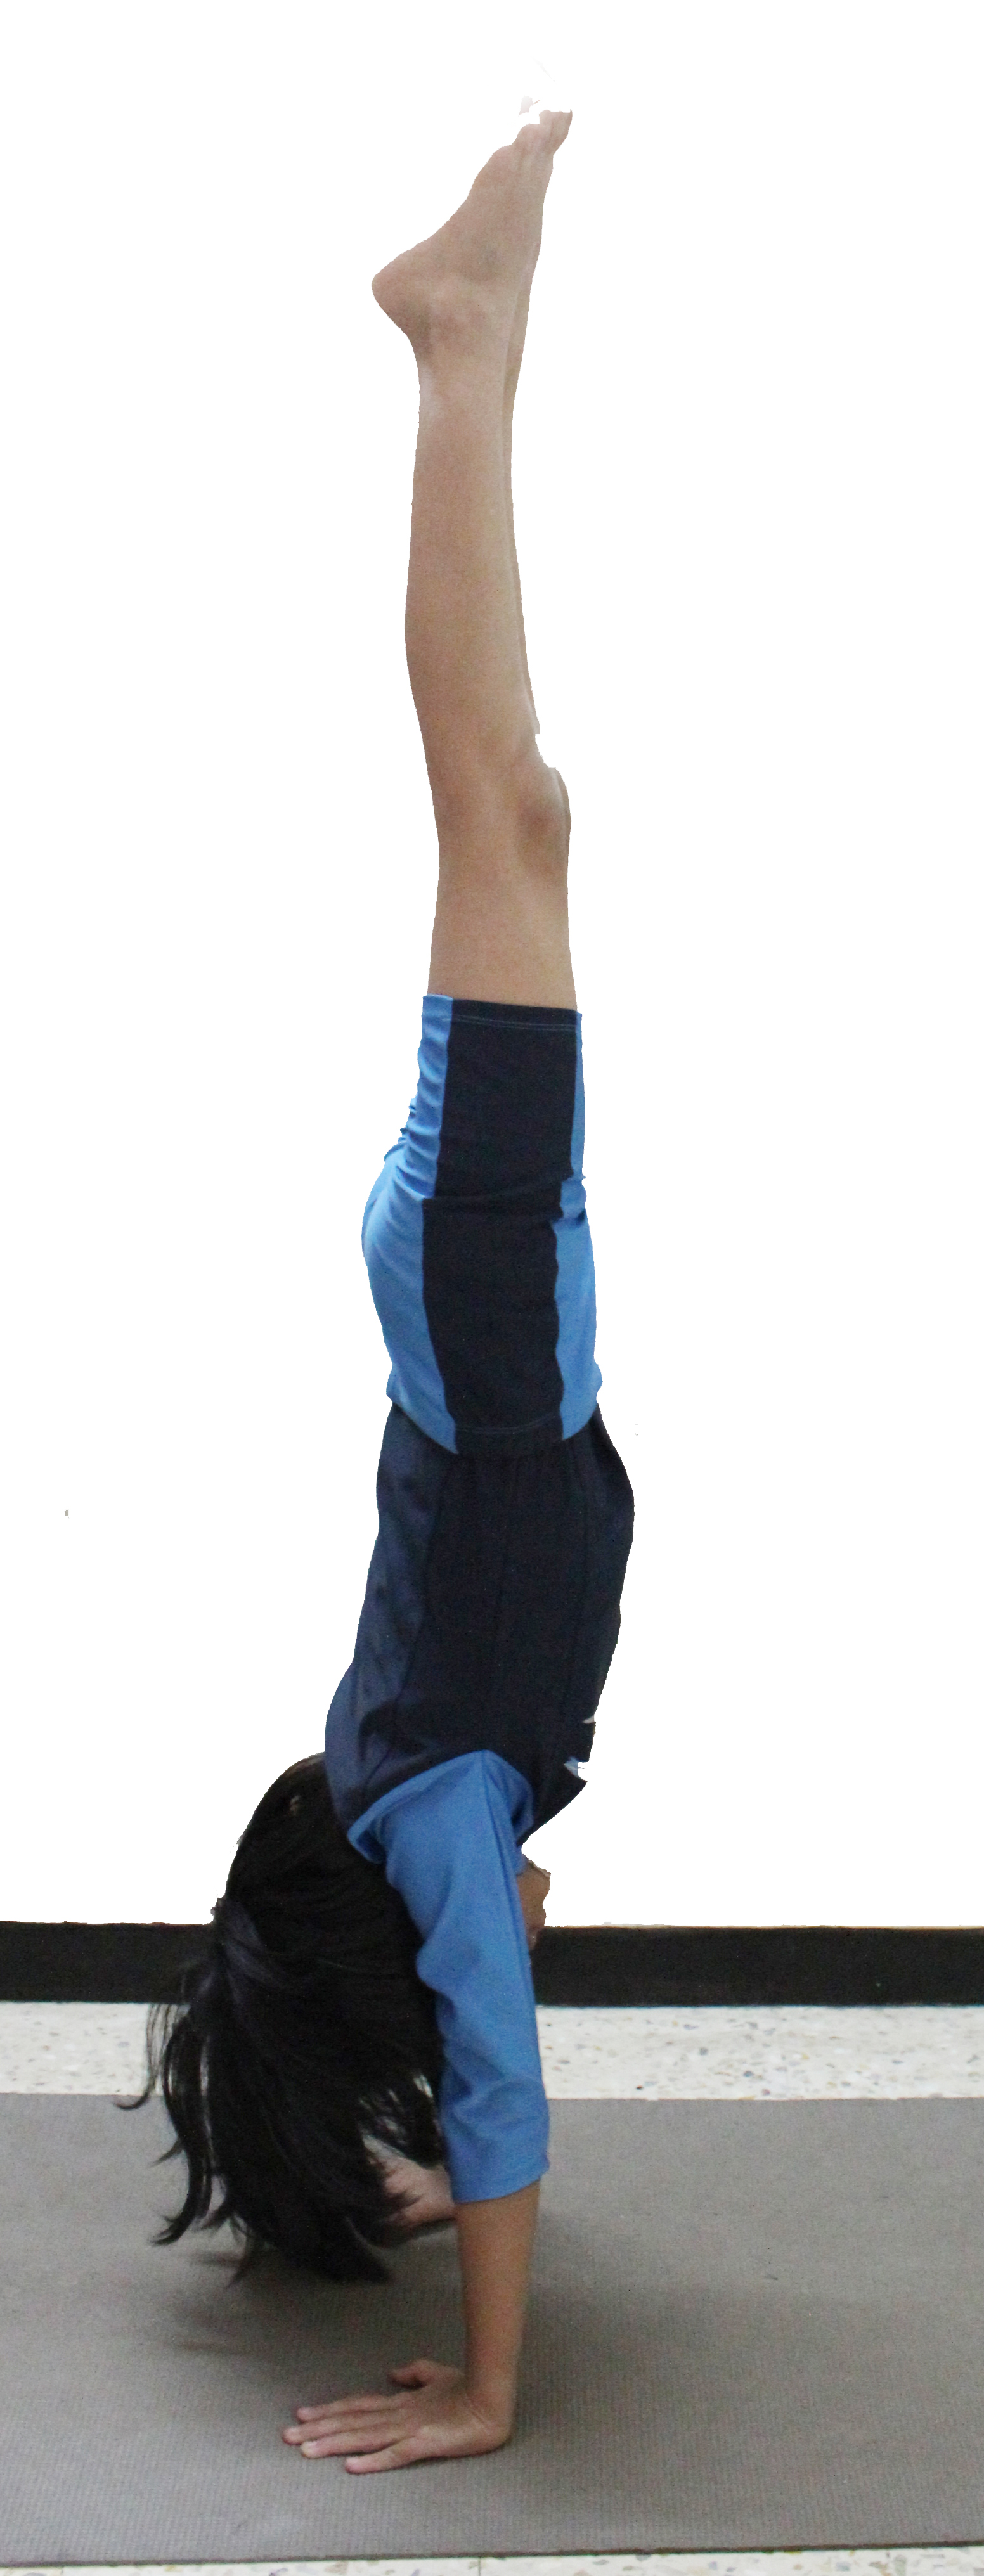
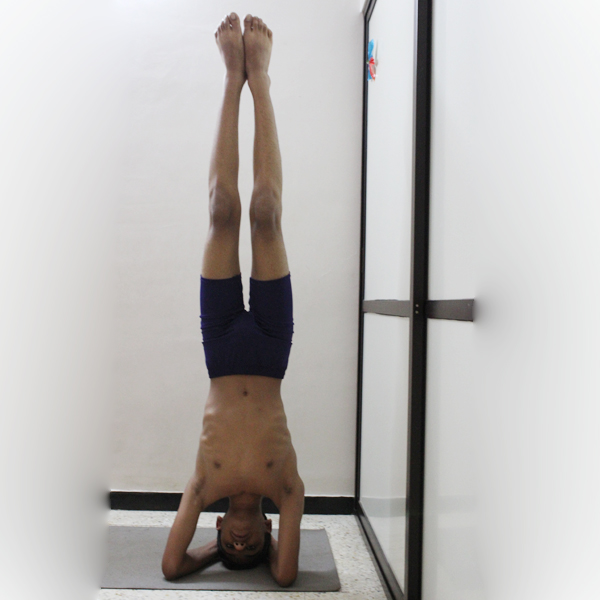
Adho Mukha Vrksasana word is taken from Sanskrit, in which Adho stands for Downward, the meaning of Mukha is facing, Vrksa represents the Tree and Asana means seat, Pose. Handstand Yoga Pose is also named as titled tree pose. In this, your hands support your whole body weight. This is not an easy Asana for learners, but they can master it by daily practice. Adho Mukha Vrksasana mainly focuses on brain, shoulders, pituitary, legs, arms, wrists, spine and the lungs. When you perform Handstand Yoga Pose, your body resembles a solidly rooted tree, and your body faces downwards as you attempt this pose, so that’s why this Asana is named as so.
Steps of Adho Mukha Vrksasana (Handstand Yoga Pose)
First get into the Adho Mukha Svanasana, you can also take wall support; note that your hands are six inches away from the wall.
Now, slowly walk in the direction of your hands and place your shoulders right over your wrists.
After that, bend your knee (any of one leg), and raise your alternate leg off the floor, try to keep your leg straight when you are comfortable.
Next, slowly raise your alternate leg.
Remain in the position until you are comfortable.
During this, keep in your mind that, you have to place your head in between your upper arms.
Then, gently try to take your feet off the wall along with maintaining the balance.
Keep looking on a specific point at the ground or floor.
Remain in the position for 1 to 3 minutes, at this time take a deep and slow breath.
For releasing pose, put down one leg at a time and come to your earlier stage and relax. There is no repetition for this Pose, but you can increase the holding time as per your capabilities.
Handstand Yoga Pose is also coming under intense pose, so beginner’s not to attempt this. For this, you have to clear the basic level first. For this pose, you can practice headstand pose for balance this pose will helps you. And perform all the Yoga Asana under the eyes of an expert teacher.
Benefits of Adho Mukha Vrksasana (Handstand Yoga Pose)
Your belly gets a good stretch.
Adho Mukha Vrksasana improves your sense of balance.
Beneficial in stress, anxiety and calms your mind.
Handstand Yoga Pose is an awesome pose for making your shoulders, wrists, and arms strong.
It increases your stability and stamina.
NOTE
In the condition of back injuries, headache, shoulder injuries, High blood pressure, Menstruation, neck injuries, heart problems do not perform Handstand Yoga Pose. Please attempt the Yoga Asana in a right way.
3
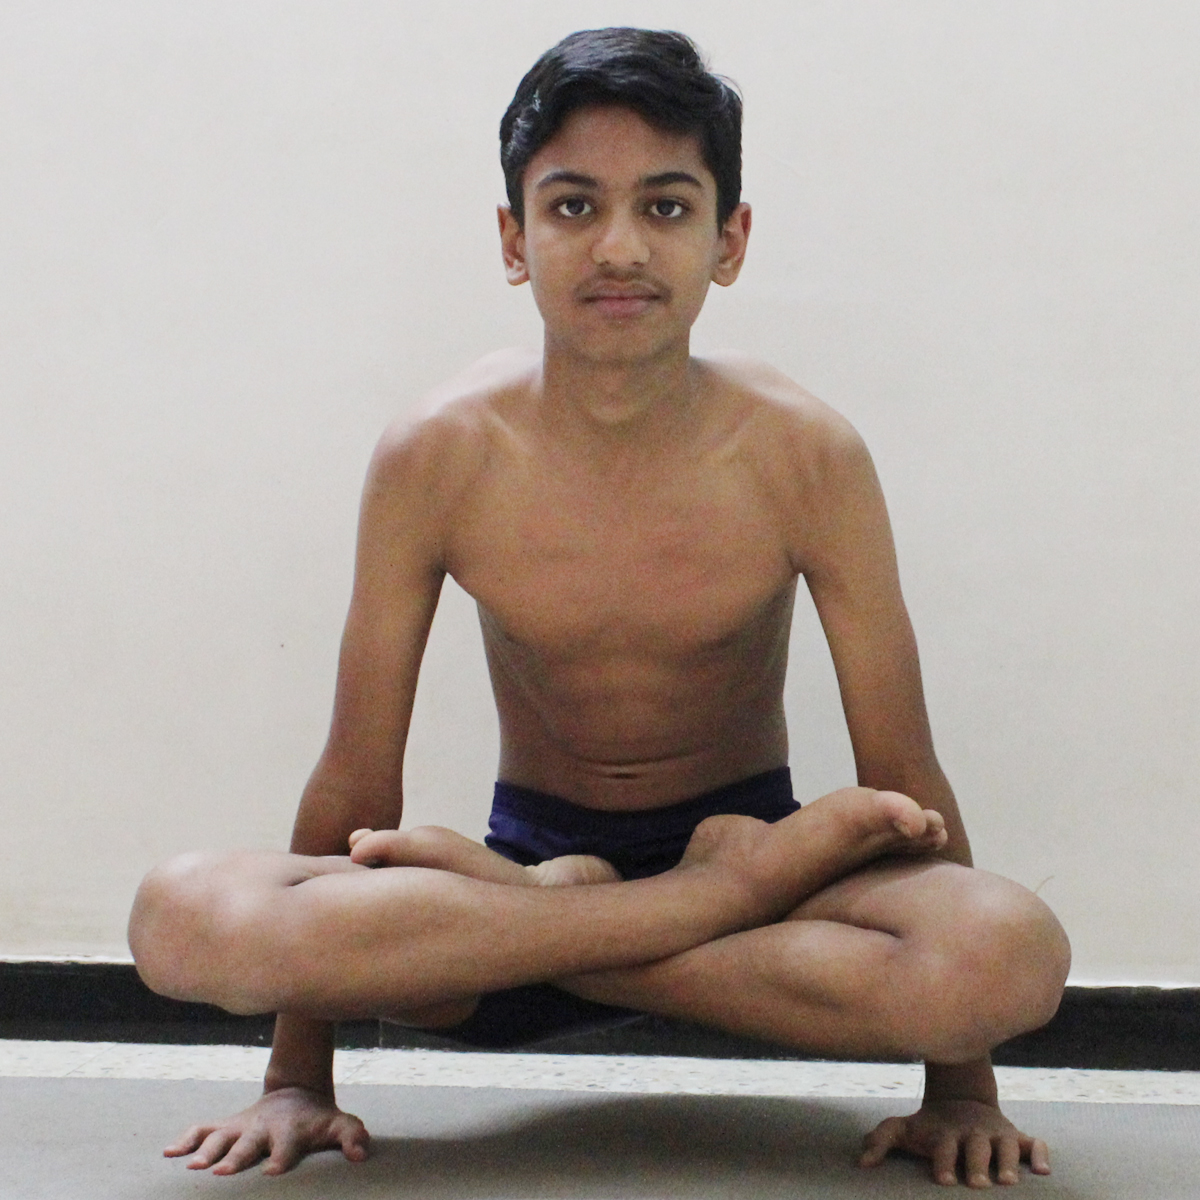
Agnistambhasana
Agnistambhasana
Agnistambhasana
{Burning log Pose}-
Steps And Benefits
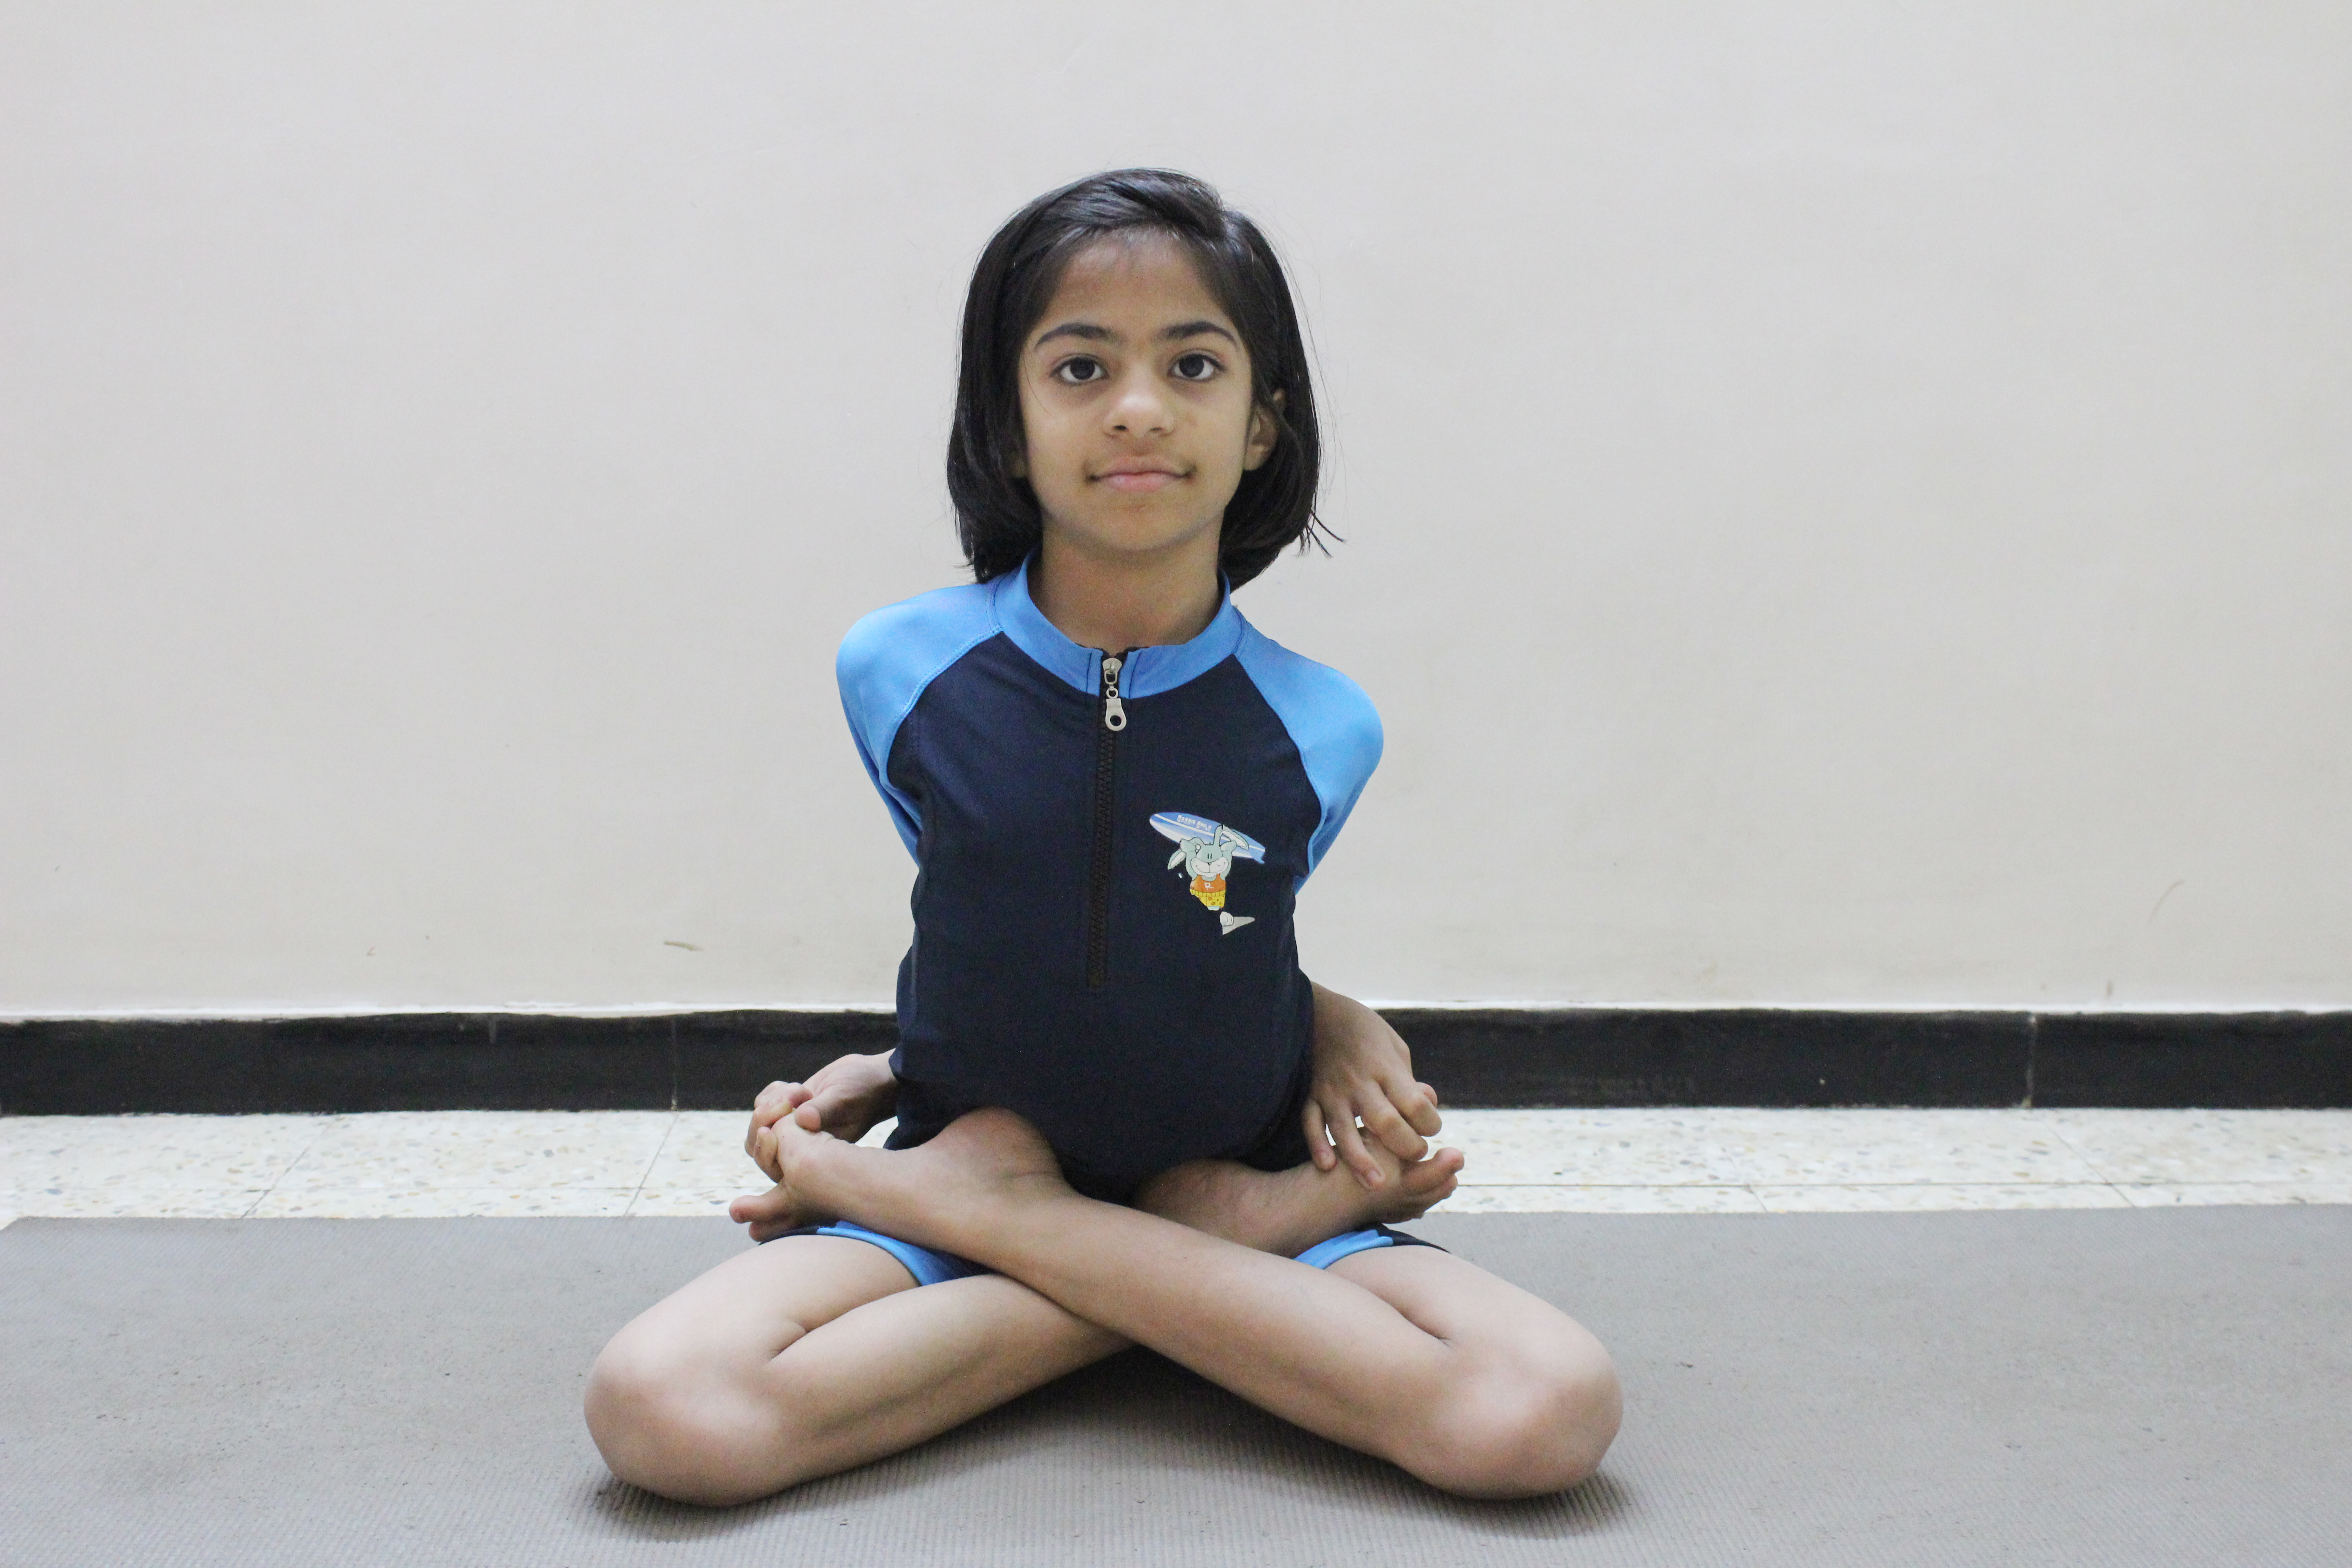
Agnistambhasana is a Sanskrit word which is made up of the combination of three words Agni+ Stambha+Asana. In which Agni is refer to as Fire, Stambha means Statue and the meaning of Asana is seat, pose or posture. This Asana is also known as Burning log pose, Double pigeon pose and Fire log pose. This pose comes under the level of intermediate and it’s a hip opening asana. From a basic folded legs position, the shins are stacked on top of each other by putting the left lower leg on top of the right knee, then sliding the right foot forward until it is underneath the left knee. With a level back, the abdominal area folds forward to extend the stretch.
Steps of Agnistambhasana (Burning log pose)
Sit on the yoga mat with knees bent, and keep your feet on the ground.
Slowly lift up your shoulders and strongly roll the heads of your upper arm bones back. Now press the bottom tips of shoulder blades into your backward direction.
Put your left foot under your right leg to the outward direction of your hip; keep your outer leg on the floor. Drift (stack) your right leg on your left leg. Make sure that your right ankle is outside the left ankle.
If your hips are more flexible then, you can also slide your left shin in forward direction under the right. Keep your left heel beside your right hip.(In case of tight hips then and you feel uncomfortable then sit in Sukhasana )
Press your heels and expand your toes.
Keep your front trunk long, breathe out and fold forward from your crotches (groins). Make sure not to round forward from your gut (belly).
Keep some space between your navel and pubis long. Keep your hands on the floor before your calf.
While breathing, note that how your trunk or torso lift up slightly; when it does, try to lengthen from your pubis to your sternum after that on next breathe out , fold it deeper.
Remain in this pose for 1 or 3 minutes. Breathe in and release the pose, sit comfortably in Sukhasana (Easy pose). Repeat the process with the left leg on top.
Benefit ofAgnistambhasana
It is very effective in opening up the hips and groins.
It additionally fortifies the stomach organs and increases flexibility.
In case of Knee injuries, ankle injuries avoid this asana. If your hips or groin then sit in Sukhasana and gently try this.
4
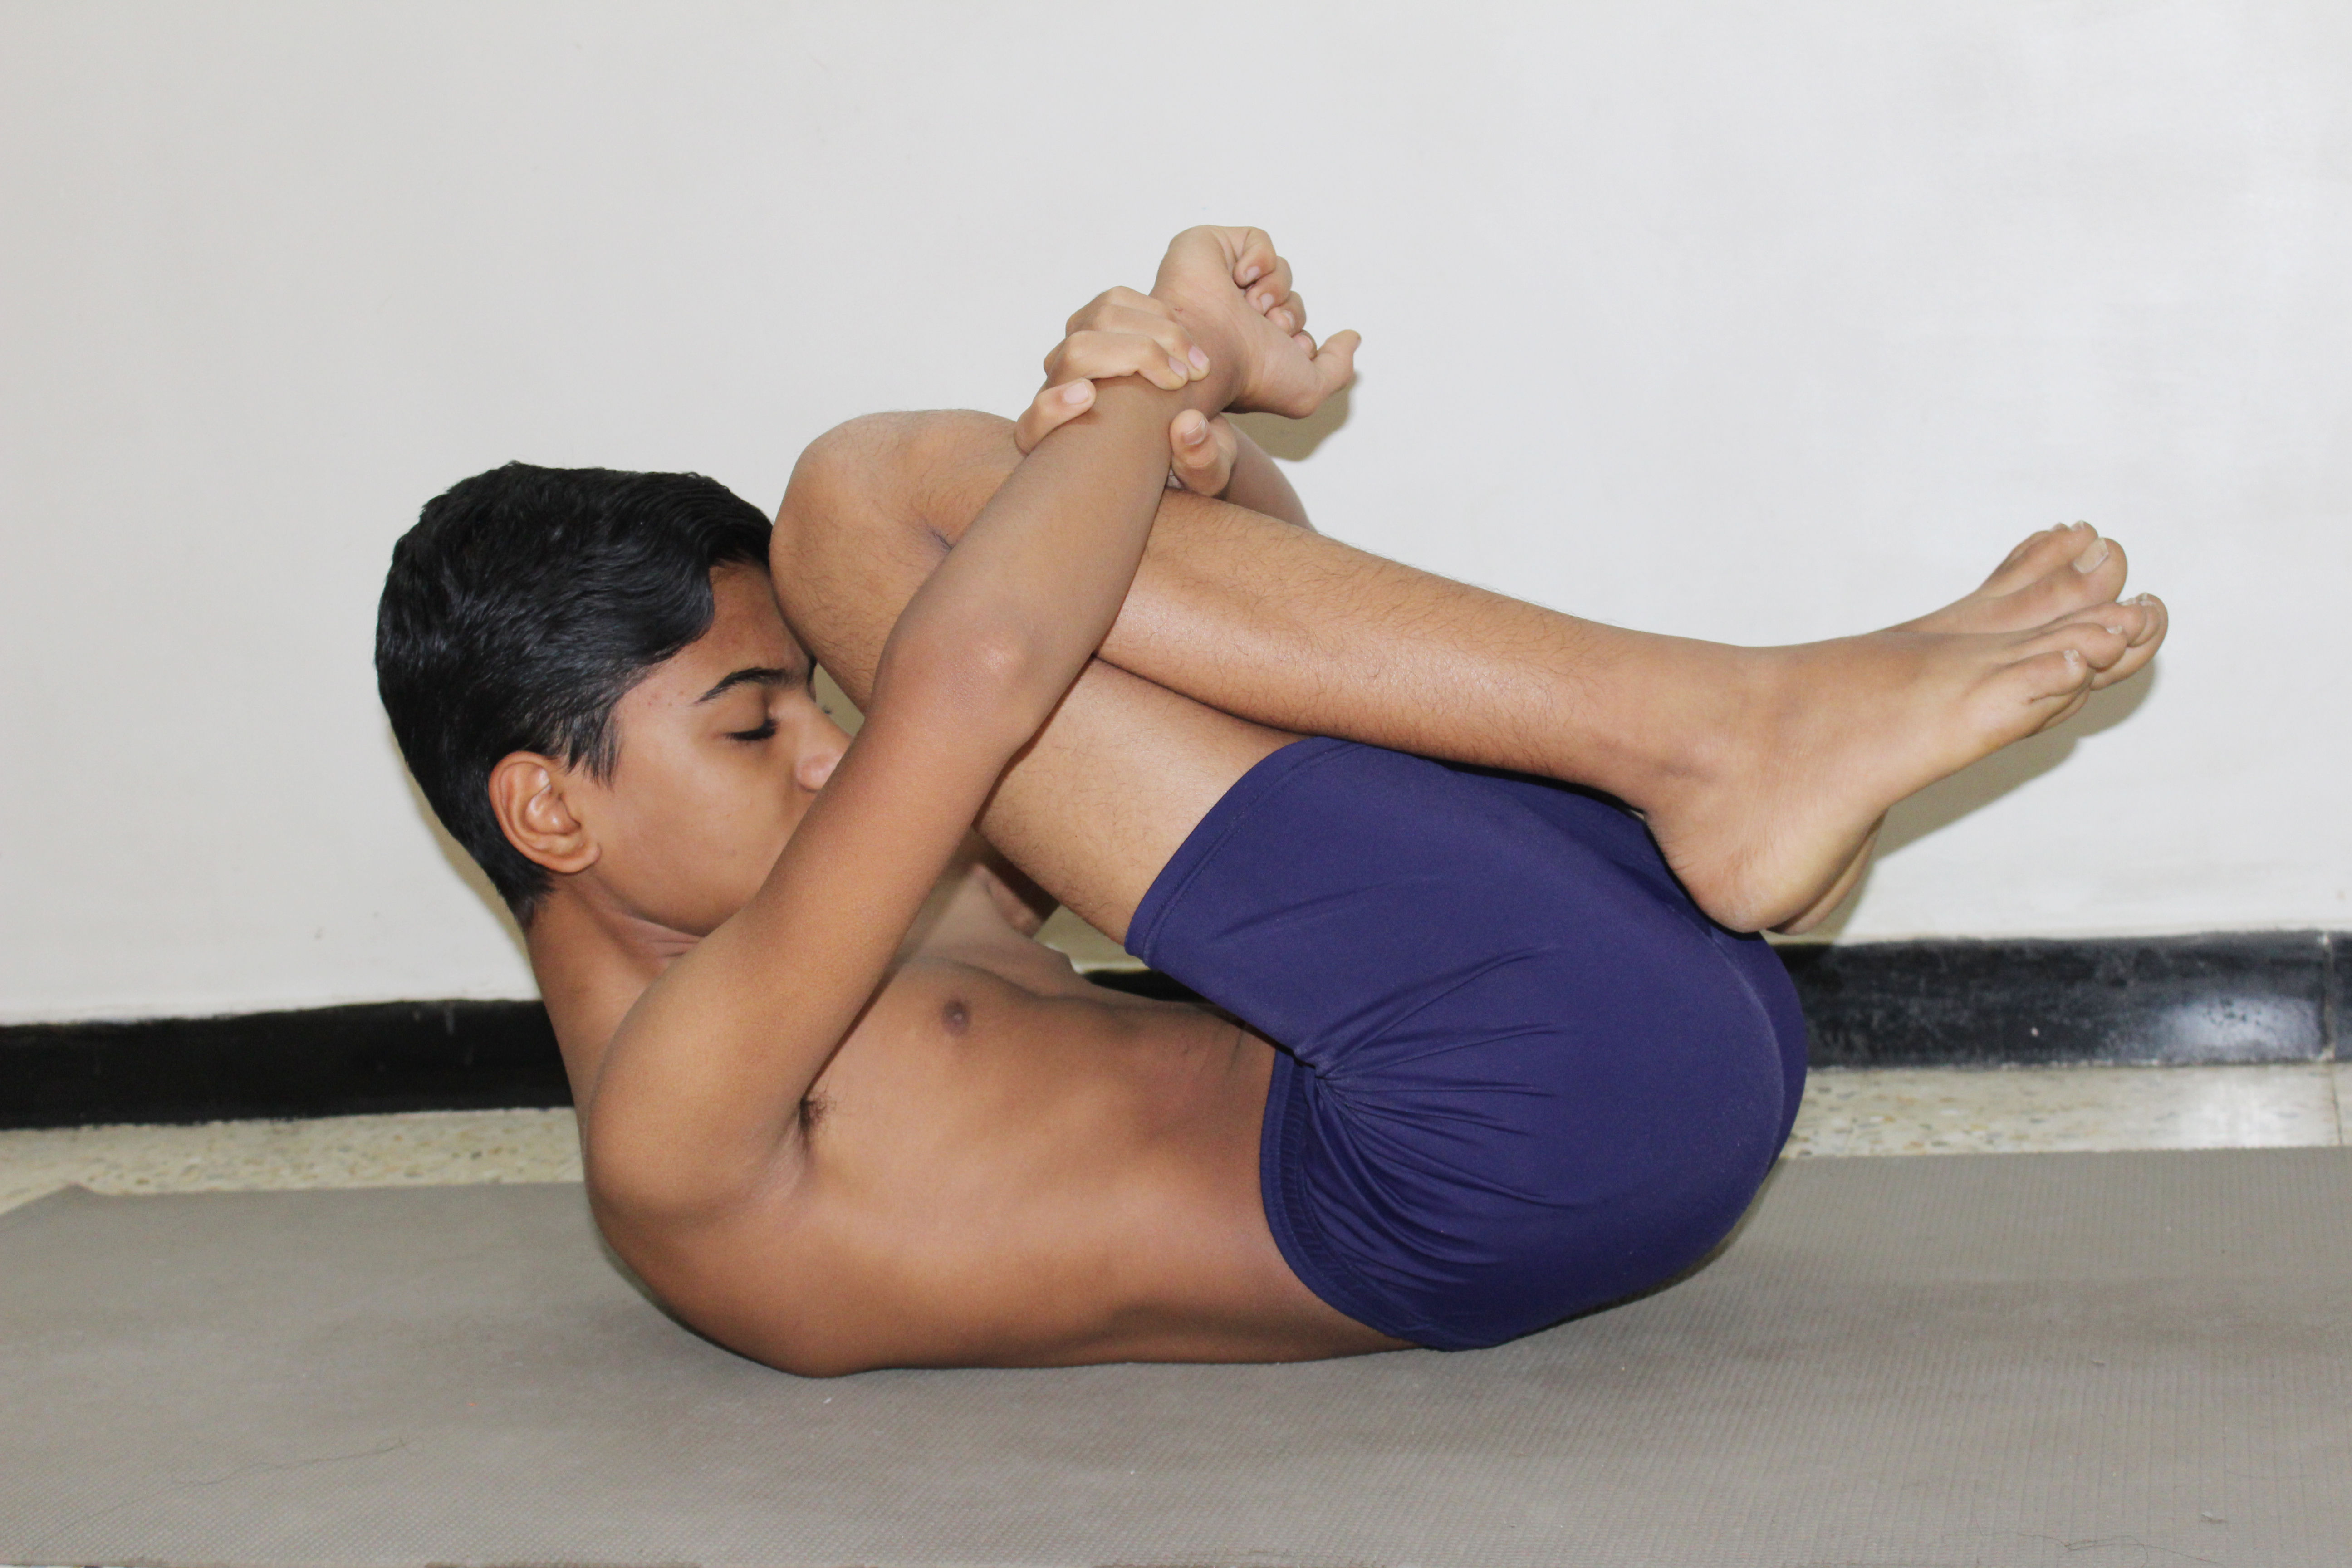
Ananda Balasana
Ananda Balasana
Ananda Balasana
{Happy Baby Pose}-
Name: – Ananda Balasana
Meaning: – Happy baby pose
Steps And Benefits
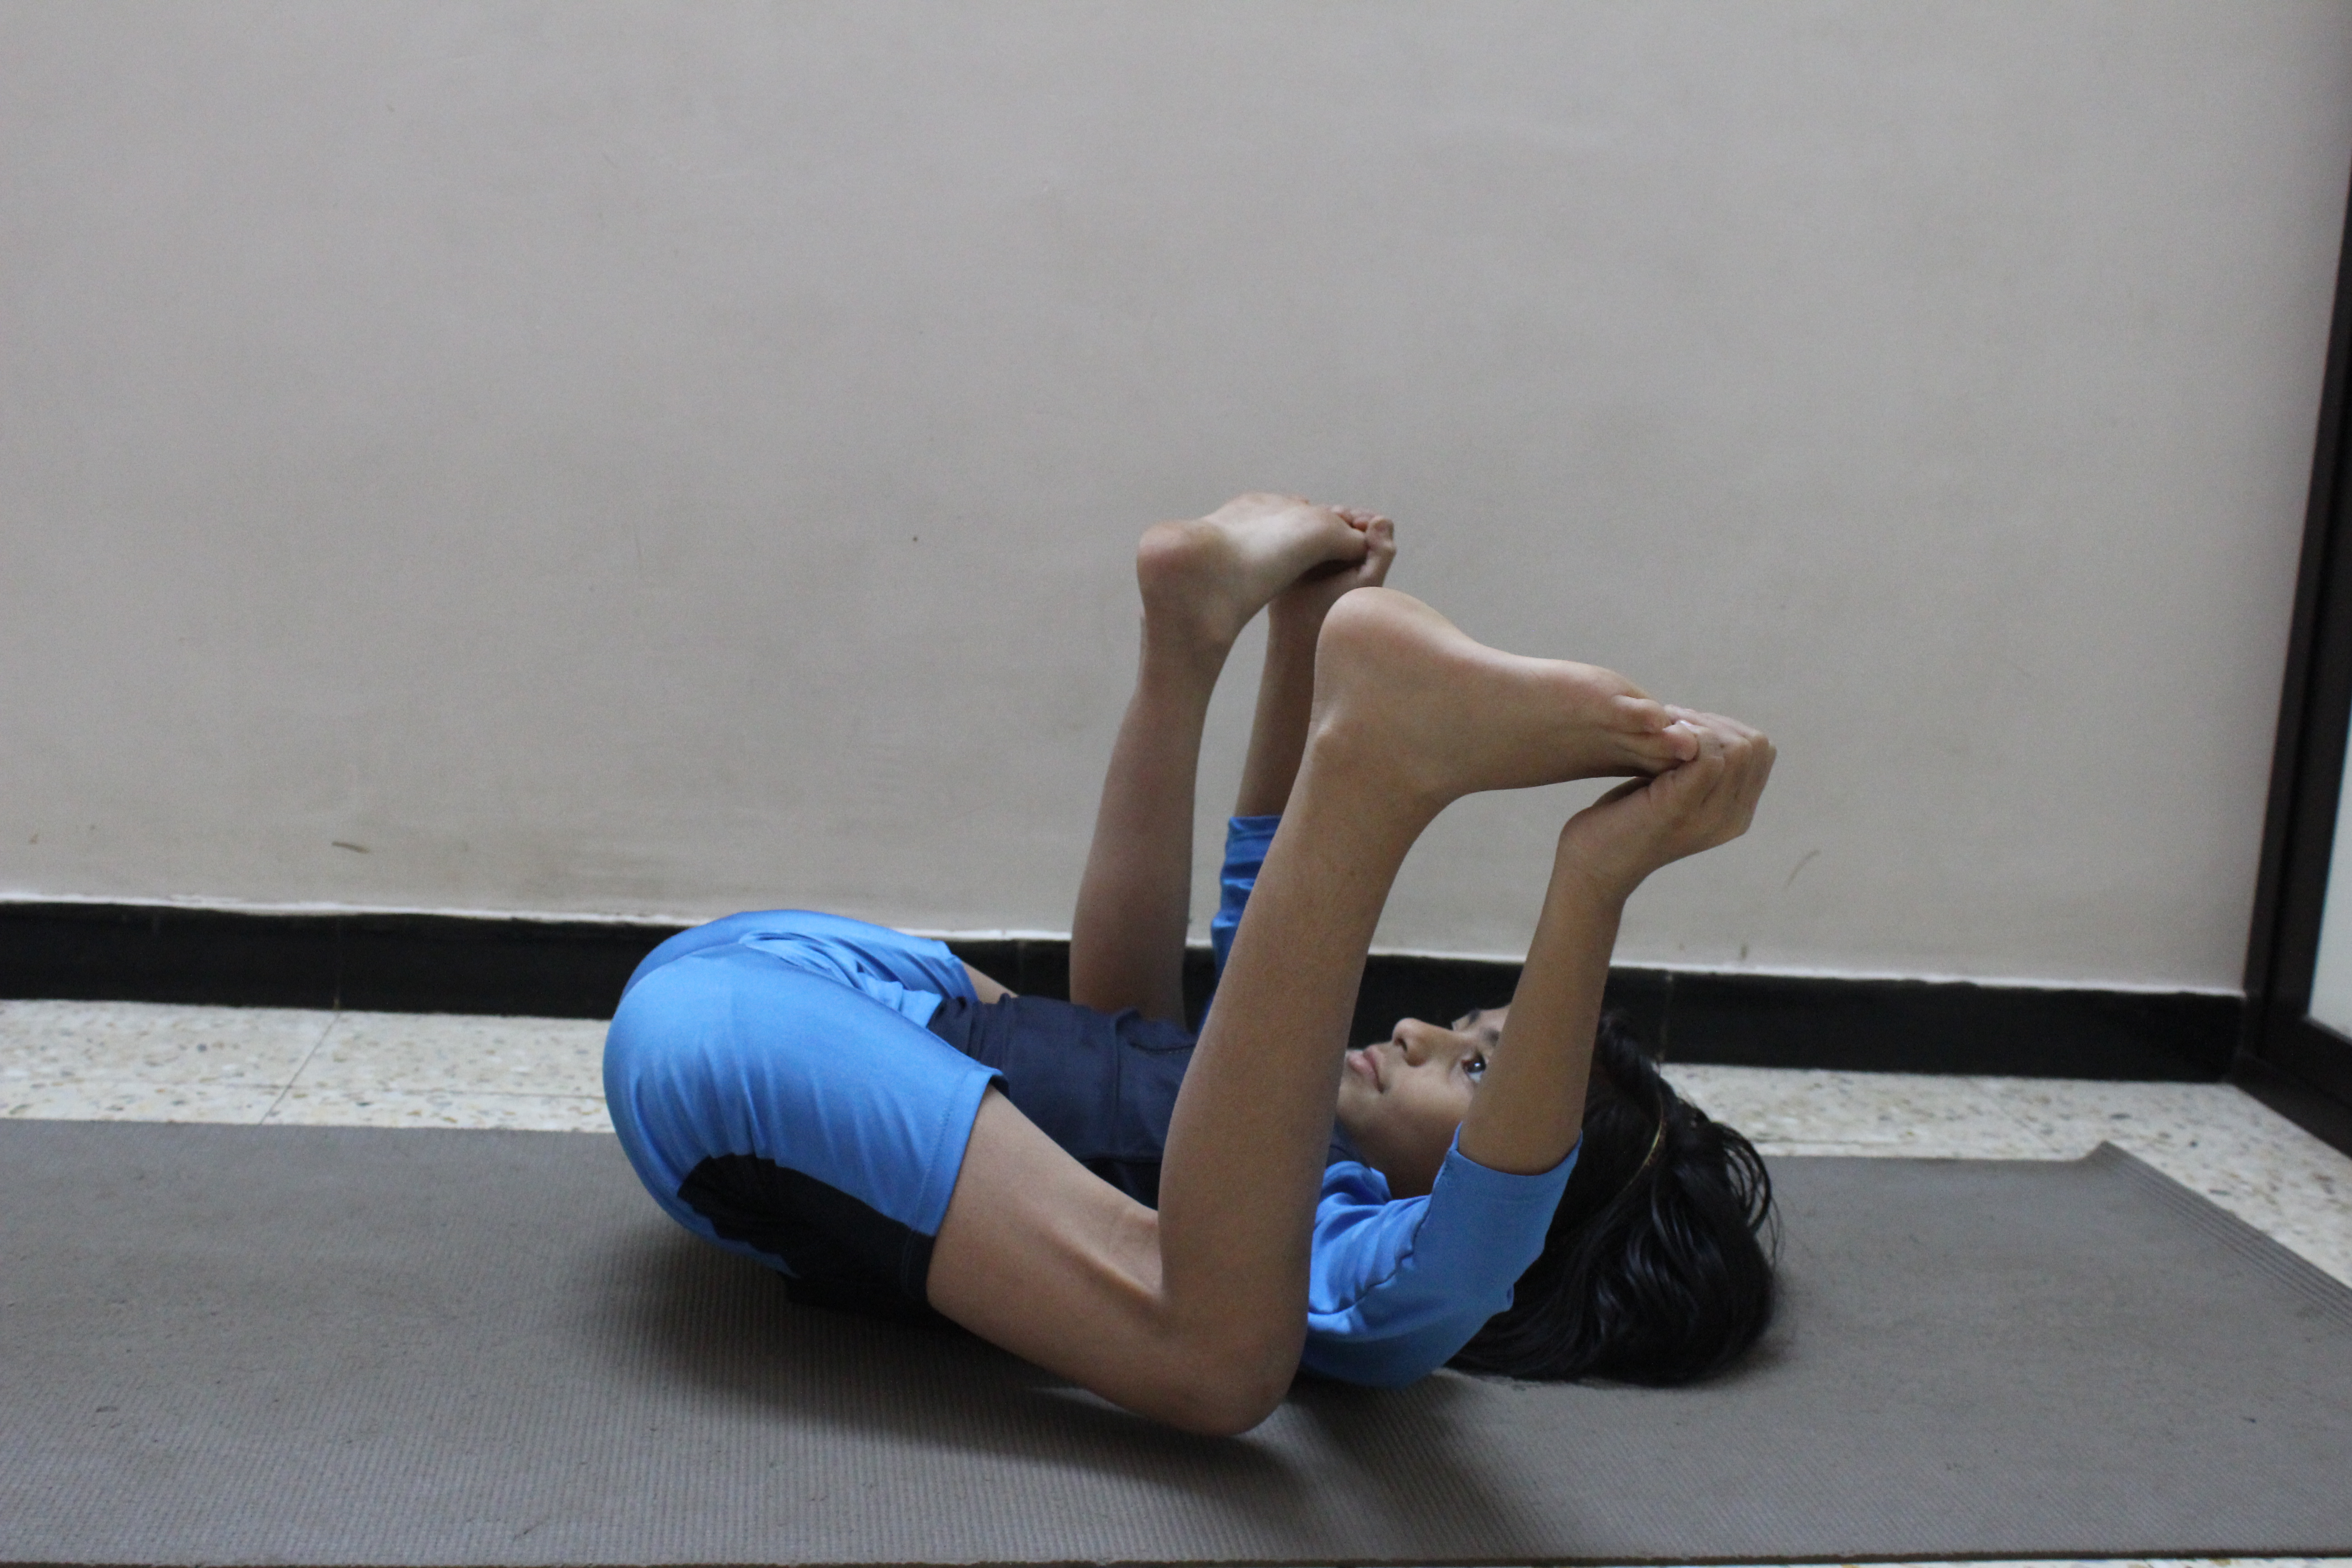
The meaning of “Ananda” is happy, blissful, joy e.t.c. and “Bala” means child. Ananda balasana is also known as happy child pose or the dead bug pose, because while attempting this pose your body looks like both nearly. But happy child pose sounds to be more positive, and it is all the more broadly known as the cheerful infant posture. It is known for its intrinsic capacity to quiet the brain and relax the body.
Steps of Ananda Balasana
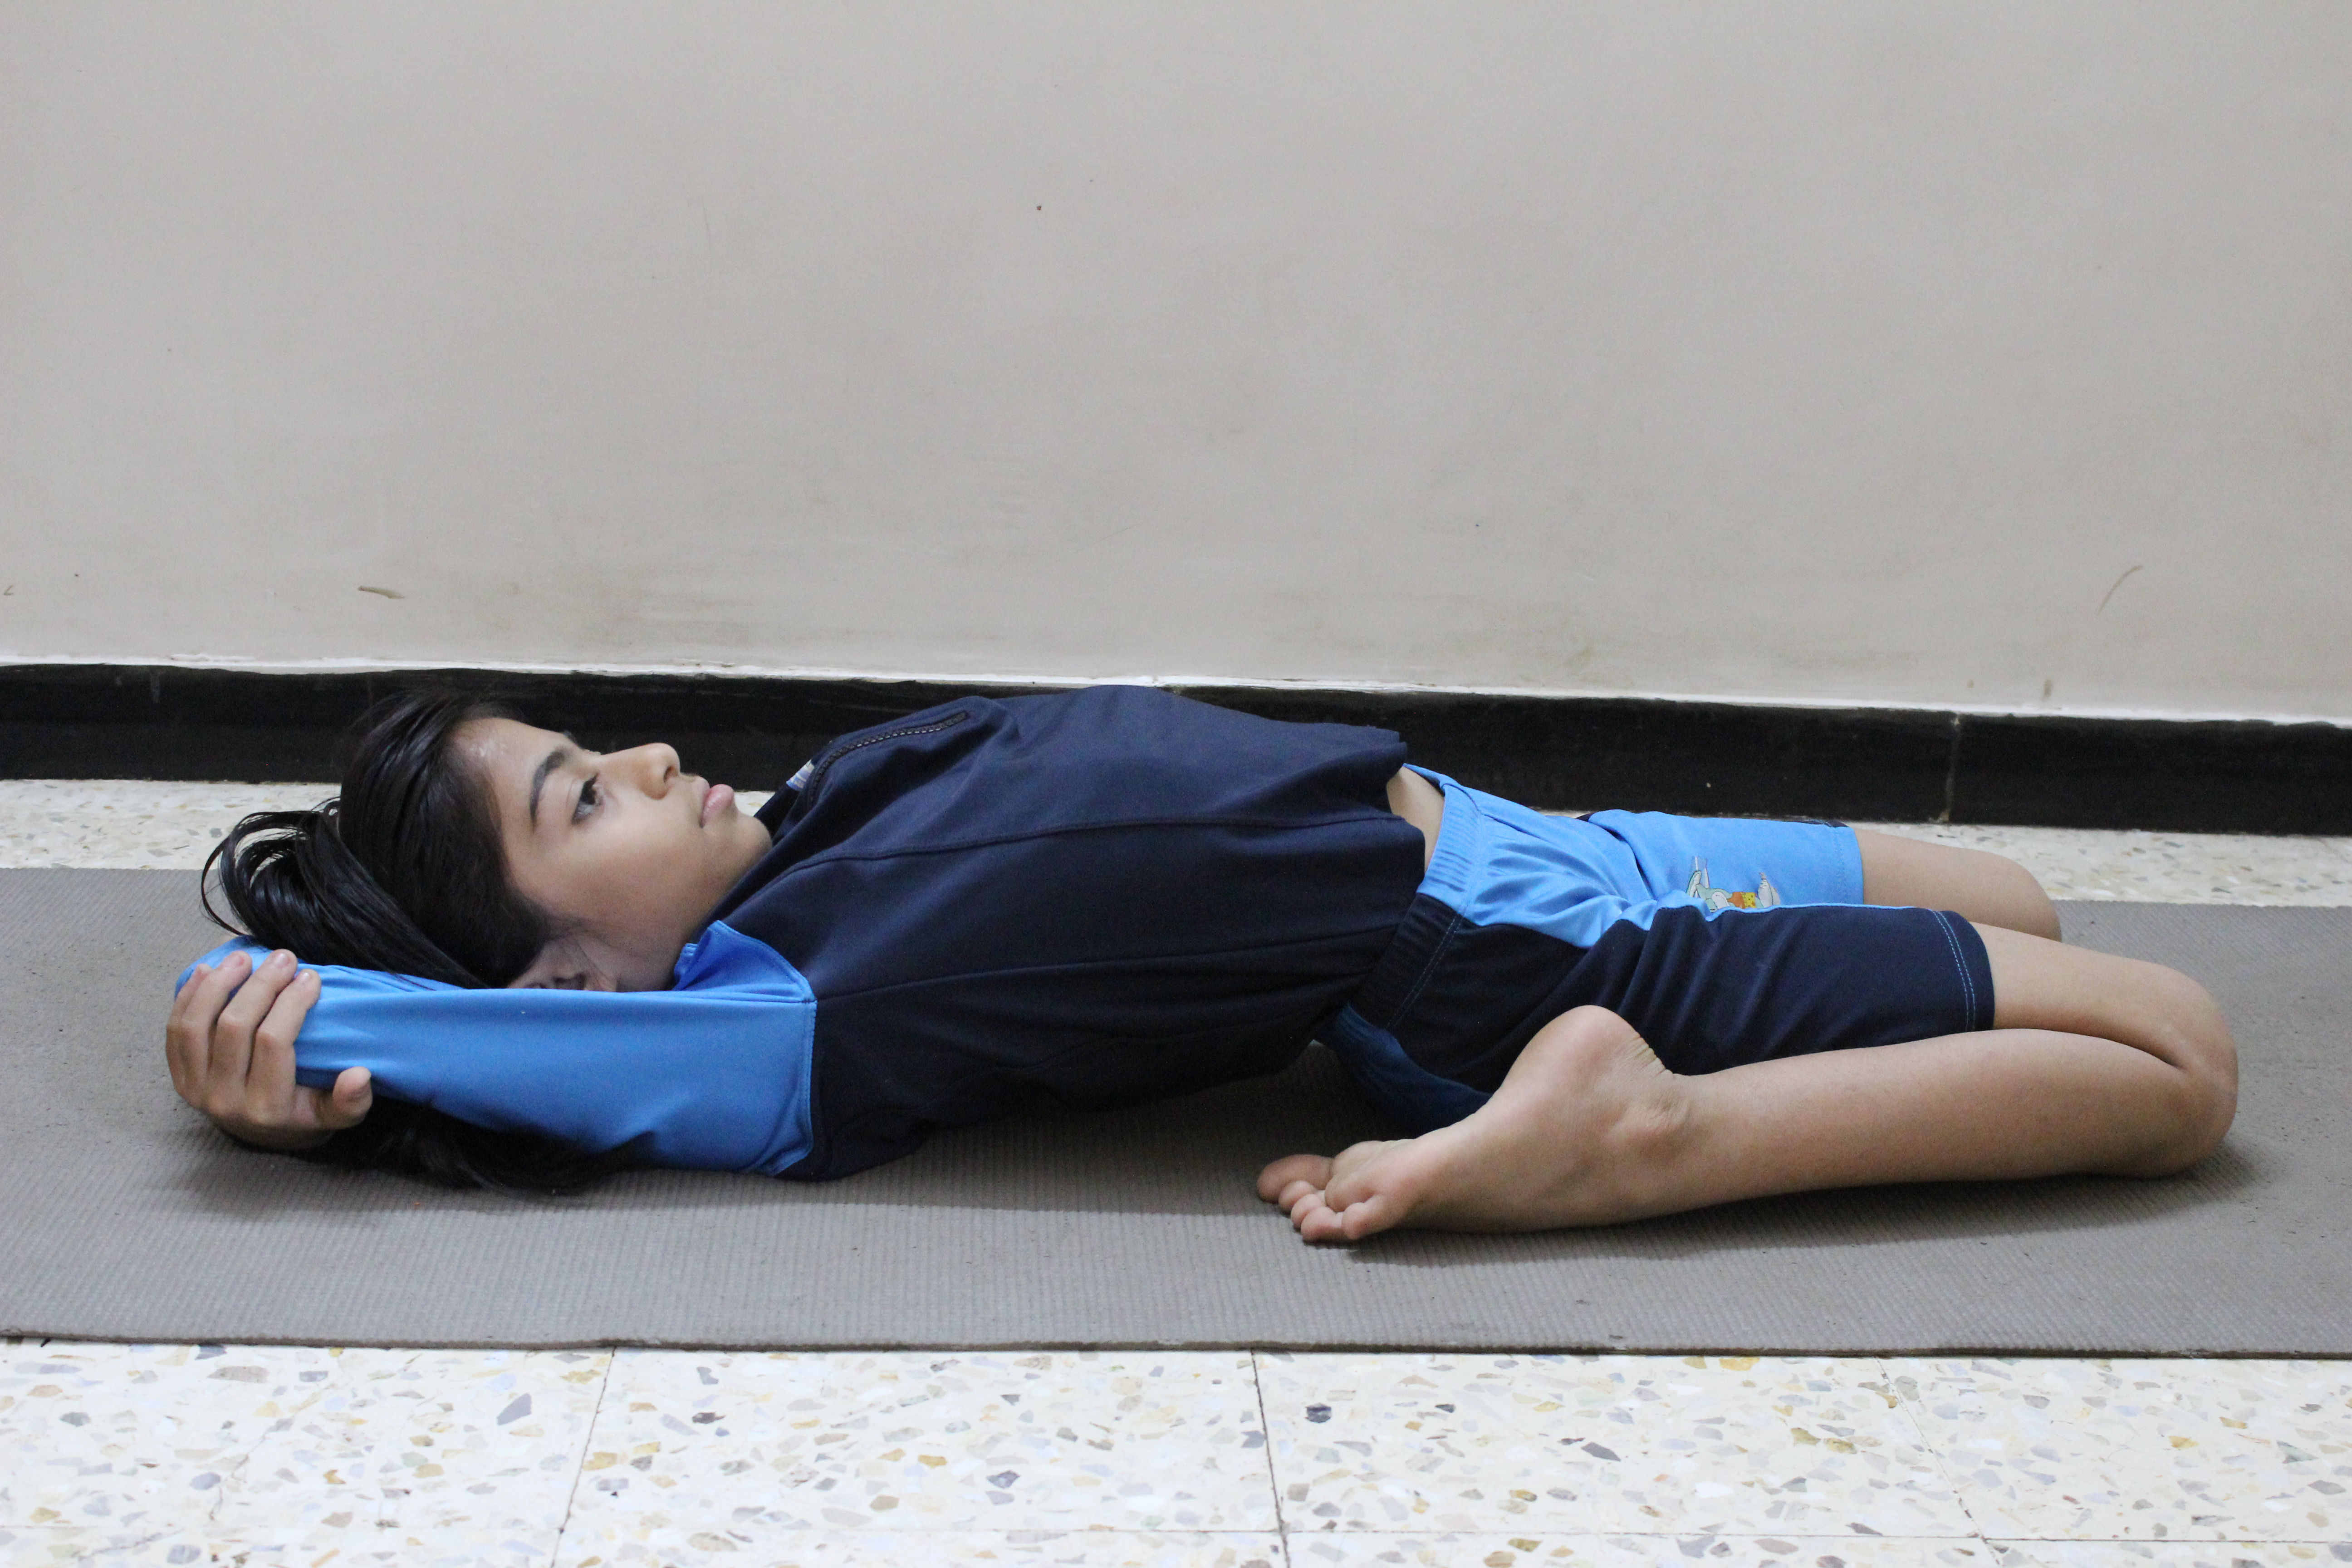
Lie down flat on your back.
Breathe in and raise your both legs up and bring your both knees closer to your chest.
Grab your feet thumb. Ensure your arms are pulled through the inner parts of your knees as you hold your toes. Delicately open up your hips and broaden your legs to develop the stretch.
Push your chin into your mid-section (chest) and keep your head touched to the floor.
Now try to touch your tailbone and the sacrum down to the floor at same time press your heels up and pulling back with your arms.
Keep your back of the neck and the shoulders down to the floor. Your whole region of the back and the spine ought to be pressed flat on the ground.
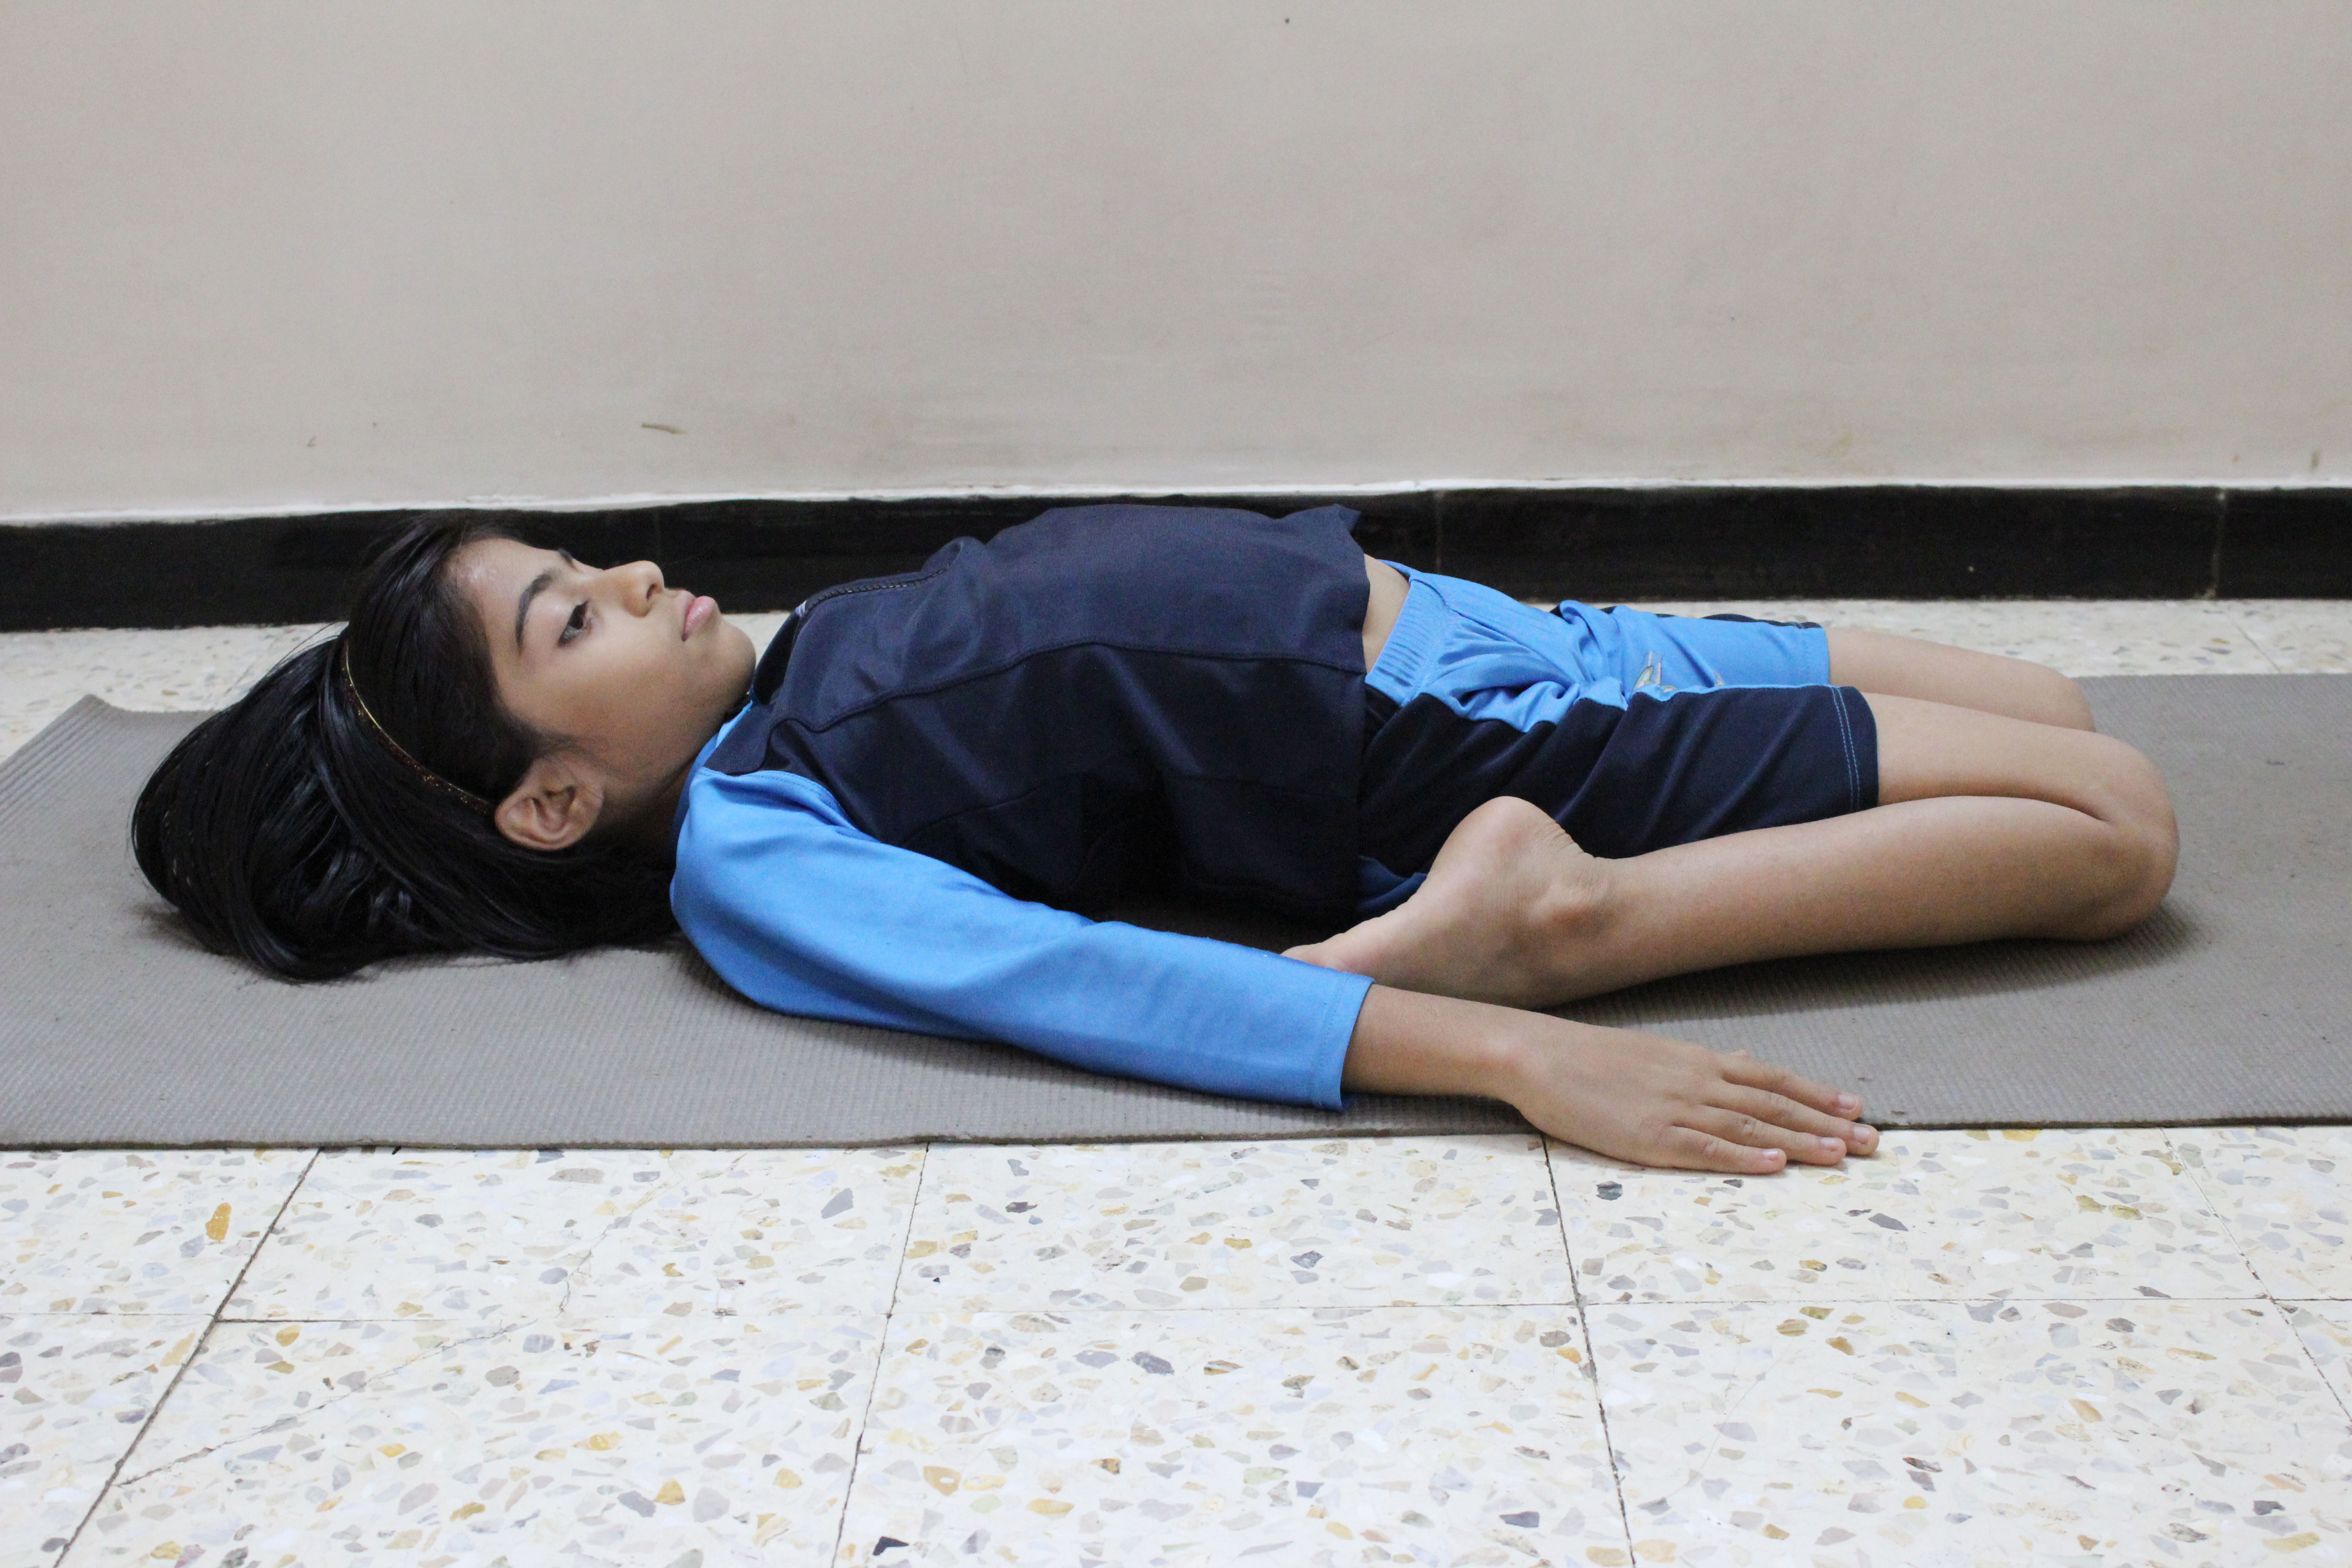
Breathe ordinarily and hold the stance for around 30 seconds or for one minute, it’s depending on your capability.
Breathe out and discharge your arms and legs; rest on the floor for a few moments after that repeat this for 2 to 3 times.
Benefits of Ananda Balasana: – (Happy child pose)
It stretches the inner part of the groin, spine, hamstrings and inner thighs.
It opens up the shoulders and the chest.
Gives strengths to biceps and arms.
It releasing all the stress trapped in back.
It relaxes the sacrum.
Beneficial for digestive system, coz it gently massage the internal organs of digestive system.
Preparatory Pose
Balasana (Simple form of child pose)
Virasana
Follow-Up Pose
Adho Mukha Svanasana (Downward facing dog pose)
The Scientific Aspects of Ananda Balasana
The Ananda Balasana utilizes diverse standards of Pranayama and asana to stimulate, stir, and control the energies we have inside ourselves that, if effectively channelized, can have positive advantages.
It additionally elevates the brain, conveying it to a level of higher mindfulness and awareness. It readies the body to go into a reflective state.
Pretty much as the infants play with their feet as they lie on their back and ooze most extreme satisfaction, this stance plans to recover that expression. In each of us, regardless of our age, there exists a “heavenly youngster” that is prepared to be conceived as a motivation – be it inventive vitality or another, distinctive experience. Rehearsing this stance frequently will open up your brain to happiness and purity and make you mindful of the clamoring divine youngster inside you.
NOTE
Avoid this Pose in case of neck injury, knee injuries; you can use a folded blanket for supporting your head. Keep your spines completely erect during the pose. During periods and pregnant women strictly avoid this Pose.
Do all the yogic activities in under the supervision of an expert person.
You must ensure your spine is absolutely straight while practicing this asana to avoid any kind of injury. Pregnant women and women who are menstruating must avoid practicing this asana. People suffering from high blood pressure and knee injuries should also avoid this asana.
5
Anjaneyasana
Anjaneyasana
Anjaneyasana
{Low Lunge Pose}
-Steps and Benefits
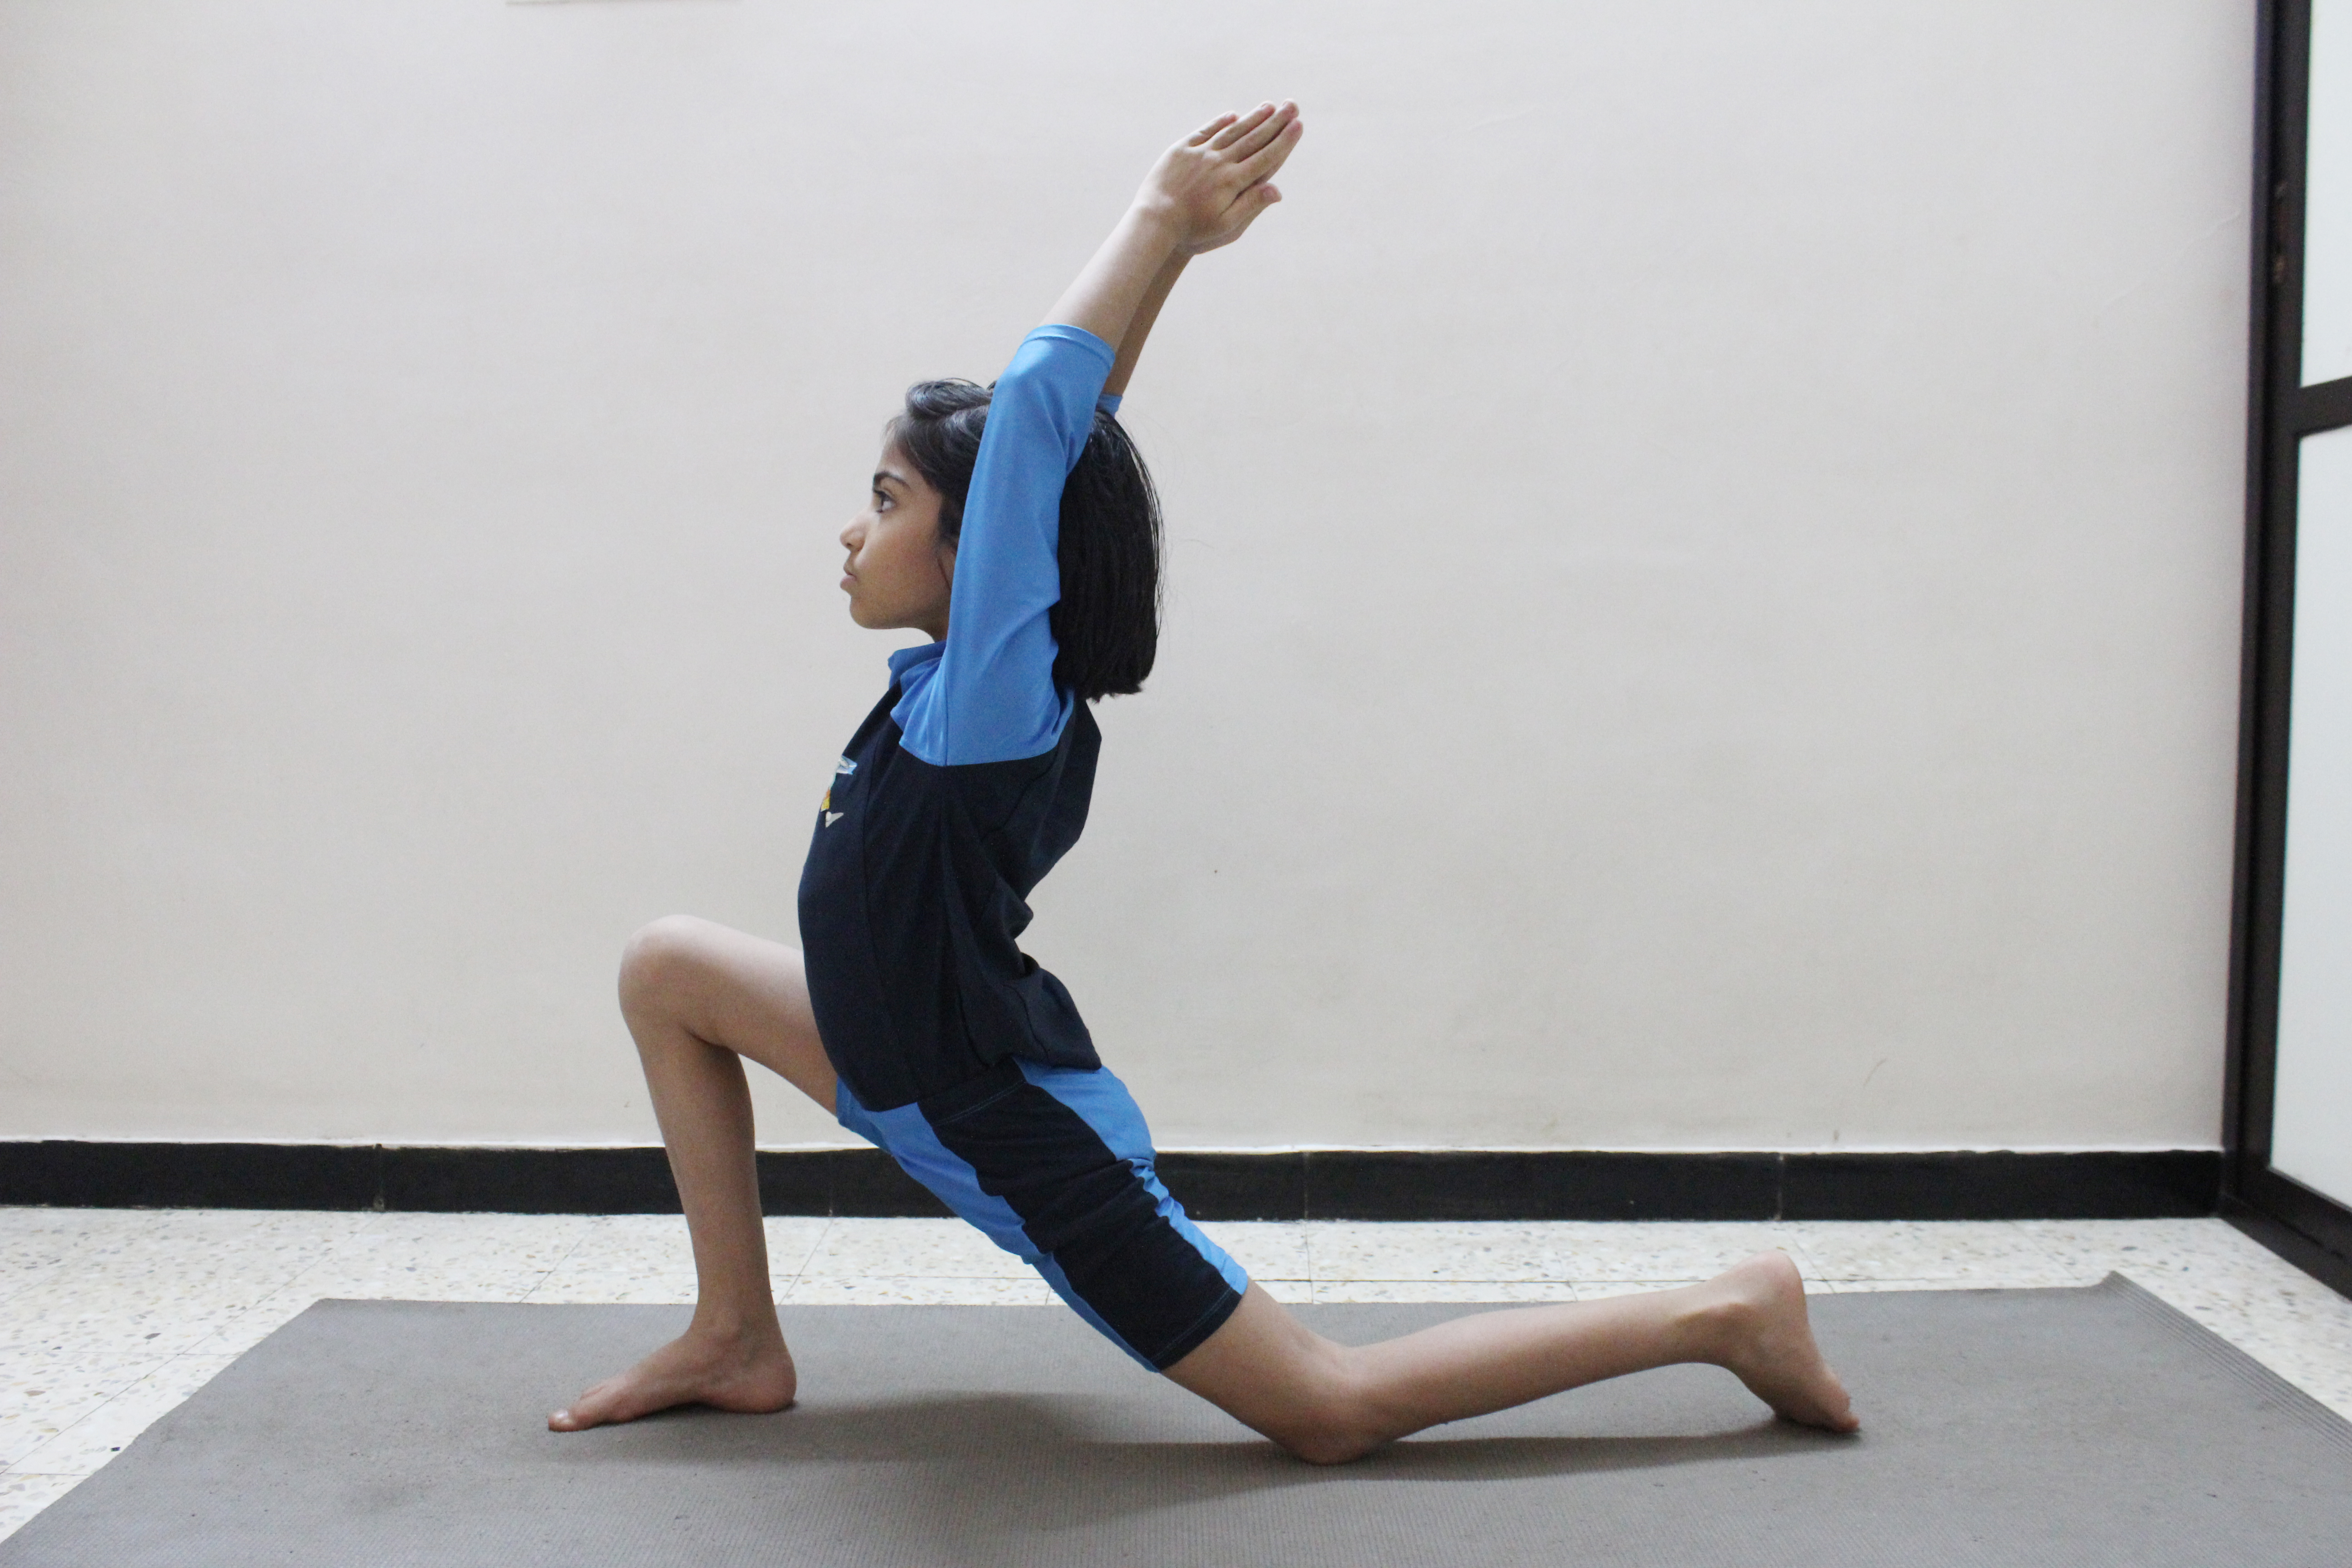
Anjaneya is the Sanskrit word which means “Son of Anjani” and Anjayneya is another name for Hindi God Hanuman in Hindu Mythology. Hanuman is Ram’s aide in Ramayana. God Hanuman helped lord Rama to get back Mata Sita from Ravana’s place called Lanka. Low Lunge Pose gets its name from the shape of body forms during asana. Anjaneyasana could be a complete package – it tones the body and calms the mind. You’re guaranteed to feel energized even when an intense low lunge exertion.
Other Name: – Crescent Pose, Half Moon Pose in Sivananda Yoga, Low Lunge Pose.
Level: – Basic
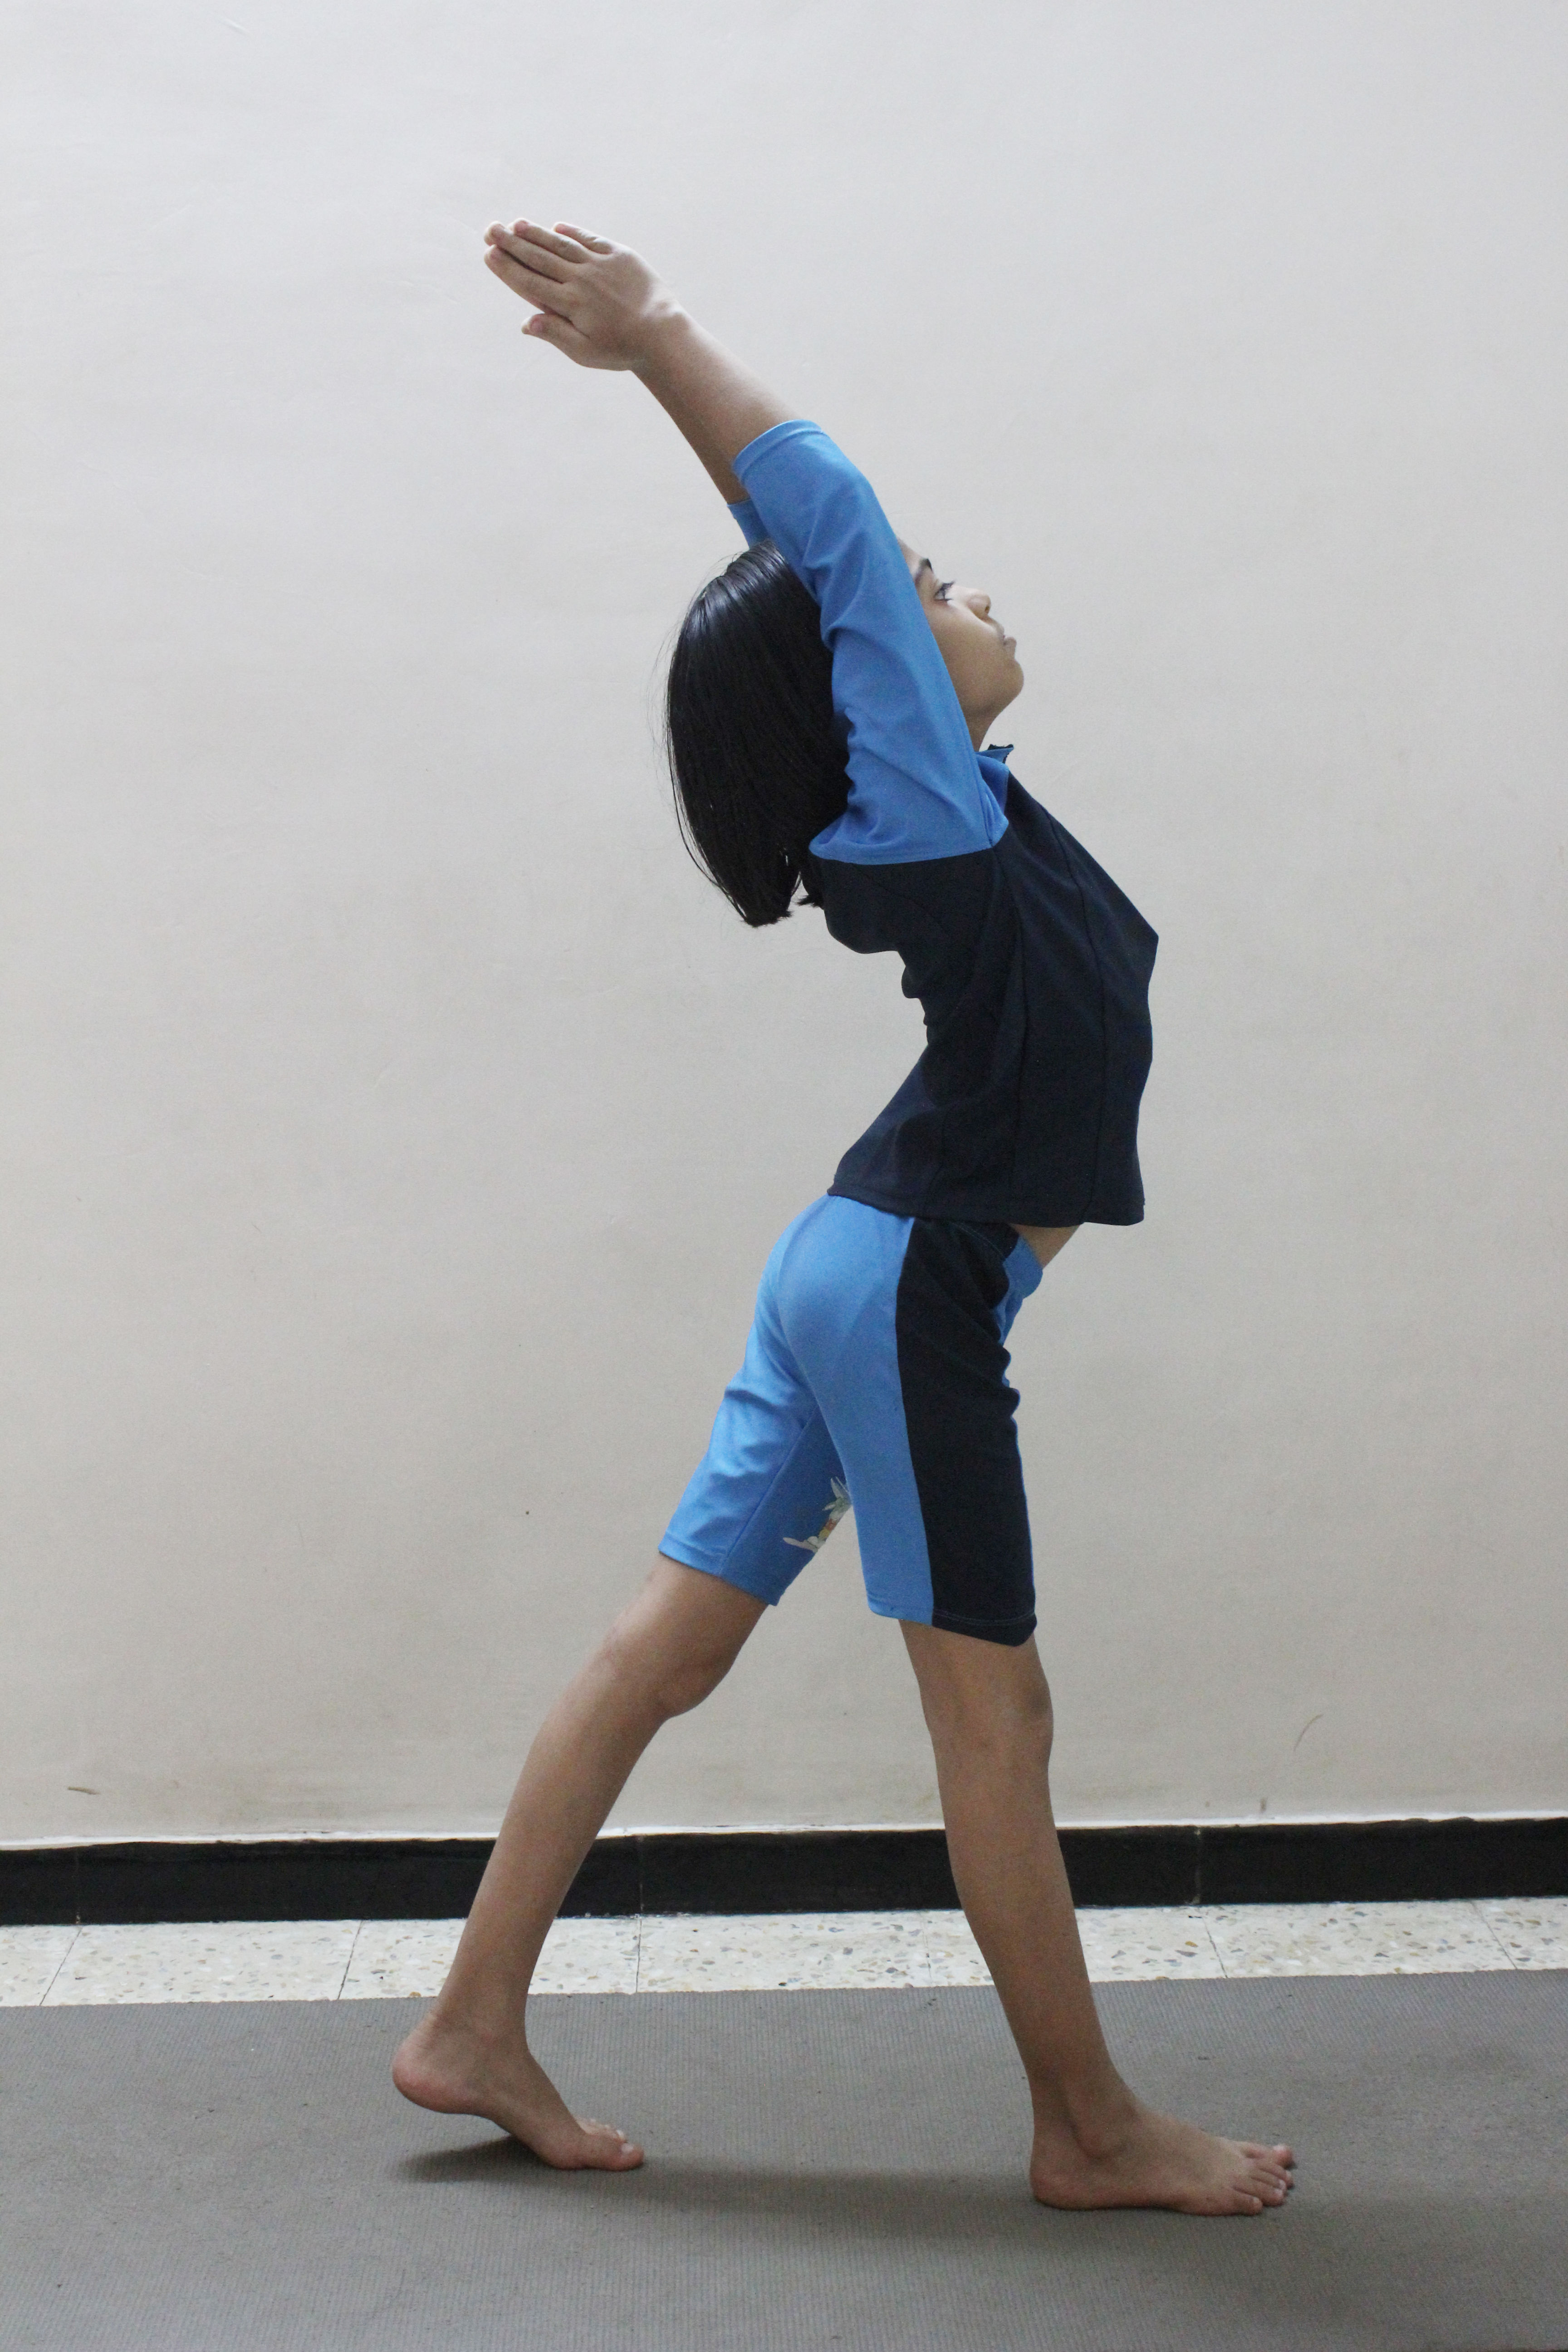
Steps of the Anjaneyasana (Low Lunge Pose)
Start the pose by getting into the pose of Adho Mukha Svanasana. When you are completely in the pose, breathe out and keep your right foot in forward direction beside your right hand.
Note that your right knee and your ankle are in parallel line.
Now slowly lower down your left knee and placed it on the ground or floor, right behind the hips.
Breathe in, and raise your torso; after that lift your arms above your head, in a way that your biceps are touching your ears, and combine your palms and make Namaskar gesture.
Breathe Out. Let your hips relax and forward, specified you are feeling a decent stretch within the frontal region of your leg and therefore the hip flexors.
Keep your tailbone towards the floor. Stretch your lower back as you have interaction your spine. Stretch your arms additional behind so your heart is pushed up. Look behind as you progress into the delicate acrobatic stunt.
Remain in the pose for 15 to 30 seconds. You may also lift up your knee of the back leg off the floor to perform a full Crescent pose.
For releasing the pose, keep your hands back to the floor and get back into the Adho Mukha Svanasana. Repeat the same process with your opposite leg also.
Benefits of the Anjaneyasana (Low Lunge Pose)
Anjaneyasana makes the gluteus muscles and the quadriceps stronger.
It gives the hips and hip flexors a good stretch.
It opens up your shoulders, lungs, and chest.
Low Lunge Pose helps you improve your balance.
Increases your ability to concentrate and also builds core awareness.
Anjaneyasana helps relieve sciatica.
Low Lunge Pose stimulates the digestive and reproductive organs.
If you practice this asana regularly, your body will be toned and energized.
Scientific Aspects of the Anjaneyasana (Low Lunge Pose)
This Asana opens up the mid-section of body, lungs and heart. It likewise develops the warmth in the body and works amazingly well for the individuals who think that it’s difficult to adapt to icy climate. The opening up of the lungs tosses out all the bodily fluid, giving the lungs decent rinses.
To practice this Pose, you need a decent feeling of equalization, and your hips, crotch, and legs must be adaptable. This asana is again one of those beguiling looking ones that appear to be simple, however are very testing. This stance gives the hamstrings, crotch, quadriceps, and hips a decent extend, furthermore permits a full scope of movement in the lower body. This posture is ideal for cyclists and runners and profoundly benefits the individuals who have work area occupations.
NOTE
Don’t perform this Asana in case of High B.P. and knee injuries. If you are suffering from shoulder problems then don’t raise your arms above your head. For this you could keep your hands on your thighs. Don’t look behind in neck problem.
Always Perform Asana in front of an expert person.
6
Adho Mukha Vruksasana
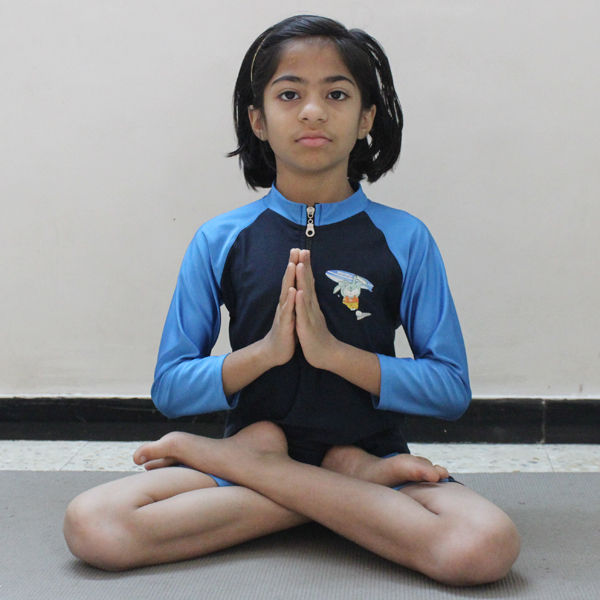
Siddhasana
Siddhasana
{The Accomplished Pose}
Sanskrit Name: – Siddhasana (The Accomplished Pose)
Meaning: – Accomplish, achieve.
Position: – Sitting
-Steps And Benefits
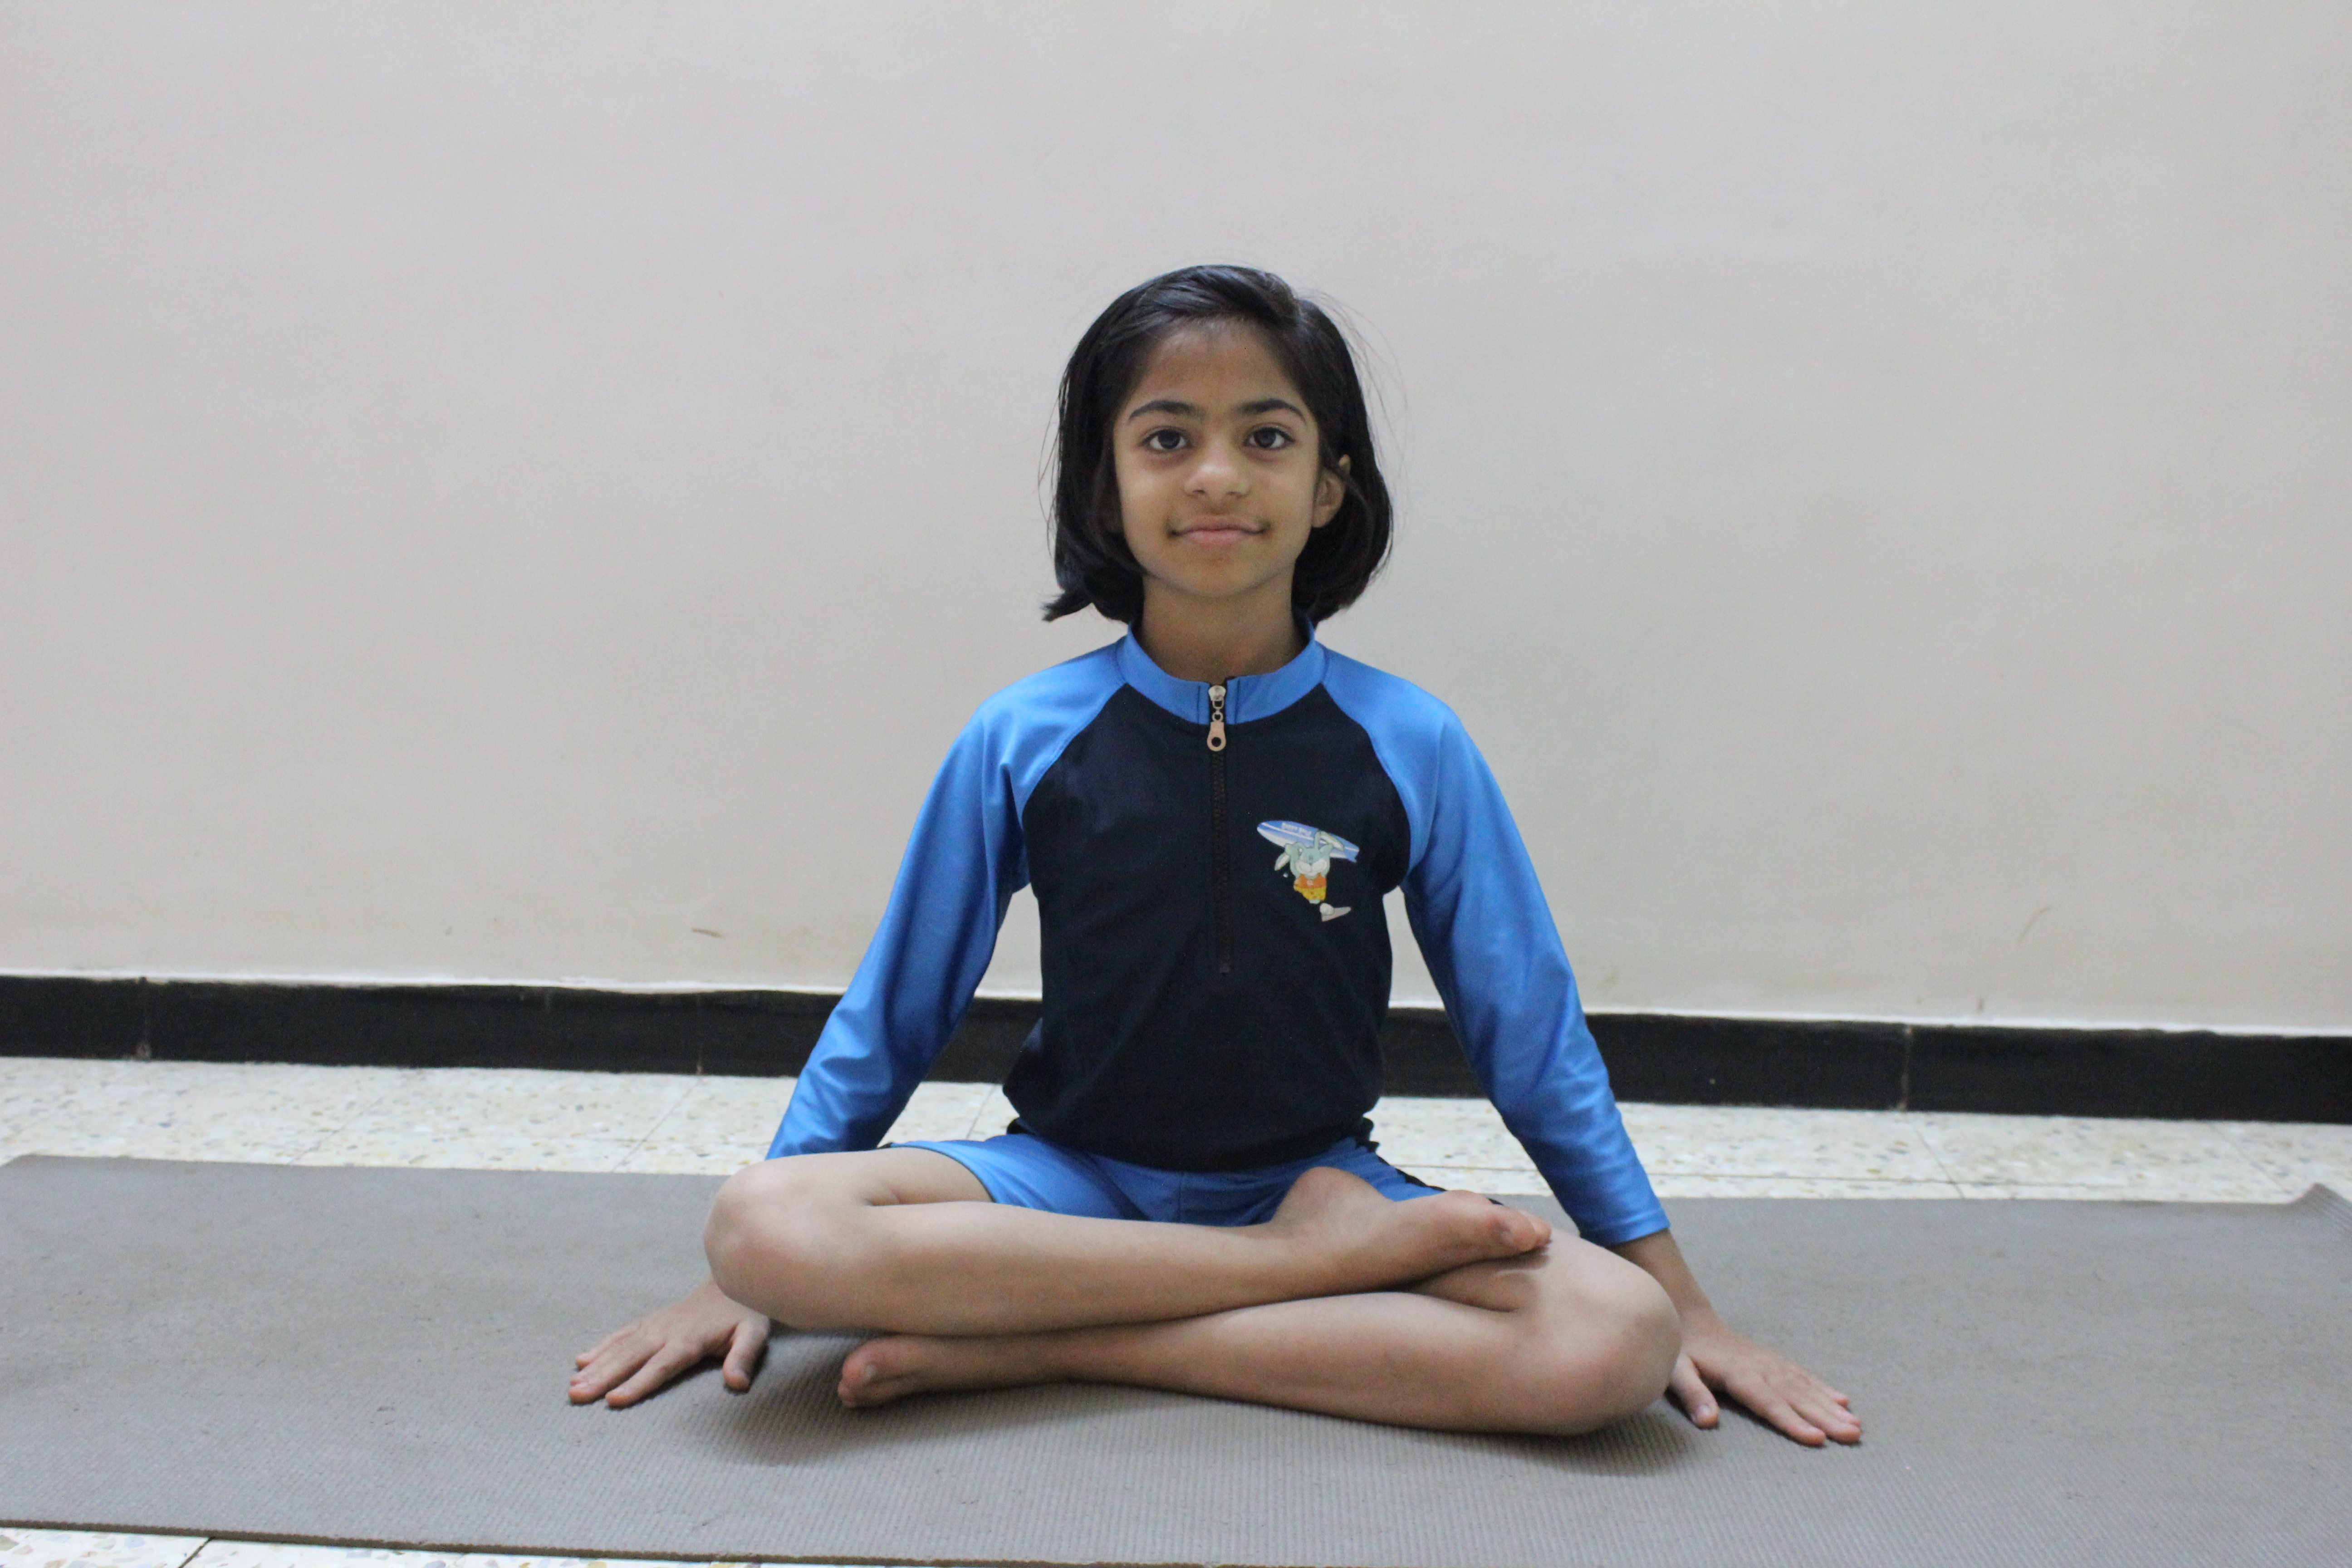
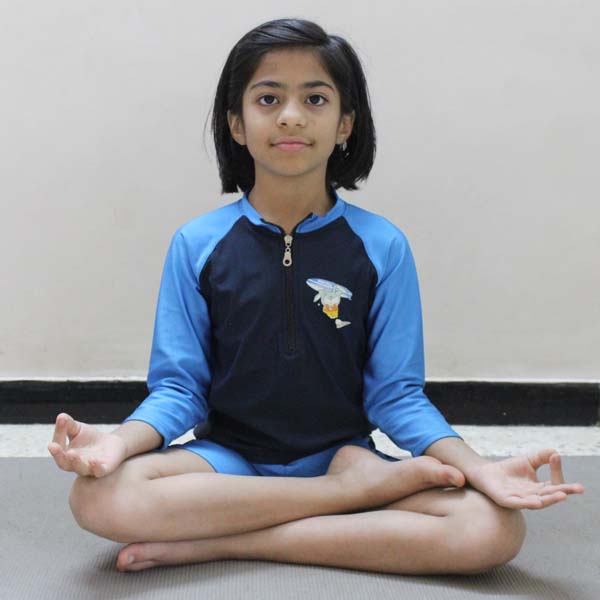
Siddhasana is a Sanskrit word in which the meaning of ‘Siddha’ is achieve, accomplish or finish and the meaning of Asana is sit, pose or posture. Siddhasana is another simple meditative pose use for meditation or other yogic activities. In term of Hath Yoga Pradipika (Yoga text) Siddhasana is the fourth very effective sitting poses which suited for Dhyan (meditation). In Hatha Yoga Pradipika there are 84 different- different Asanas are mentioned; in this text it is said that every yoga learner must attempt Siddhasana, among the eighty four Asanas. According to the meditation practitioners, Siddhasana is the second best sitting asana after Padmasana (Lotus Pose.)So some yoga practitioners assume Siddhasana is the most effective of all Asanas for meditation. According to Hatha yoga Pradipika, the practice of this pose purifies all the 72,000 nadis or energy channels or energy gateway within the body, by which the prana flows. This Asana is simple to perform and suitable for everybody.
Steps of Siddhasana (The accomplished pose)
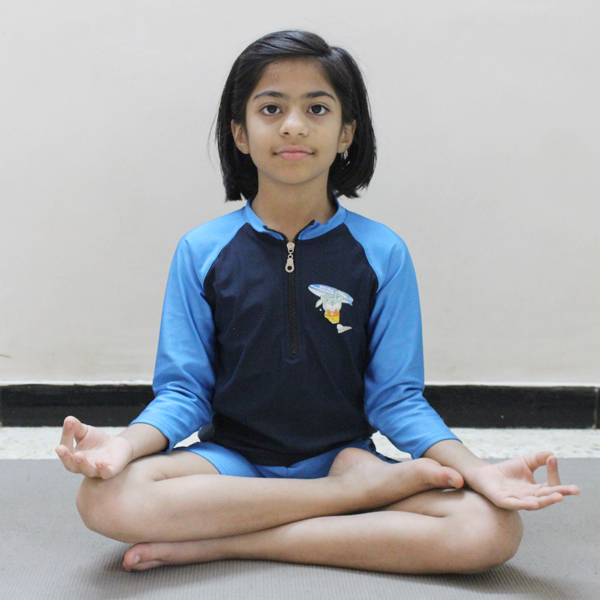
First sit comfortably on the floor, keep your legs close to each other.
Now keep your left foot at the perineum. (The area is that the soft tissue between the anus and also the male reproductive gland). Females ought to place their left foot within the labia majora of the vagina.
Now keep your right foot over your left foot.
To create the pose steady, slide your right foot toes into the gap between the left calf muscles.
Your knees ought to touch the ground.
Keep your spine erect during the process.
You can press your chin against the chest.
Keep focusing in the space between the eyebrows.
You have to attentive to your respiration process.
Breathing should be natural and deep.
Place your hands on the knees, or you can make Jnana gesture of Chin gesture with the fingers.
Remain in this position for as long as you can.
Benefits of Siddhasana (The Accomplished Pose)
It is one of the important Asana used for meditation. One can maintain this position for a long duration.
Makes spinal column straight and steady.
In Siddhasana, the heel is kept pressed against the Muladhara This ensures that the energy currents flow upwards towards the spine.
This Asana gives the control over sex urge and the sexual functions.
It stabilizes the nervous system.
NOTE
Step by step increase the time period of sitting in this Asana. Don’t go beyond over your abilities. Ask an expert before attempting any Yogic activities.
7
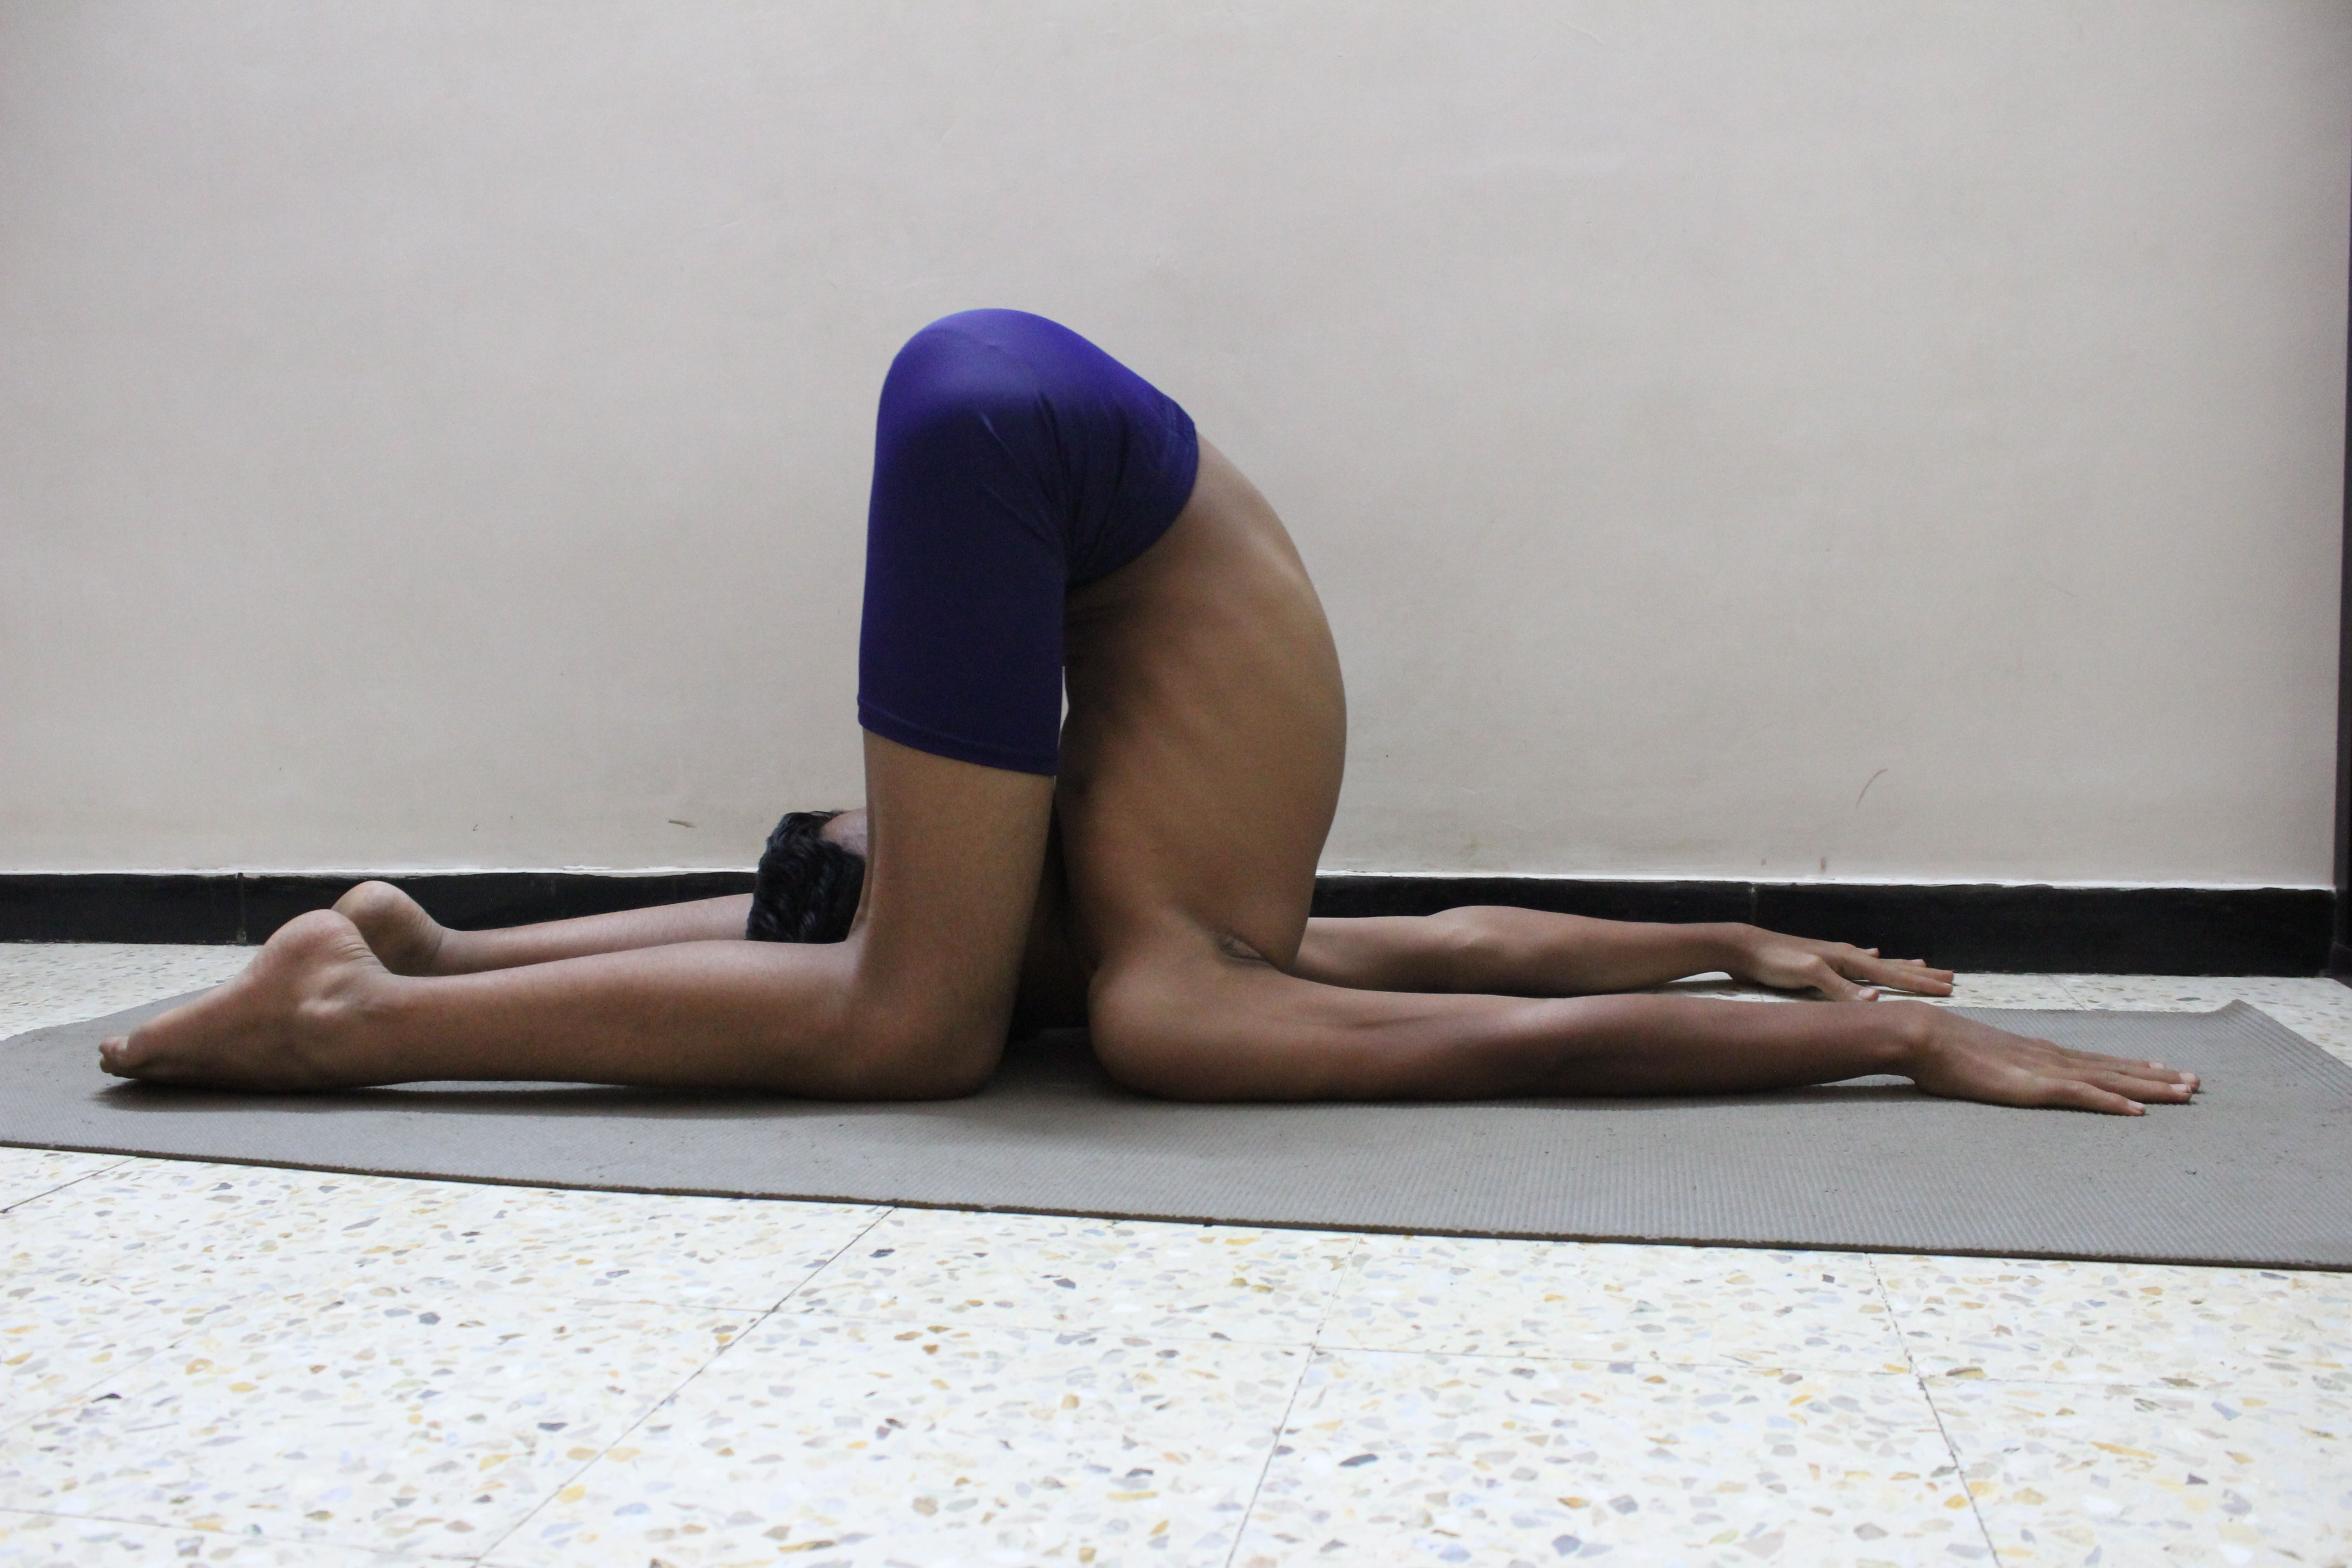
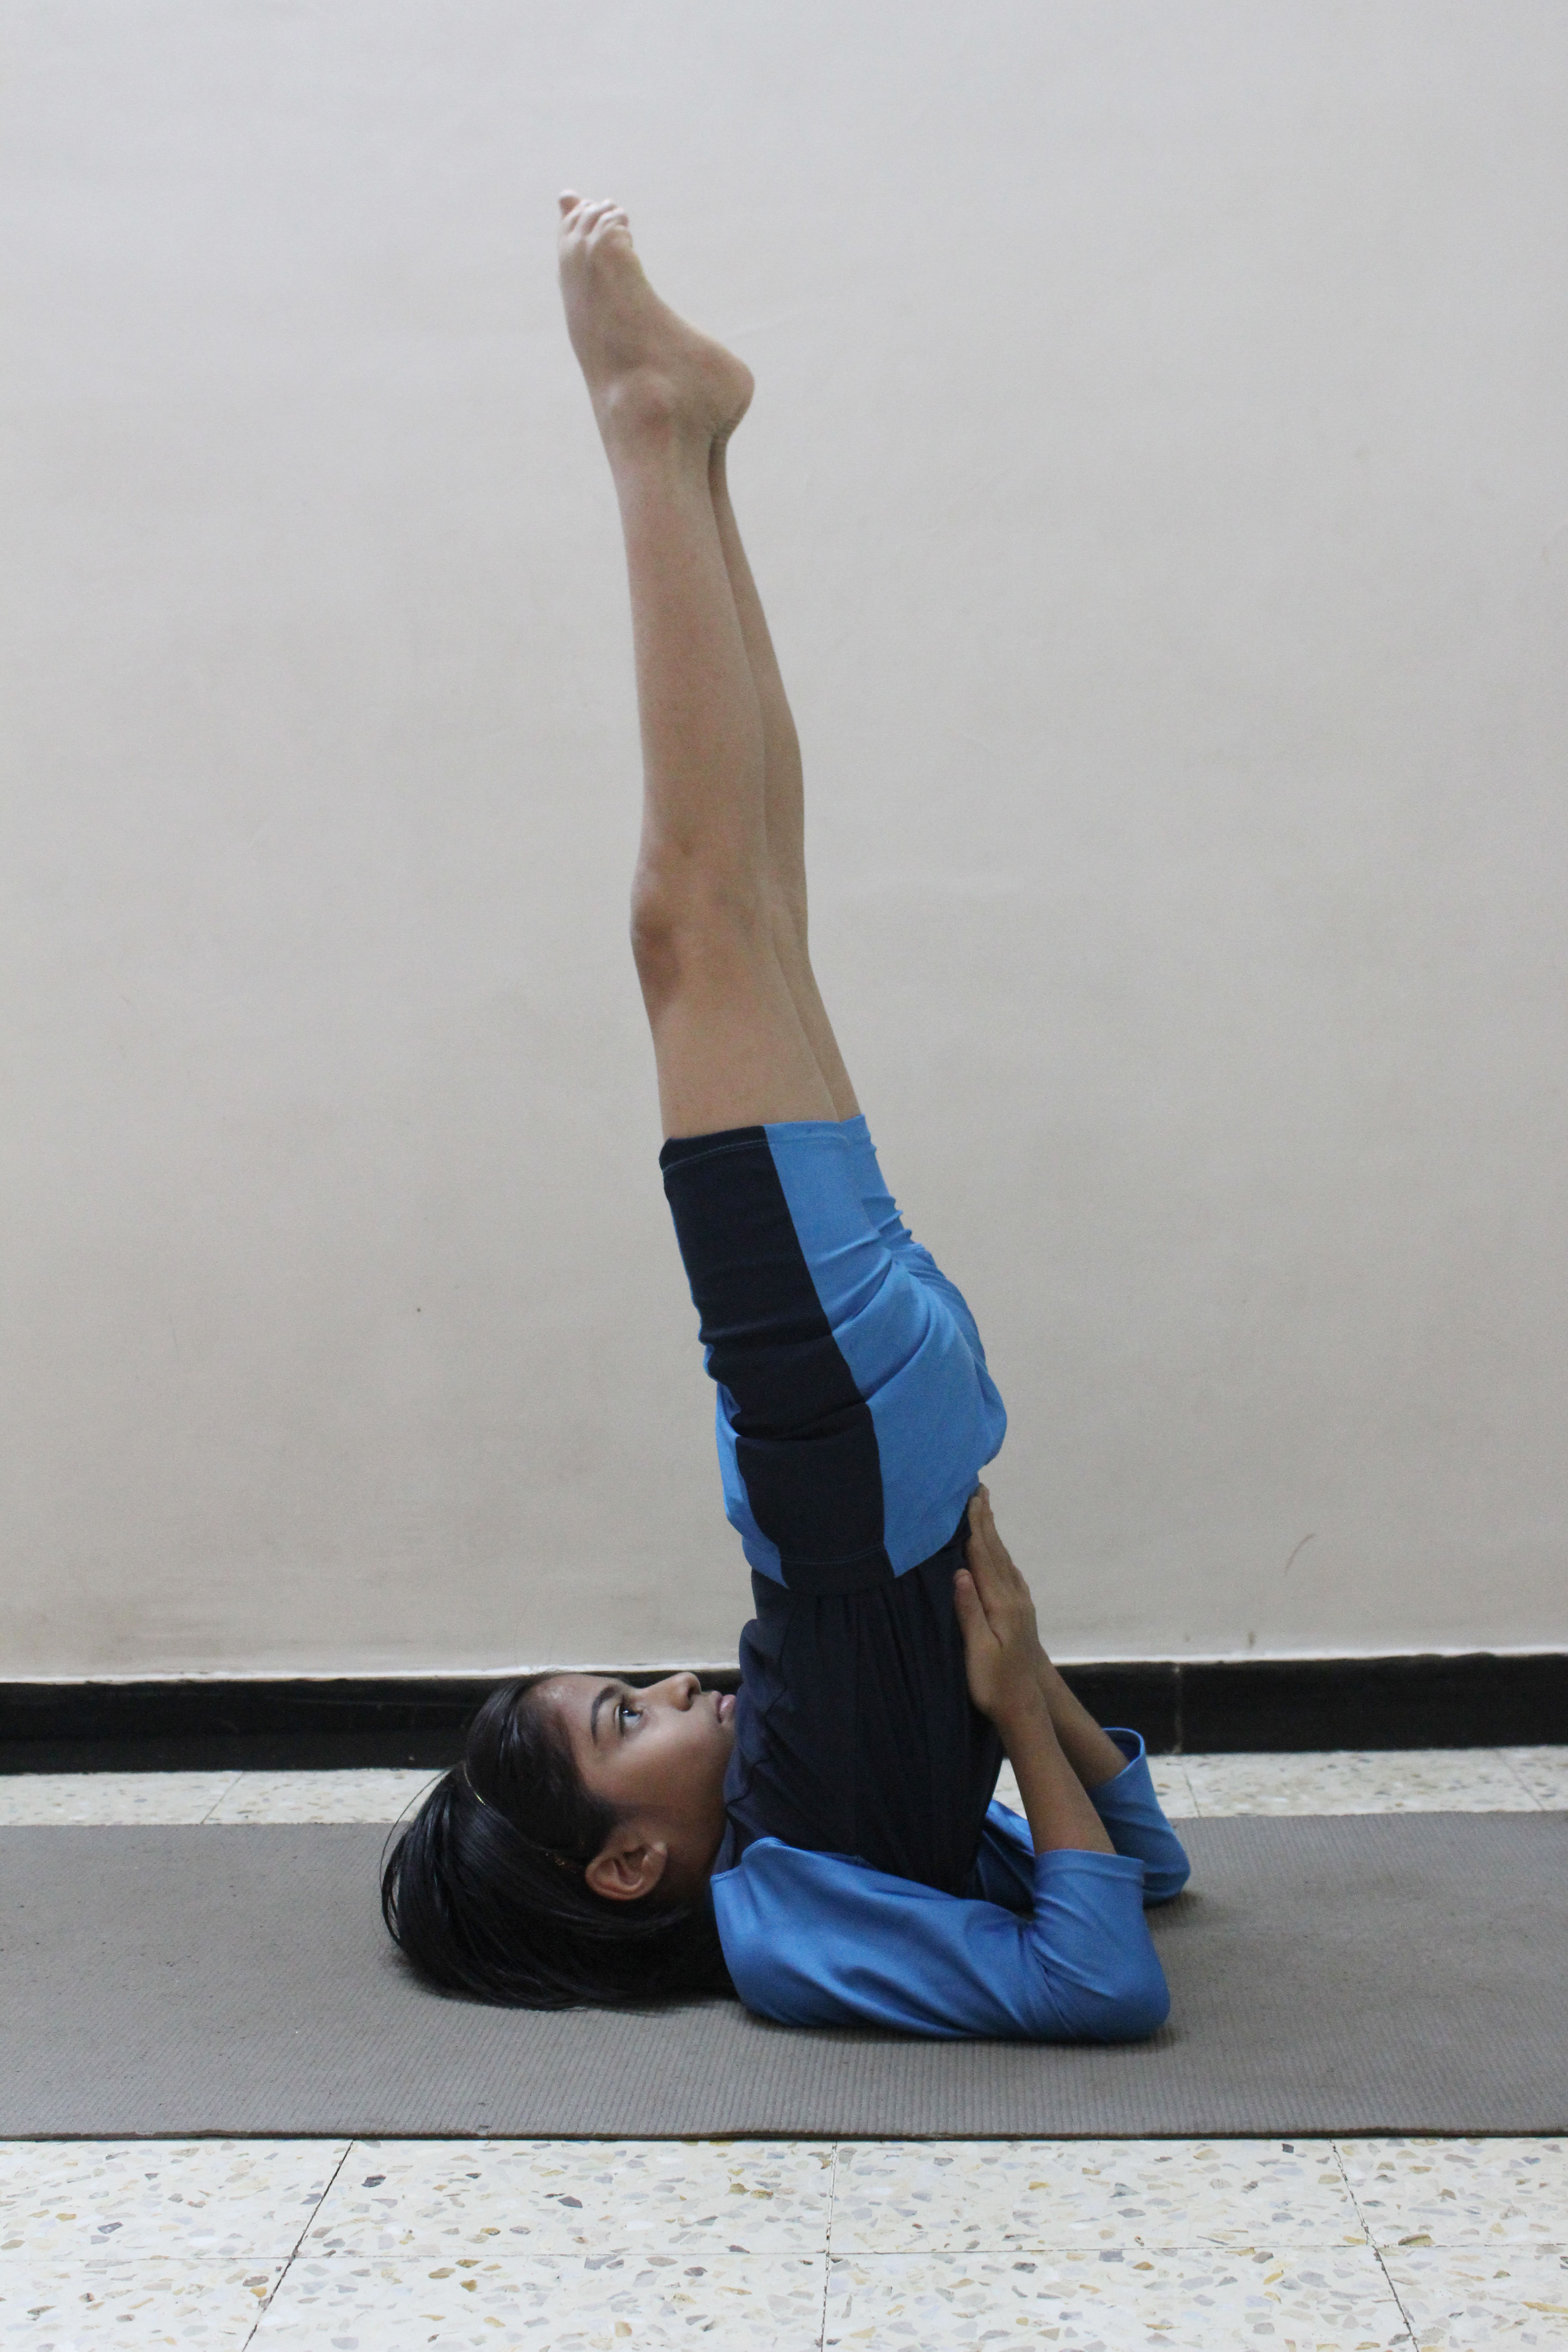
Ardha Halasana
Ardha Halasana
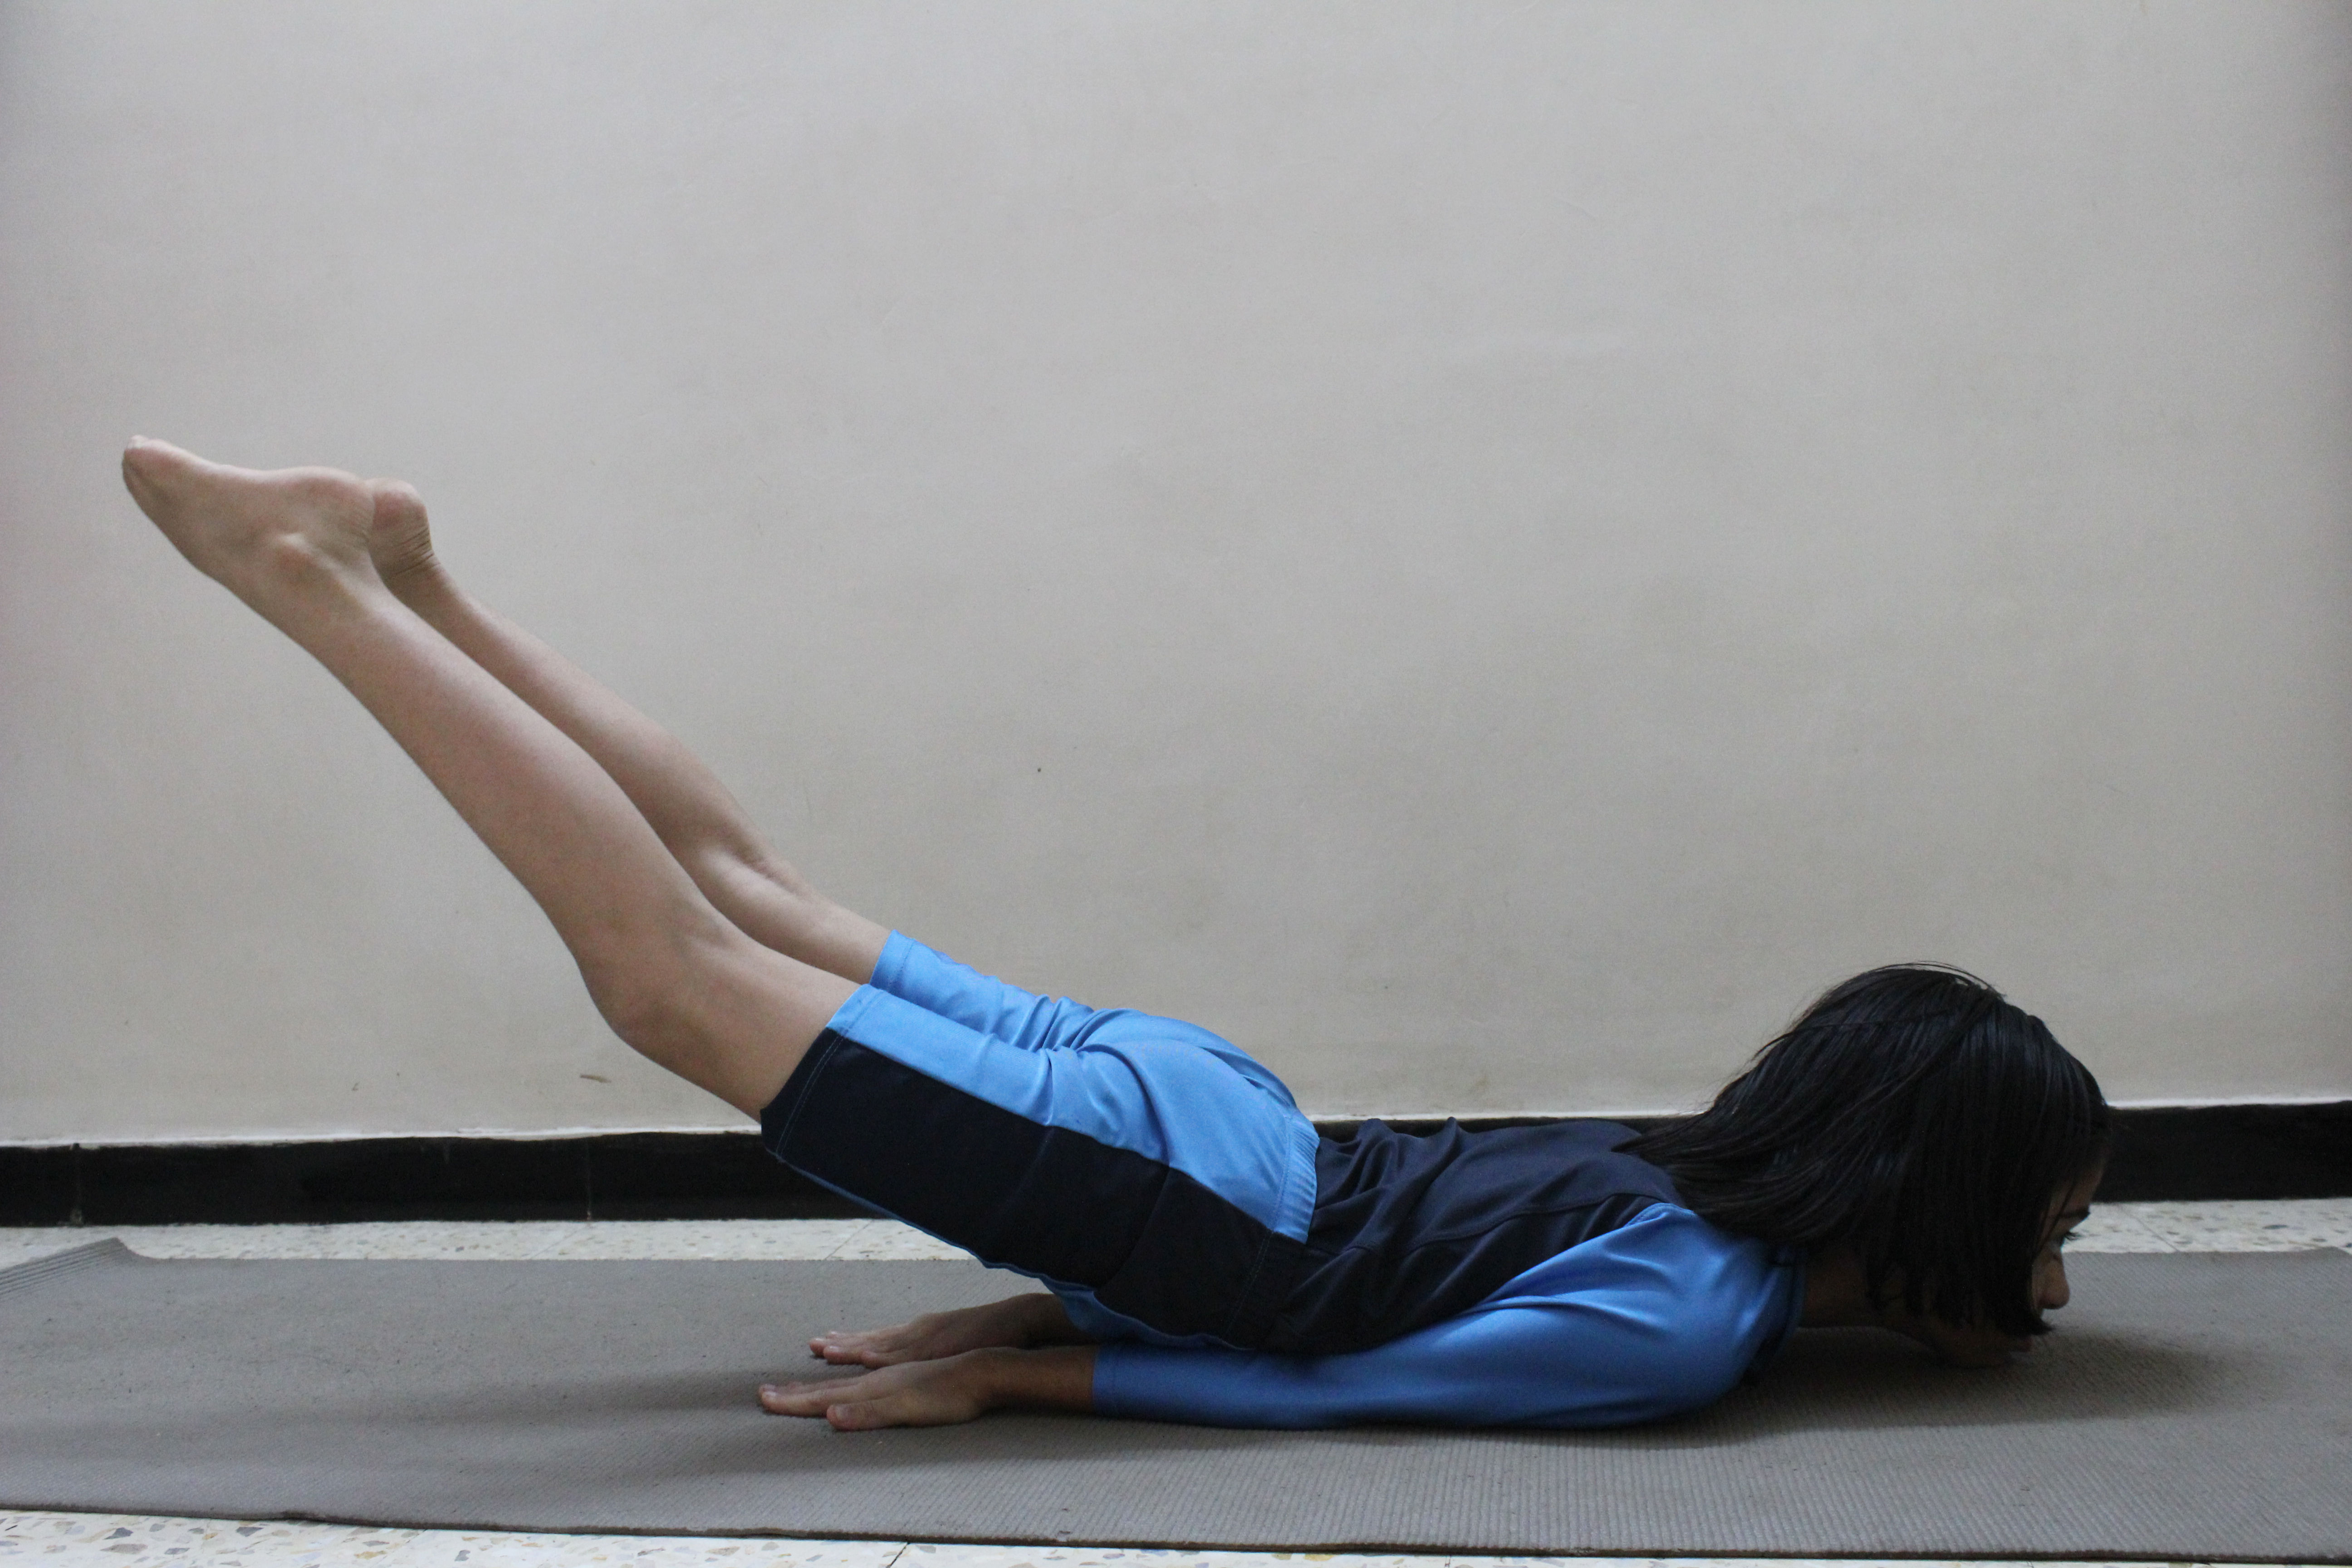
Ardha Halasana {Half Plough Pose}-Steps And Benefits
SANKSRIT NAME: ARDHA HALASANA
ENGLISH NAME: HALF PLOUGH POSE
Ardha literally means half and Hala means plough. It is an intermediate posture to perform Halasana hence it is named as Ardha Halasana.
Technique of Ardha Halasana:
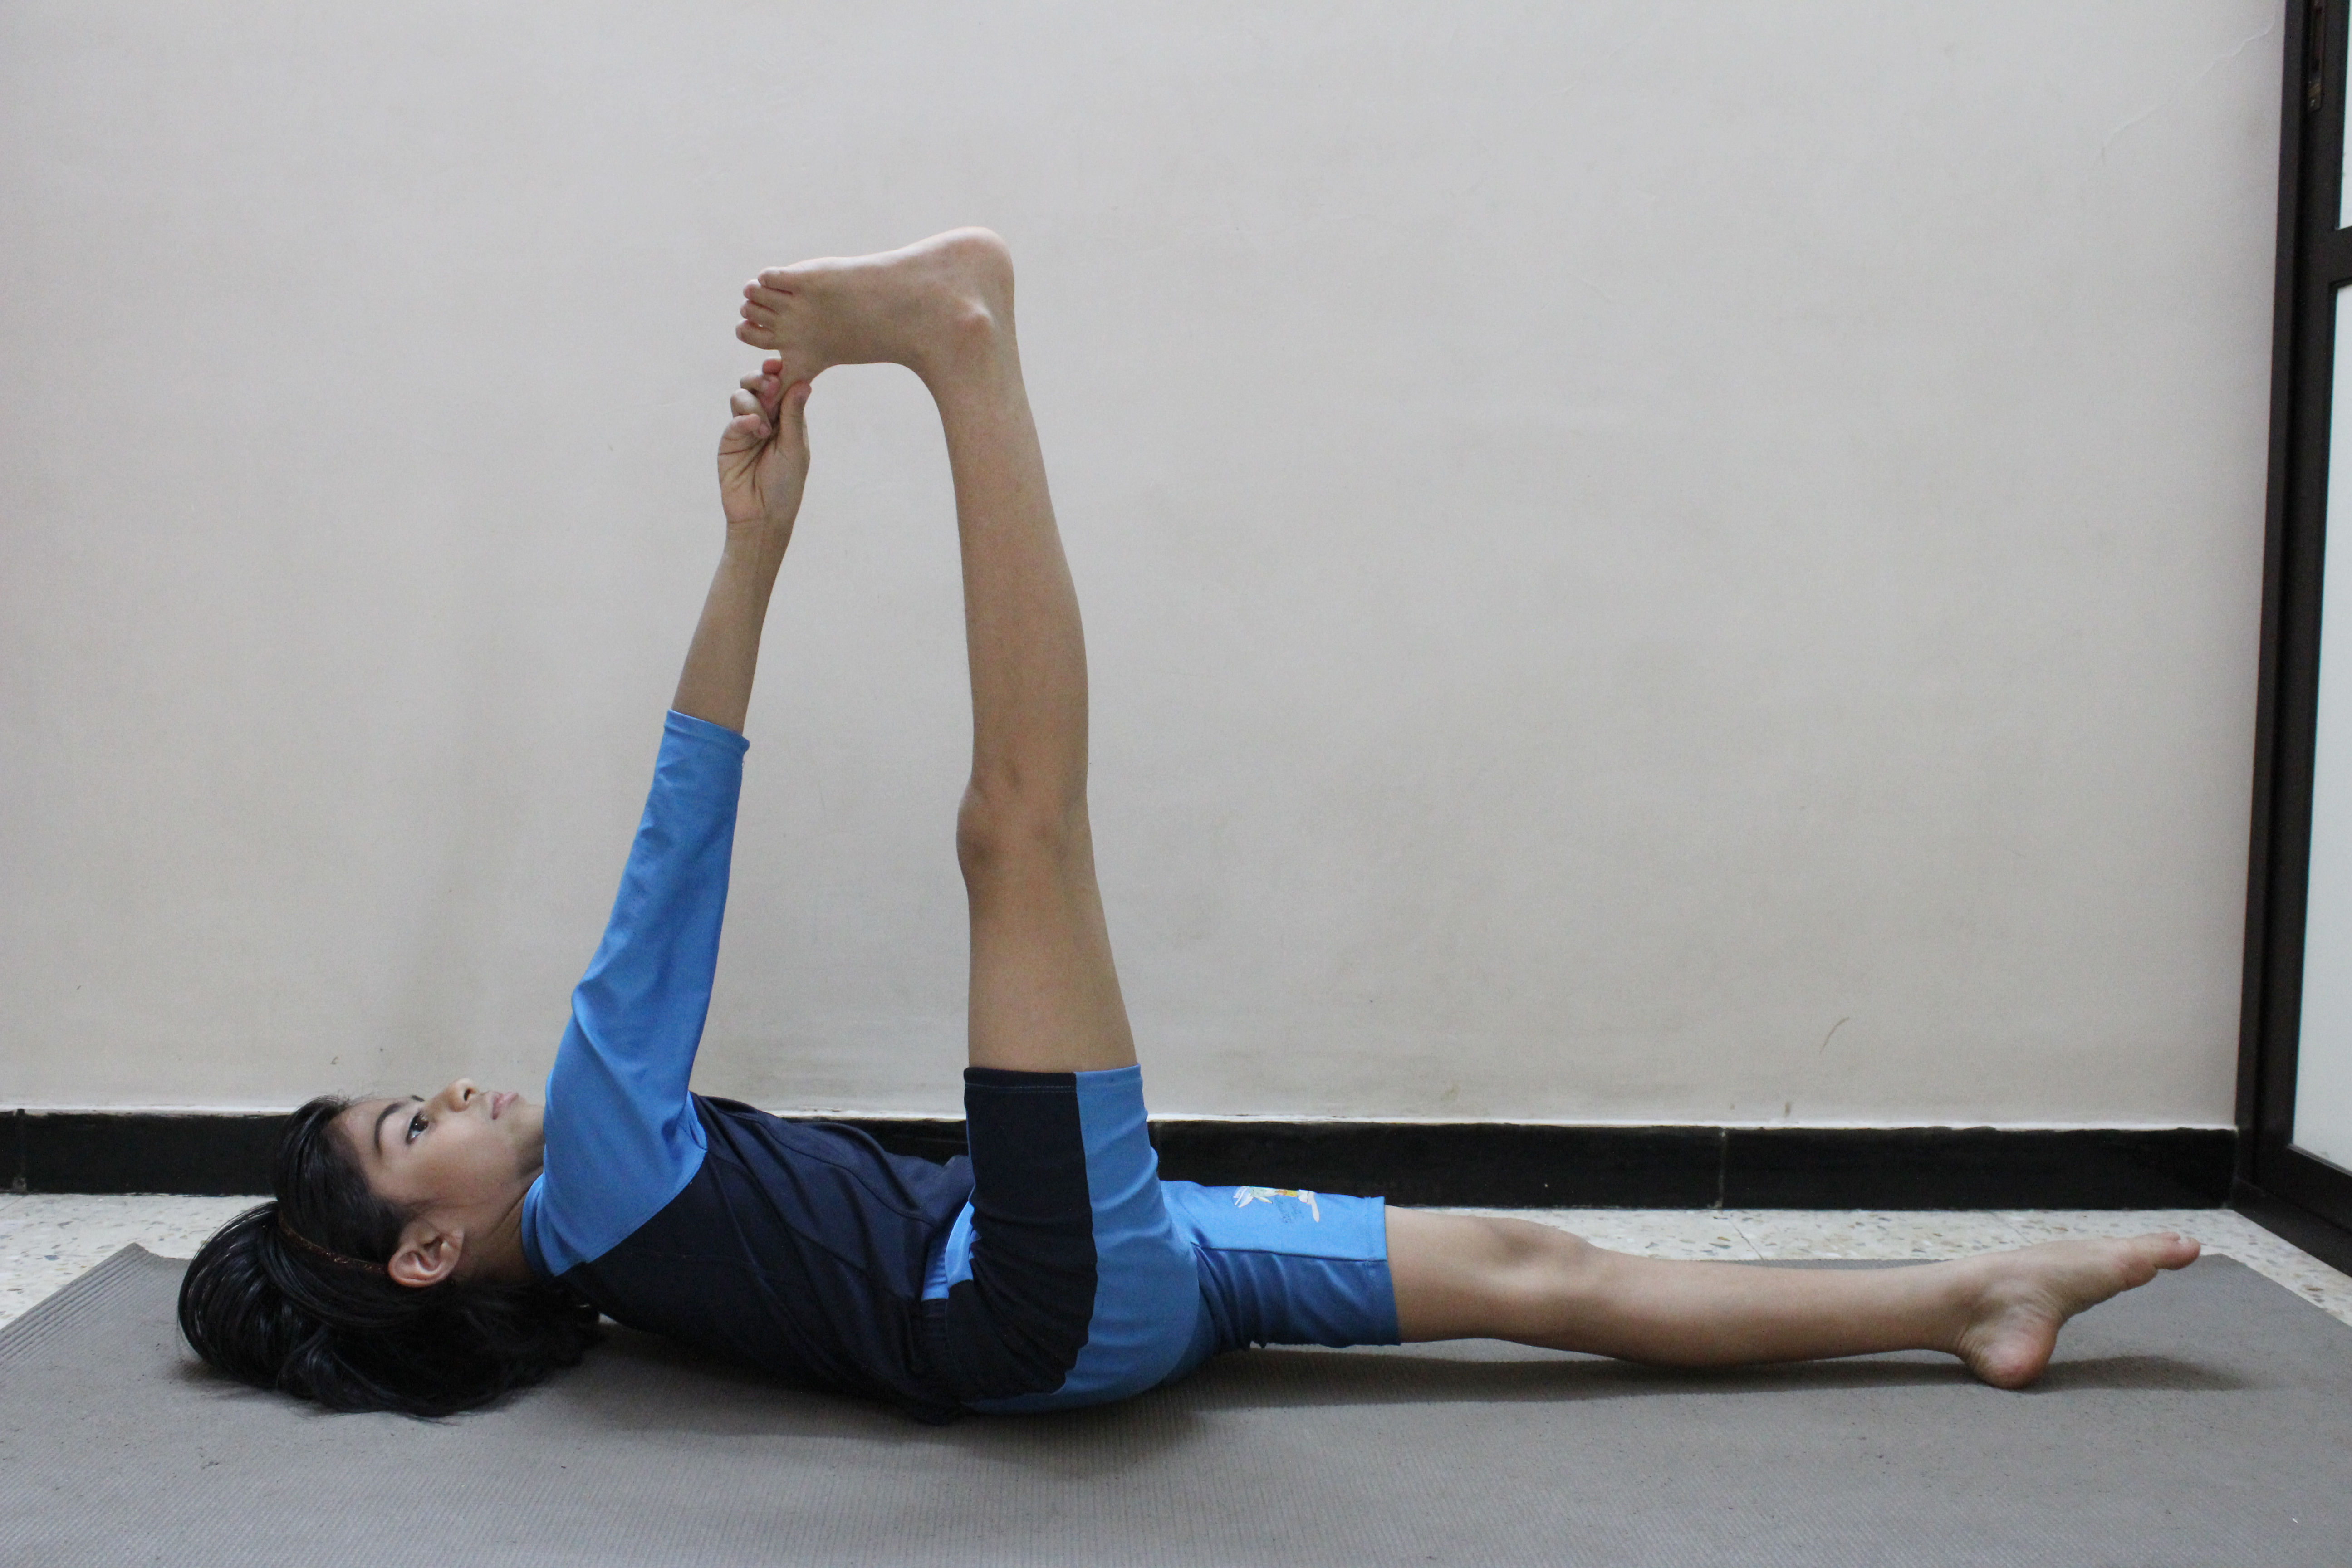
Lie down in Shavasana (supine position).
Join the both legs and keep your hand with the thighs.
Slowly breathe in and raise the leg perpendicular to the ground keeping the knee straight.
Hold in the breathe and stay in this position as long as possible.
Breathe out and bring back your legs.
Come back to the normal position and relax for a while.
Repeat the same for 3 to 5 times.
The above mentioned technique can also be performed only with a single one after the other.
Benefits of Ardha Halasana:
Improves digestion and appetite.
Improve blood circulation.
Strengthens the thigh muscles and calf muscles.
Helpful to reduce abdomen fat and lose weight.
Stimulates the abdominal organs.
Therapeutic application of Ardha Halasana:
Indigestion
Constipation
Obesity
Urinary disorders
Contraindications:
People suffering from any cardiac problem, back pain, high blood pressure should avoid this practice.
8
Ardha Pincha Mayurasana
Ardha Pincha Mayurasana
Ardha Pincha Mayurasana
{Dolphin Pose}
-Steps And Benefits
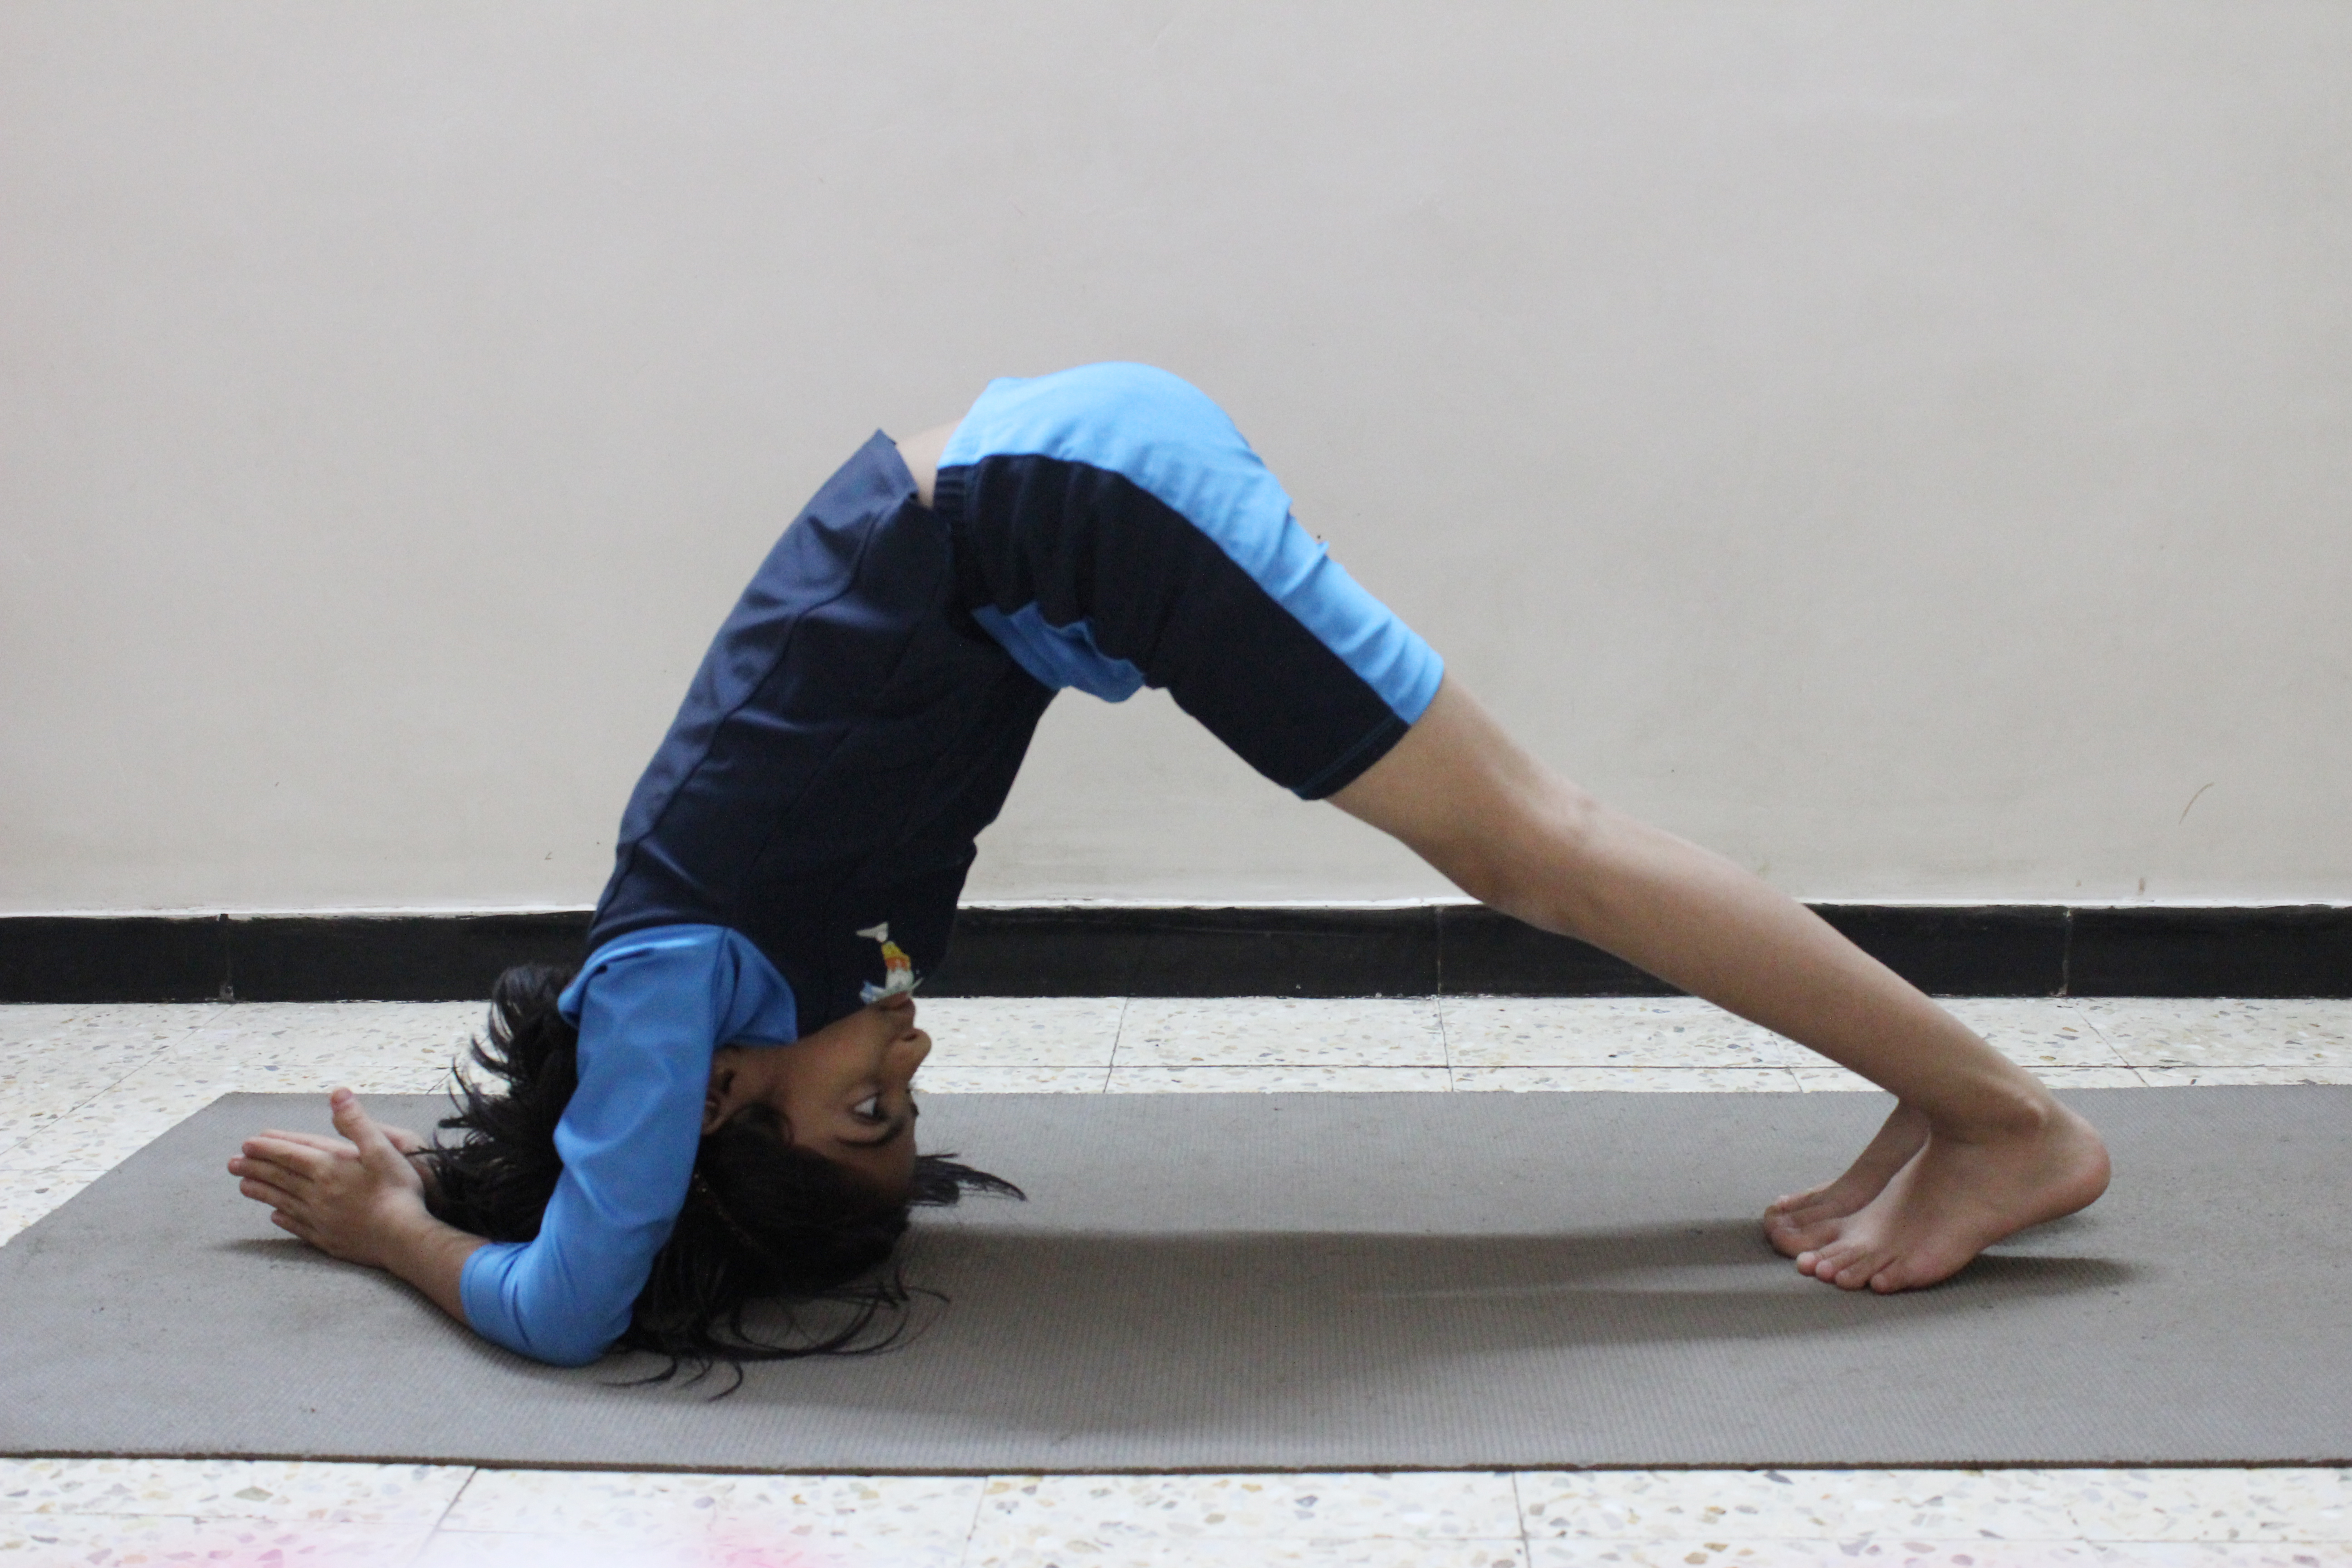
In Sanskrit meaning of ‘Ardha’ is half, ‘Pincha’ means Feathers and the meaning of ‘Mayura’ is Peacock. It is a Inversion and standing pose. When you attempt Ardha Pincha Mayurasana your body looks like an inverted ‘V’. In this Asana you have to keep your forearms and your toes on the floor, and rest of your body is raised to make a V shape. This Asana is famous as Dolphin Pose; this Asana is also known as Half Feathered Peacock Pose and Puppy Pose. This Pose is very much similar to the Downward Facing Dog Pose, with the forearms lying on the ground instead of your palms.
The Dolphin yoga Pose is one of those asanas that you should add into your every day workout. It gets ready you and advantages you in ways you never anticipated that it would!
The Ardha Pincha Mayurasana is all – round stance. Dolphin pose is one of those Asanas that help you set up your psyche and body for a full reversal. It opens up your abdominal area as well as makes it more grounded as well. ardha pincha mayurasana is additionally an incredible substitute for the postures where your legs are over your head, and you are not happy with doing them. As you practice this asana consistently, your shoulders and spine encounter a more extensive scope of movement. Your center and arms get to be solid as the heaviness of the body lies on your upper arms and abdominal area. With this stance, you will open up your reality to an alternate measurement; you will wind up with the quality and vitality that you had when you were more youthful.
Start the Asana by getting down on your knees and hands.
Keep your forearms on the floor; ensure that your elbows and shoulders are in the parallel line.
Now raise your spine (back) and buttocks as you tuck your toes and keep your legs straight.
Make sure that, your shoulder blades should be firm and into your ribs. Now release (free) your neck by raising your shoulders away from ears.
After that walk in towards your arms.
At that point take 4 to 6 deep breaths. Take three long and deep breaths and hold the Position for 30 to 60 seconds.
Dolphin Yoga Pose Tips for Beginner
As a learner, it may be hard for you to get into and stay in this stance. To help you with it, simply open up your shoulders. For this, raise your elbows on a moved (rolled) up blanket, and press your wrists solidly to the floor.
Pose Alteration
Adho Mukha Svanasana is a variation of the Dolphin Pose. For increasing the stretch and intensity of the pose; you can raise your legs, one at a time.
Benefits of Ardha Pincha Mayurasana (Dolphin Pose)
Ardha Pincha Mayurasana calms your mind, and relieving depression.
It stretches shoulder, aches of the feet, Claves and hamstrings.
Strengthens your arms and legs.
Dolphin Pose helps to stimulate the reproductive organs, relieve menstrual discomfort, and reduce the symptoms of menopause.
Gives strength to your bones and beneficial in Osteoporosis
Stimulates the digestive organs and also improves digestion.
Helpful in Insomnia, fatigue, back pain and headaches.
Dolphin Yoga Pose is beneficial in Asthma, Sciatica, and flat feet.
NOTE
All asana should be performed on an empty stomach. Keep 4 to 6 hours gap between your meals and your yoga practice. Avoid this pose in neck or shoulder injury.
9
Astavakrasana
Astavakrasana
Astavakrasana
{Eight Angle Pose}
-Steps And Benefits
Astavakrasana or Eight Angle Pose is dedicated to the well-known sage Ashtavakra. According to the Ancient story, Ashtavakra had displeased his father while he was in the womb, so he was cursed and was born curved in eight places.
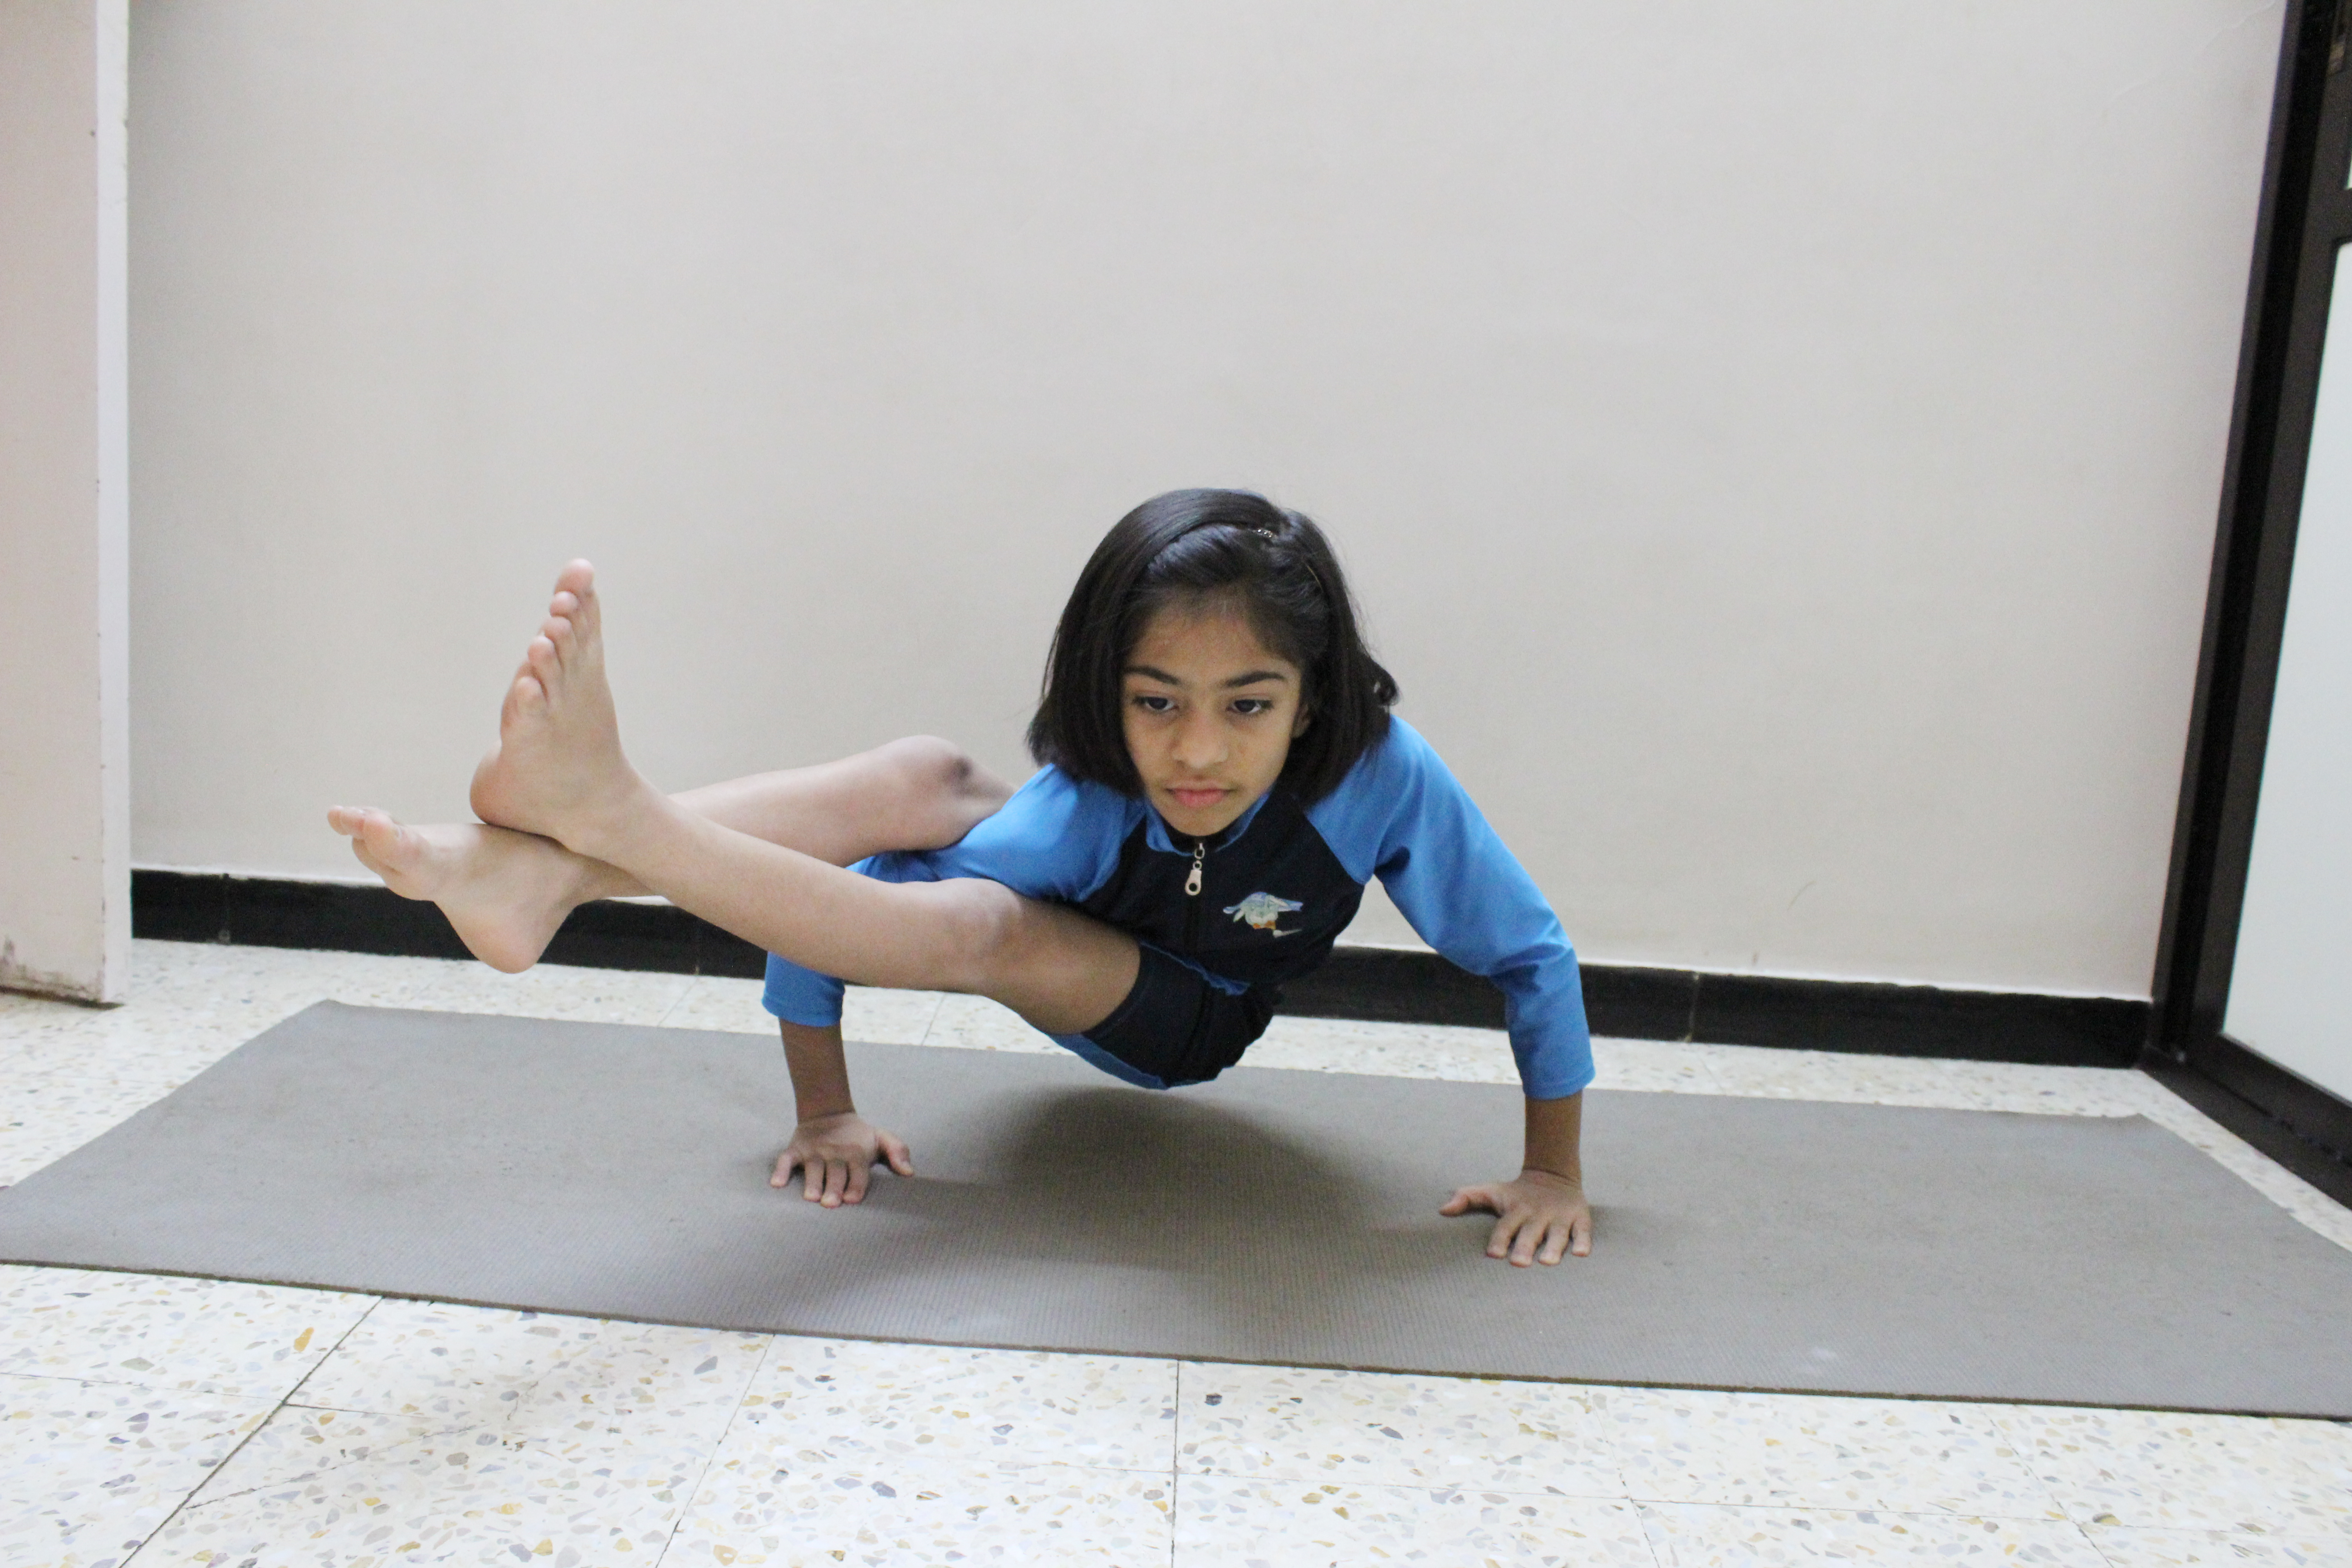
In Astavakrasana Asta means eight, Vakra means to bend and the meaning of Asana is pose, seat or posture. While performing this Asana, your body looks like crooked same as Sage Ashtavakra, so that’s why this Asana named so. Astavakrasana is an intense arm balance pose with the twist. When you practice this Yoga pose, you should keep in your mind to let go of your limitations or weakness (Physically and mentally). Eight Angle Pose is a great way to build your equilibrium and stability while strengthening your wrists and arms.
Follow – Up Yoga Poses: – Bhujapidasana, Dwi Pada Bhujasana.
Style of Asana: – Ashtanga yoga.
Level of Asana: Advanced
Steps of Eight Angle Pose(Astavakrasana)
First of all, sit down in the cross – legged position comfortably and your right knee should bend and keep the sole of the same foot (right) just near to your right hips/ buttock.
Keep your right arm thread underneath your right knee. Lift up your right foot’s sole off the floor, make your shin is parallel to the ground at this moment.
Now, try to bring right knee in the upward position as much as you can by your right arm. Your knee ought to be brought over the right shoulder.
After that, put your palms strongly on the floor, during this keep your left leg straight.
By using your palms and arms strength, lift up your body from the ground.
Once you raised left leg, bend the left leg, and try to hook the left ankle around your right leg.
At that time, keep your torso wider towards the forward direction in a way that it becomes parallel to the floor.
After that, put your both legs to come to the right side of your body.
Make sure to keep your both your legs straight.
Hold the position about 30 to 60 seconds with normal and even breathing.
Now, get your body down to the floor and repeat the same process on the alternative side.
(If you are uncomfortable in this pose then, Use a bolster to rest the bottom of your buttock and your outer legs.)
Benefits of the Eight Angle Pose
If you really want to make your arms and wrists strong, then this is best for you.
Astavakrasana stretches your legs and arms.
Strengthens and tones your abdominal muscles.
Eight Angle Pose Improves your digestive system.
Boosts your concentration and balance. Calms your mind and kick out stress and anxiety.
Astavakrasana Beneficial in Menstrual disorders and menopausal symptoms.
This Yoga pose is challenging pose, by which it helps your body and mind to make a great connect.
The challenge of the pose helps the body and mind to build a great connect.
NOTE
Don’t perform this pose, if you have wrist, elbow or shoulder injuries. Astavakrasana is very intense so practice preparatory poses, follow- ups poses and forward bending Asana before performing this pose. Don’t push your limit during asana, do as much as you can. Performing Asana in a right manner is very essential for every learner. So, perform all the yogic activities in under the supervision of an expert trainer/teacher.
10
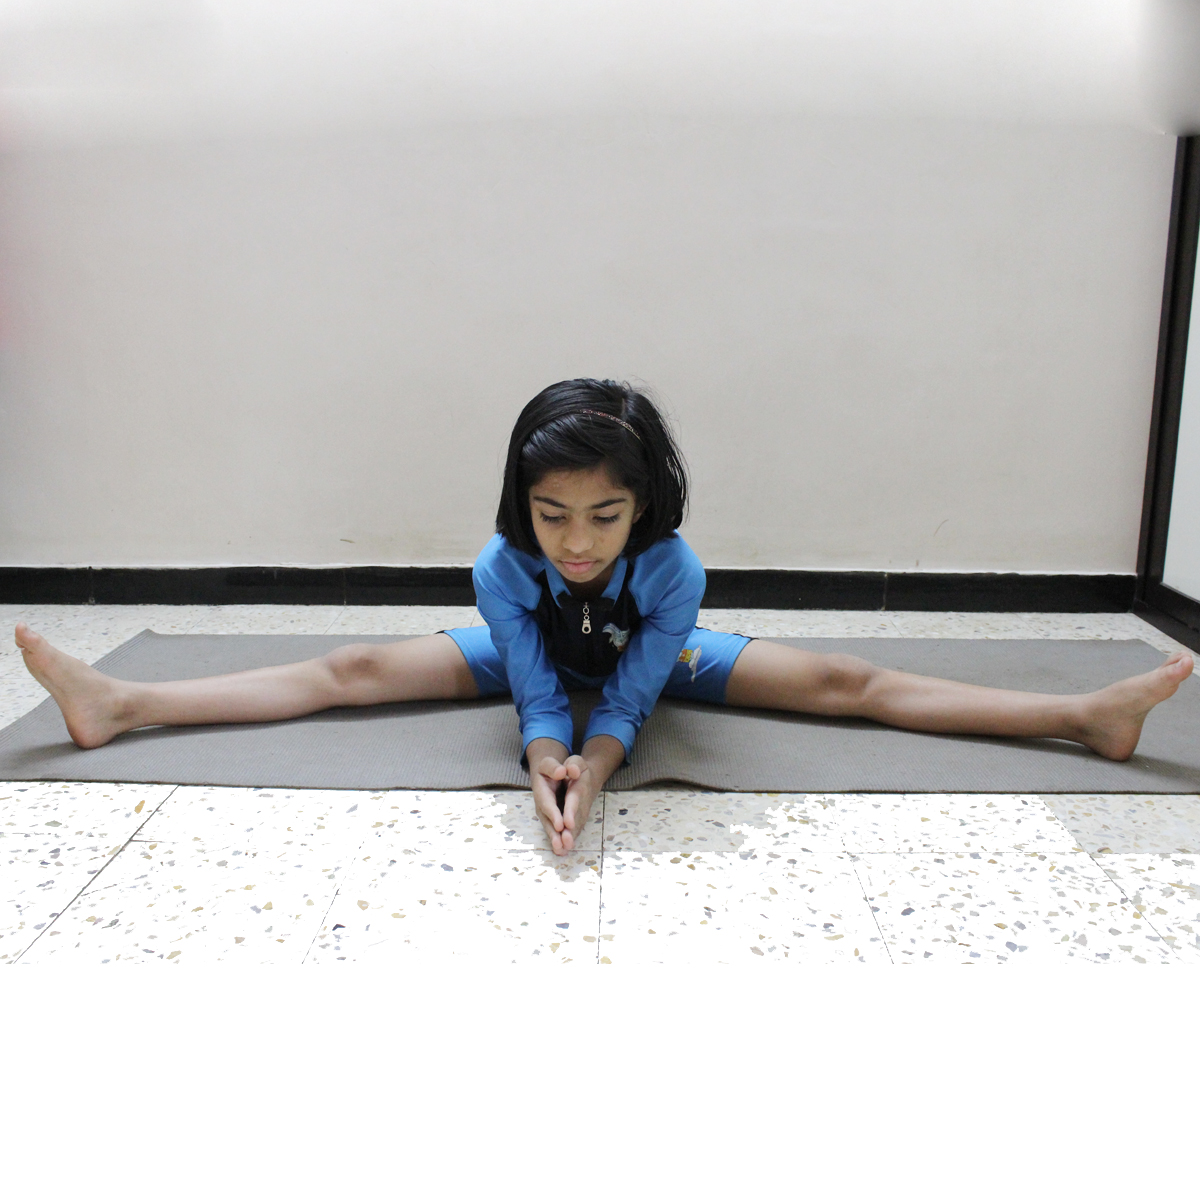
Baddha Konasana
Baddha Konasana
Baddha Konasana
{Bound Angle Pose}
Position: – Sitting.
Sanskrit Name: – Baddha Konasana.
English Name: – Bound angle Pose or Cobbler Pose.
-Steps And Benefits
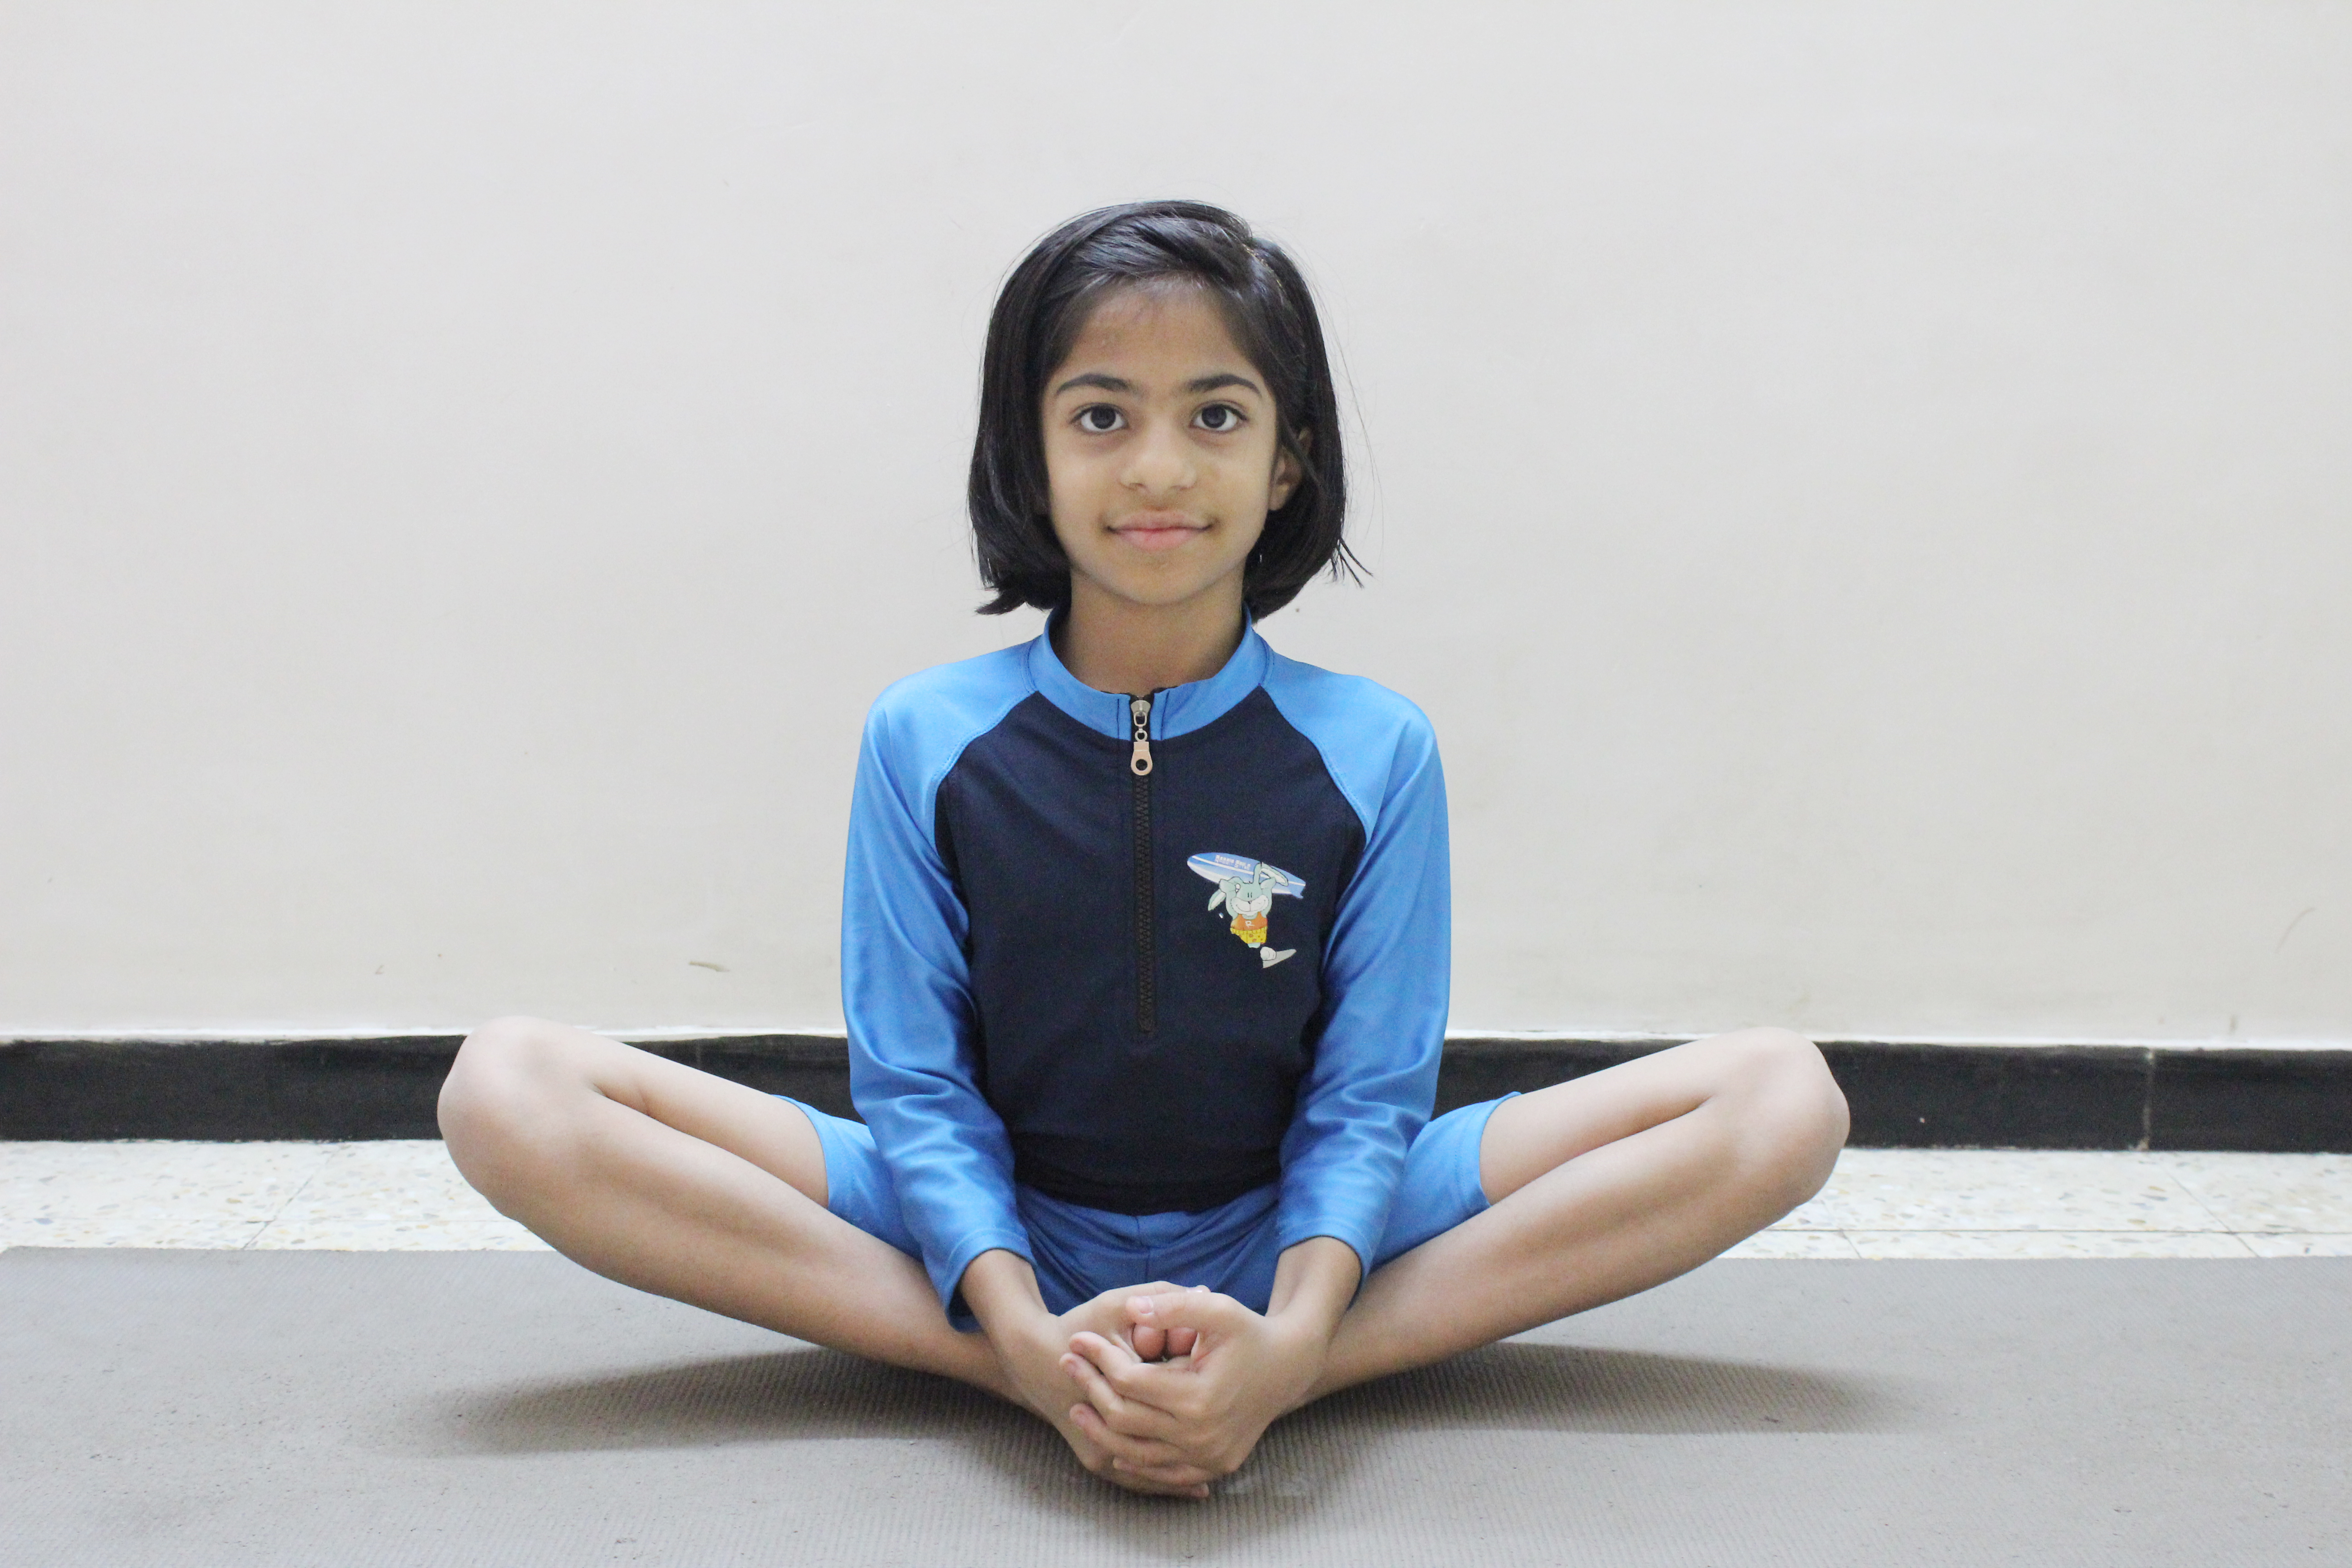
The word “Baddha” stands for “Bound” in Sanskrit and the meaning of Kona is “angle” or “split”, Asana means “pose”, “posture or “seat”. This Asana is also known as cobbler pose. This pose is easy to do and suitable for everybody. Baddha Konasana stretches your groin and inner thighs. This is often a really helpful Asana for flexibility of the knees, ankles, feet and hips. It opens and will increase circulation to the girdle region. Thence this is often a really sensible prenatal exercise and might relieve in menstrual issues. Moving the body from side to side can massage your hips. Slowly moving your knees up and down is termed butterfly pose; and Baddha Konasana is the best variation of butterfly pose.
Steps of Baddha Konasana (Bound Angle Pose or Cobbler Pose): –
Sit in the Dandasana (Staff Pose).
Now Bend your knees and join the soles of your feet.
Now hold your feet or ankles.
Move your heels to the groin as so much as doable.
Breathe out and let down your knees to the ground.
Your arms and shoulders should be relaxed.
Now press the sitting bones within the floor and let the crown of your head pointing towards ceiling to elongate the spine.
Press the sitting bones in the floor and let the crown of the head point to the ceiling to lengthen the spine.
Assume that your knees moving like the wings of the butterfly.
Hold this Pose for upto 2 minutes.
After that return in Dandasana (Staff Pose).
Benefits of Baddha Konasana (Bound Angle Pose): –
It stretches groin and inner thighs.
Increases the flexibility of knees, ankles, feet and hips.
Opens pelvic region.
Best prenatal exercise and relieves in menstrual issues.
Especially beneficial in urinary disorders.
Cut down the tension from the groin part and gap up the hips and inner thighs.
Beneficial for the lumbar region.
Useful in flat feet, high blood pressure.
Very beneficial in infertility and asthma.
Variations of Baddha Konasana: –
Supta Baddha Ko??sana in lying down Position. Meaning of Supta is “Reclining” or “supine”.
Note
Avoid this Asana if you’ve got injury within the hips, groin or knee region. You’ll use the wall for supporting the back if you are suffering from back problems.
11
Baddha Padmasana
Baddha Padmasana
Baddha Padmasana
{Locked Lotus Pose}
Sanskrit Name: – Baddha Padmasana.
English Name: – Locked Lotus Pose.
Position: – Sitting.
-Steps And Benefits
In Sanskrit the word “Baddha” means bound or locked. Baddha Padmasana is also known as locked lotus pose, cause the parts of the body, during in Baddha Padmasana , are firmly locked up and solidify to reinforce its steadiness, during this posture, the toes are grasp by the fingers, along with the arms crossed from behind. This pose is the advance level of Padmasana. At first you have to master in Padmasana and other basic asana, after that you can practice this Asana. In your first attempt if you are not able to perform this asana, then do as much as you can, don’t force yourself for performing this Pose.
Steps of Baddha Padmasana (Locked Lotus Pose):
Sit in the Padmasana (Lotus Pose), Keep your feet high on your thighs, just close to the groin.
Place your right arm behind to your back and reach round till your right hand is close to the left hip.
Now bow forward a little; twist your trunk to your right side and try to grasp the right thumb of toe, resting on the left thigh firmly with the index finger and the middle finger.
Sit straight and remain in the position for a few seconds.
Equivalently, place your left arm behind your back; crossing your right arm and try to reach round till your left hand is close to your right hip.
Now bend forward a little. Twist your torso to the left and bring your shoulder blades together, try to grasp the left thumb of toe, resting on the right thigh firmly with the forefinger and the middle finger.
Sit straight and remain in the position for a few seconds.
Now your arms and legs are tightly locked.
Try to keep your head, neck and spine straight.
Your knees should press the ground.
Look straight forward and breathing normally.
It is the final position of Baddha Padmasana.
Try to hold this pose for about ten seconds or as long as you can.
Now release your hands and open the foot lock and come back to the initial position.
Repeat the same process with your alternate legs and hands also.
Benefits of Baddha Padmasana (Locked Lotus Pose): –
Make your legs flexible.
It stretches the joints of shoulders, wrists, back, elbows, hips, knees, ankles and makes them more flexible.
Beneficial in the shoulders and back pain.
It improves the posture of the spine.
It increases the range of the shoulder movements.
It is beneficial in constipation and improves the functions of digestive system.
Daily practice of this Asana is beneficial in Arthritis.
Helps to make your spine straight.
Note: –
Try to grasp the right thumb of your toe with the fingers of your right hand and the left thumb toe with the fingers of your left hand. This Asana need needs a high degree of skill so attempt this pose after mastering in the basic Asanas. Avoid this asana in case of knee injury, severe back or shoulder pain. Pregnant women avoid this Pose. If you really want to get the all the benefits of Asana and Pranayama you have to practice daily. Supervision of well educated trainer is strictly recommended.
12
Bakasana
Bakasana
Bakasana
{Crane Pose}
English Name: – Crane Pose.
Sanskrit Name: – Bakasana.
-Steps And Benefits
The word “Baka” is derived from the Sanskrit word which means Crane and the meaning of Asana is Posture. This Asana is very similar to the body posture of crane, so it is also named as Crane pose. Bakasana is a compact arm leveling posture that helps in strengthening the arms similarly as the abdominal organs. The anatomical focus of this pose is that the wrists. By frequently practicing the Bakasana, the spine stretches to its full length and this will increase its flexibility for the most part. This Asan is comes under the advance Asana. Bakasana is the best balancing Asana. Bakasana is a kind of yoga posture that seems to be troublesome to perform, however actually is quite easy. There is one another Asana that is very similar to Bakasana and that is Kakasana, but has some differences.
SO what’s the difference between Bakasana (Crane Pose) and Kakasana (Crow Pose)?
As with several yoga postures, Crane and Crow are often confused for each other, particularly as different- different colleges of yoga observe usually have different names for things. The key distinction between the 2 poses is that Crow pose is performed with bent arms whereas Crane pose is performed with straight arms. Additionally crow pose is sometimes the primary step to learning Crane.
Crow pose is less complicated, as your bent elbows permit you a little additional flexibility with regard to your positioning. Crane is far less forgiving, as you hold yourself up with the next centre of gravity.( Remember the distinction between Kakasana and Bakasana is simply that in Kakasana, your arms are bent to a small degree within the forward direction like that of a crow and in Bakasana, you’ve got to stay your arms straight like that of a crane.)
Steps of Bakasana (Crane Pose)
Stand in the position of Tadasana.
After taking the position of Tadasana, come down to the Uttanasana position.
While doing Uttanasana, keep your hands on the floor just in front of your feet. For this, you’ll need to bend a little more from your hips.
If you’re not capable to balance properly, attempt to keep a fold blanket below your hands so your body gets a platform to rest on.
Now Bend your arms a bit (as much as possible).
Attempt to carry your left leg up within the air.
Fold your knee and take a look at to rest your left knee on the outer facet of your left arm.
Fold the right leg from the knee and take a look at to put the right knee on the outer facet of the right arm.
There ought to be acceptable distance between each your hands, so it becomes easier for you to balance your body on your hands.
Stay steady during this position for concerning 15-20 seconds, after that slowly-slowly release.
Repeat this process three times a day.
Benefits of Bakasana (Crane Pose)
Regular practice of this pose will increase mental and physical strength.
Helps in to make your body more flexible.
It increases endurance capacity.
Practicing this posture on a daily routine helps you in strengthening your forearms, wrists and shoulders.
It provides a decent stretch to your higher back and even strengthens your abdominal muscles.
Note: –
Those people who are suffering from Carpal Tunnel Syndrome, sciatica pain, slip disc, Spondilitis problems and wrist injury are not allowed to practice this asana. Be extra careful if you have shoulders injury or hamstrings while attempting this pose. If you are a beginner then don’t try this pose immediately, at first start with basics, when you are master in that then go for it .This is an advance Asana so try this Asana under the supervision of a yoga teacher.
13
Balasana
Balasana
Balasana
{Child Yoga Pose}
Name: – Balasana
Meaning: – Child Pose, child resting pose
Position:– sitting
Suits: – Everybody
-Steps And Benefits
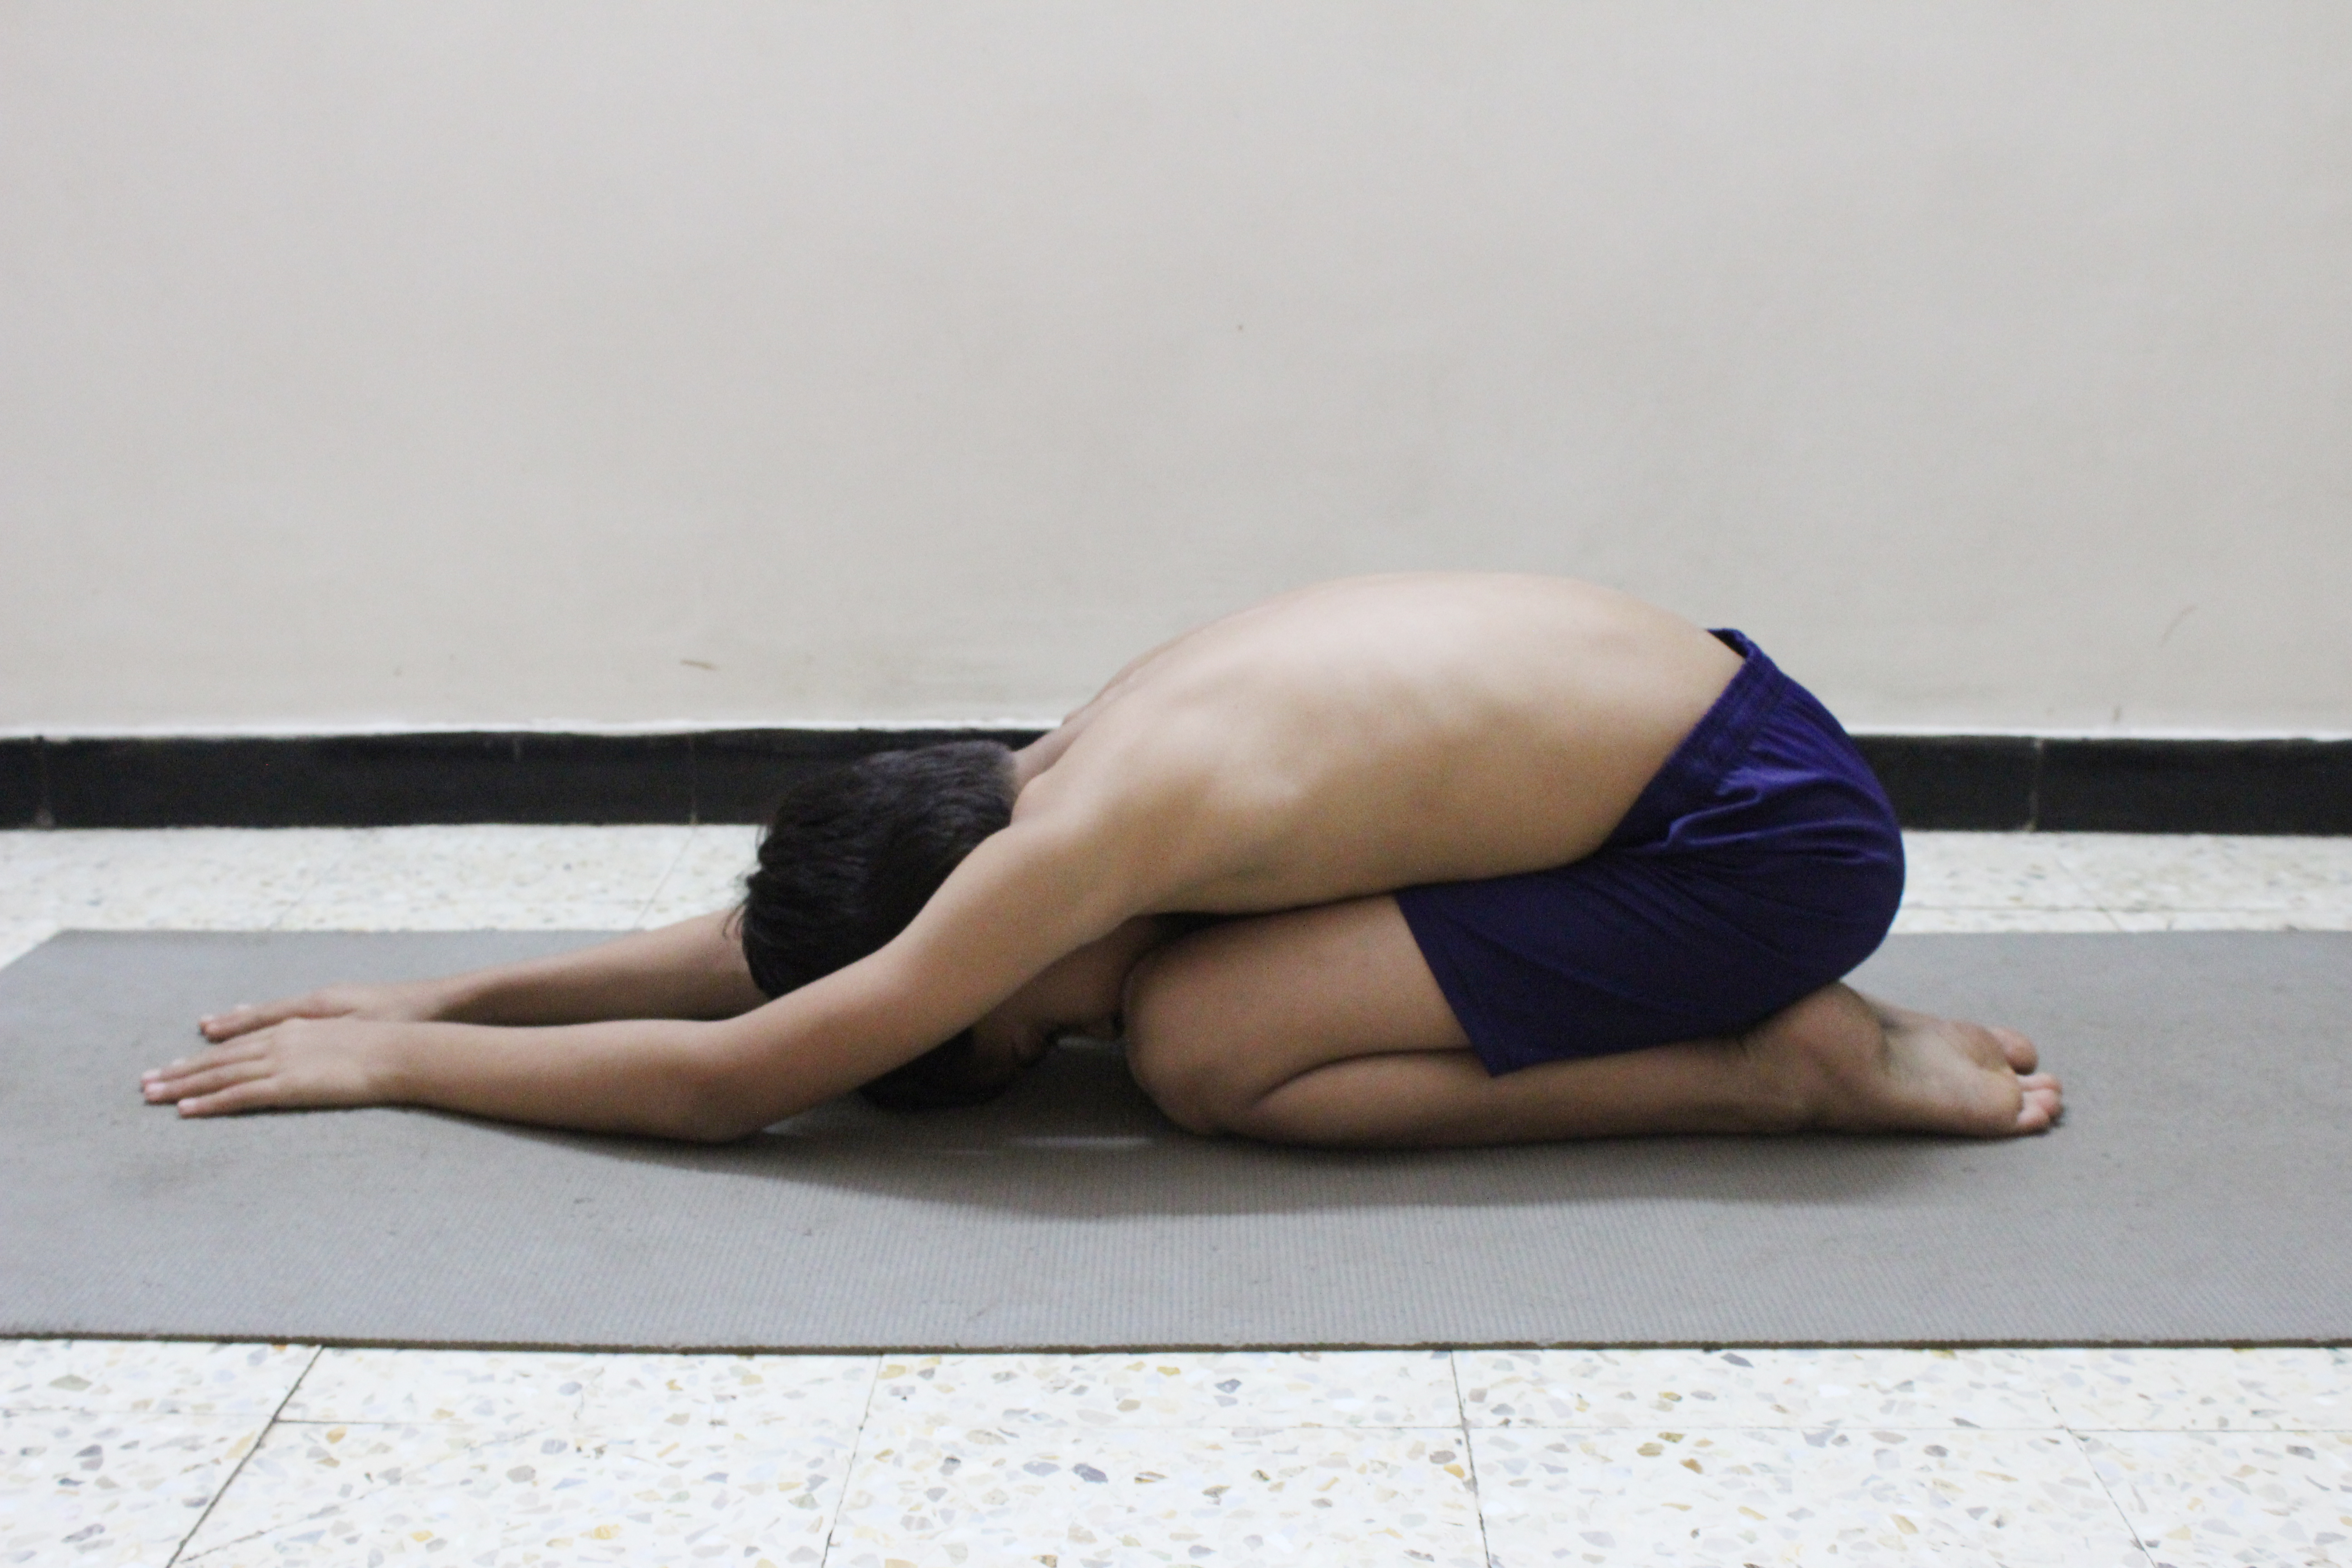
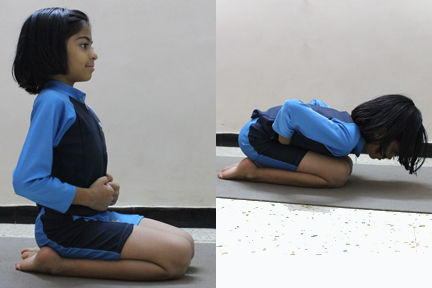
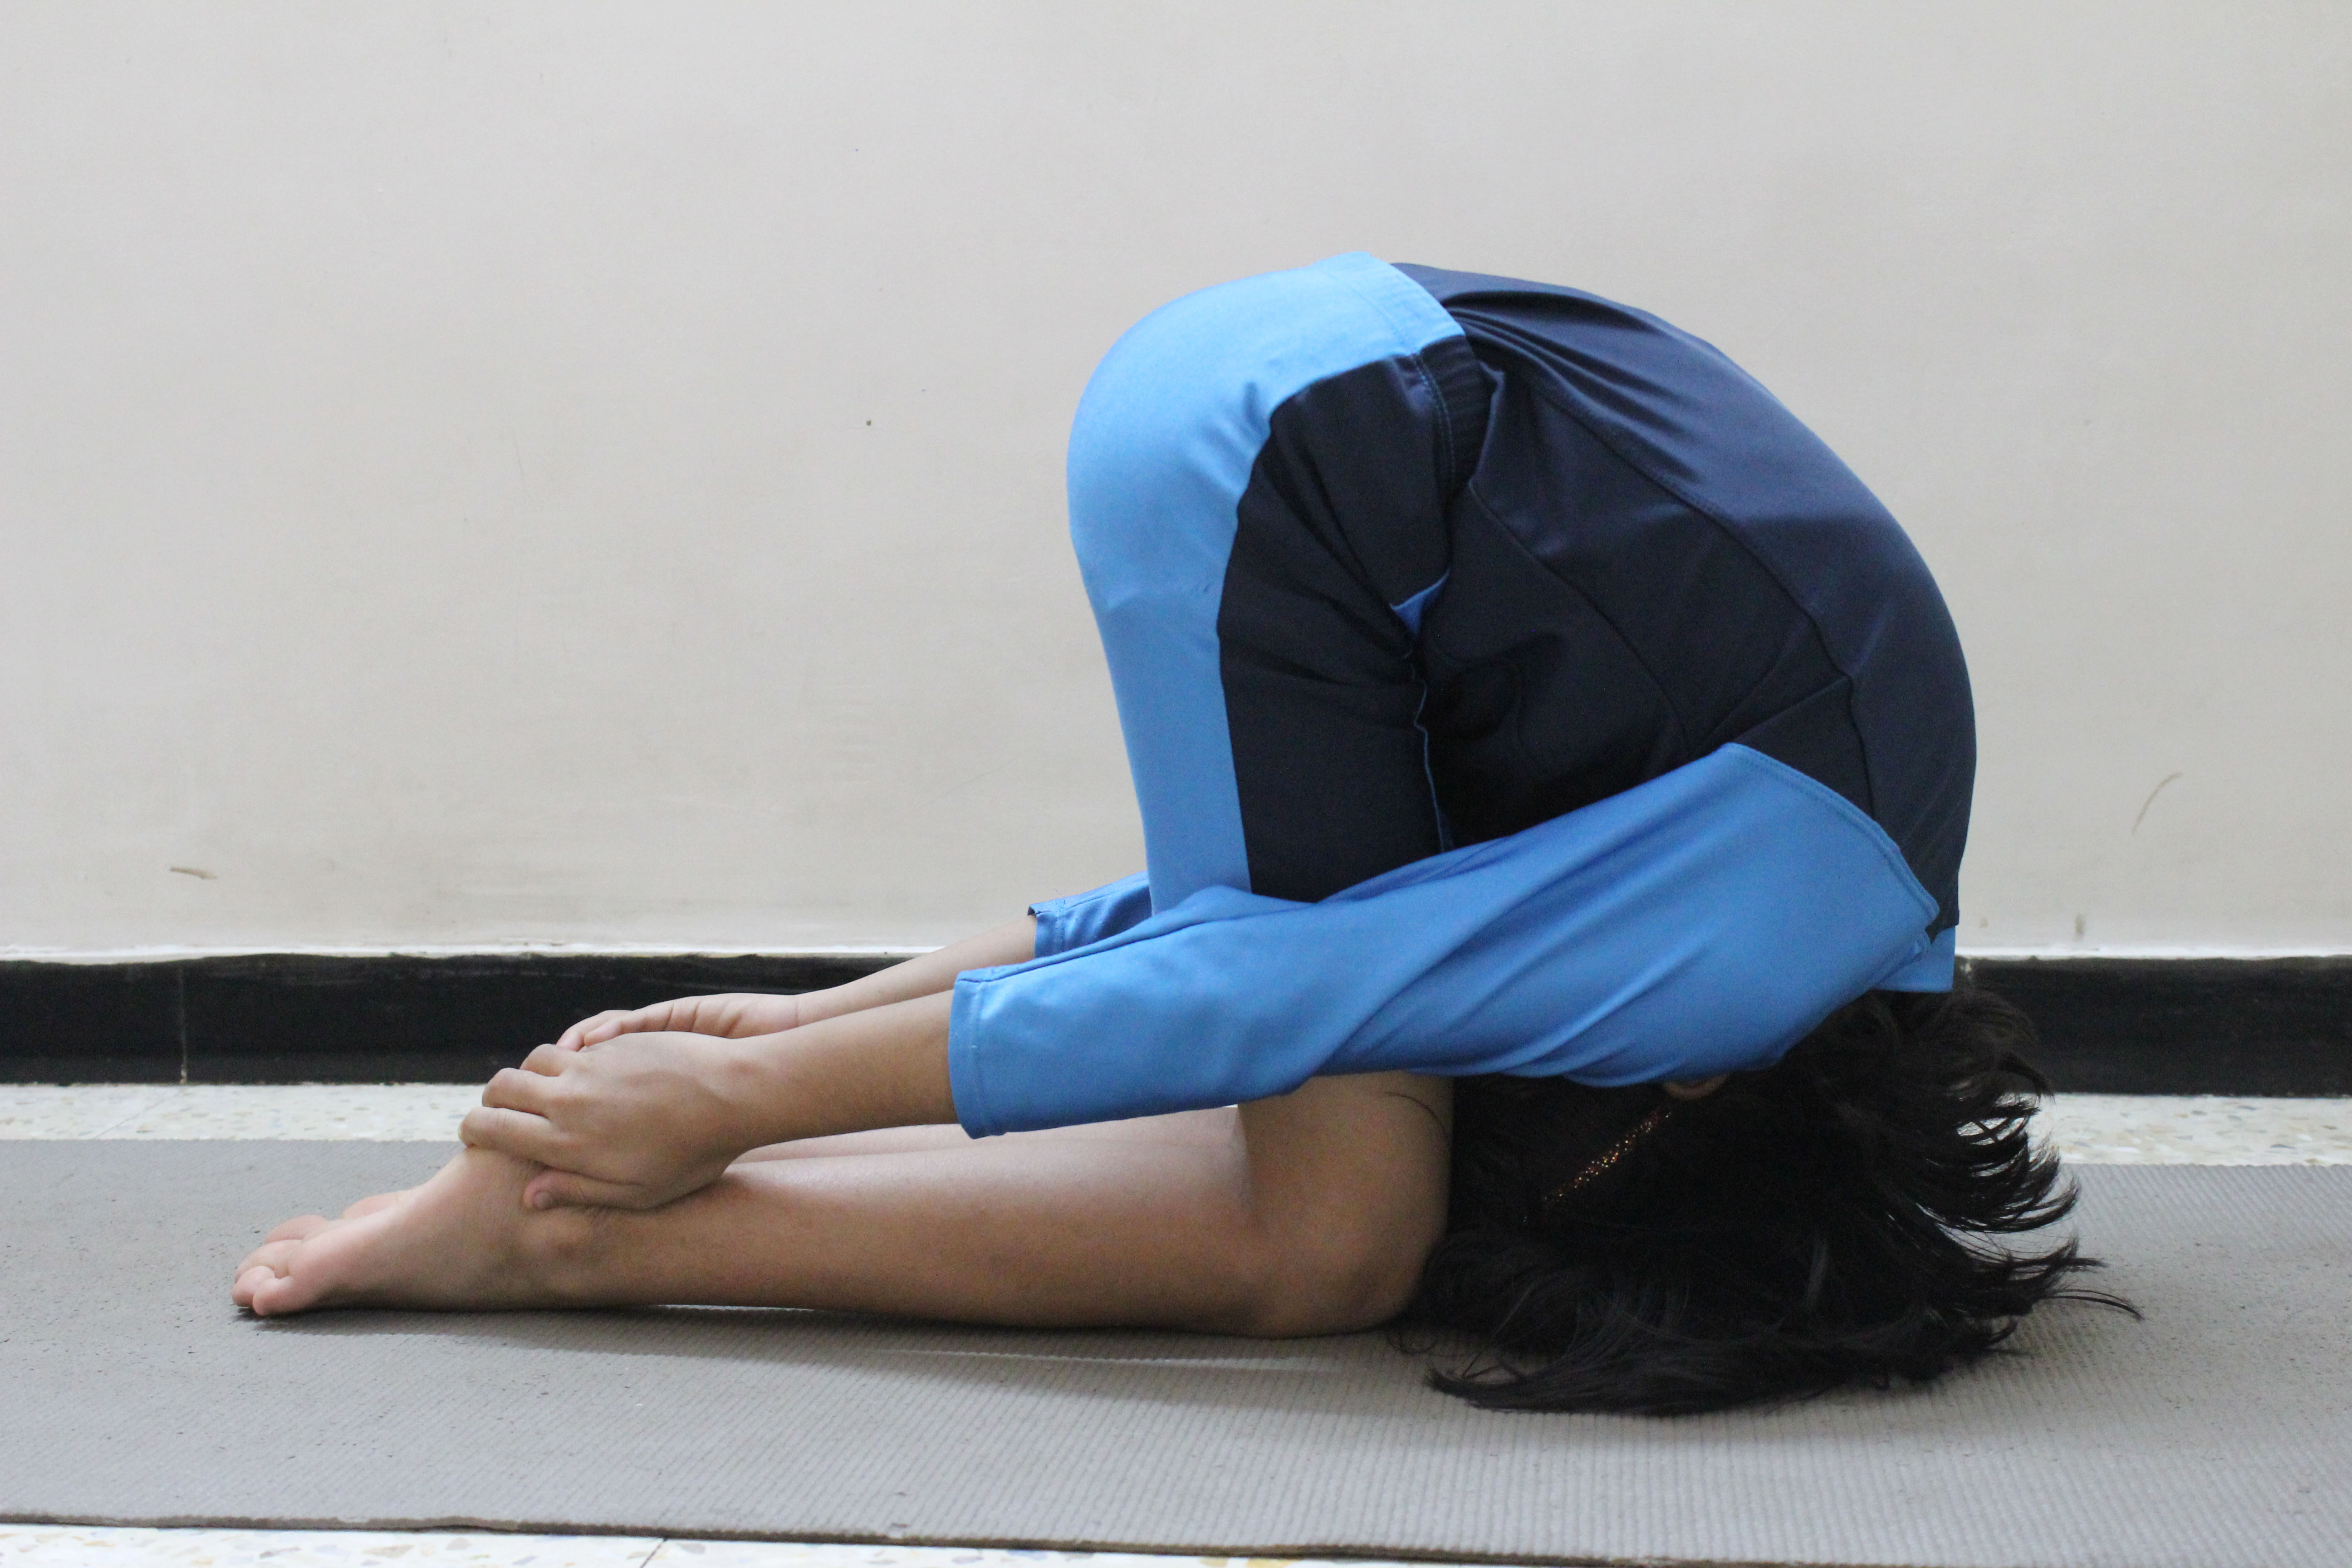
In Sanskrit meaning of Bala is ‘child’ and the meaning of Asana is seat, pose or posture. This Asana is a counter posture for different asanas and is normally attempted prior and then afterward Sirsasana. Balasana is a curve or bend pose, which extends and discharges the spine and lower back. You can utilize this posture as a warm-up represent, a resting posture or a counter stance for a back bend exercises.
In this asana, the body confronts the floor in a fetal position. The knees and hips are bowed with the shins on the floor. In this your chest can lay either on the knees or the knees can be spread to about the width of a yoga tangle, permitting the mid-section to go between the knees. The head is extended forward towards the ground – the brow may touch the ground. The arms might be extended forward before the head or in reverse towards the feet.
You ought to encounter your spine stretching when you drop the heaviness of your hips to your heels and keep your head to the floor in a relax way. Inhale equitably all through the Pose and envision your body resting with each inhale. Extend your arms forward as opposed to keeping them alongside you to extend the shoulders and Place your forehead on the on your collapsed (folded) arms to lessen the weight on the temple(forehead) or to empower your temple to touch the floor This posture is exceptionally agreeable and ok for all aside from the general population with knee issues or hypertension Keeping a support between the knees to keep put abdominal area, arms and head will make the stance more agreeable and helps pregnant or large individuals Placing a thick cover between the heels and posterior and sitting on it will help you to sit, while diminishing the strain on knees and hips.
Steps of Balasana (Child yoga Pose)
First sit straight and comfortably in Vajrasana or table pose with your spine erect.
Now breathe out gently and try to bend your body in forward direction towards your thighs.
After that try to touch the floor by your forehead.
Place your hands in forward direction in a way that they ought to totally lay on the ground and ought to be casual (Your hands should be adjacent to your feet and keep your hands to back direction just near to heels with palms facing up).
As you touch the floor by your forehead, just close your eyes and start counting your breath. Breathe in and breathe out slowly at that moment.
Try to hold your body in this posture for up to 2 minutes (Day by day increase the time).
By inhaling release the pose and get back to your initial position or Vajrasana rest for while and repeat the pose about 3 to 5 times (During the process don’t give any strain to your body).
Benefits of Balasana (Child Yoga Pose)
It stretches your lower back and relaxes spine.
It strengthens and stretches your thighs, ankles and muscle of hips.
It gives calmness to mind, and slower down the level of stress and fatigue.
It is useful in back pain.
NOTE
Avoid this Asana in knee injury, joint pain or high blood pressure problem. Pregnant women do not perform this Asana. Perform all the Yog Asana and Pranayama in under the supervision of an expert person or teacher.
14
Bhujangasana
Bhujangasana
Bhujangasana
{Cobra Pose}
-Steps And Benefits
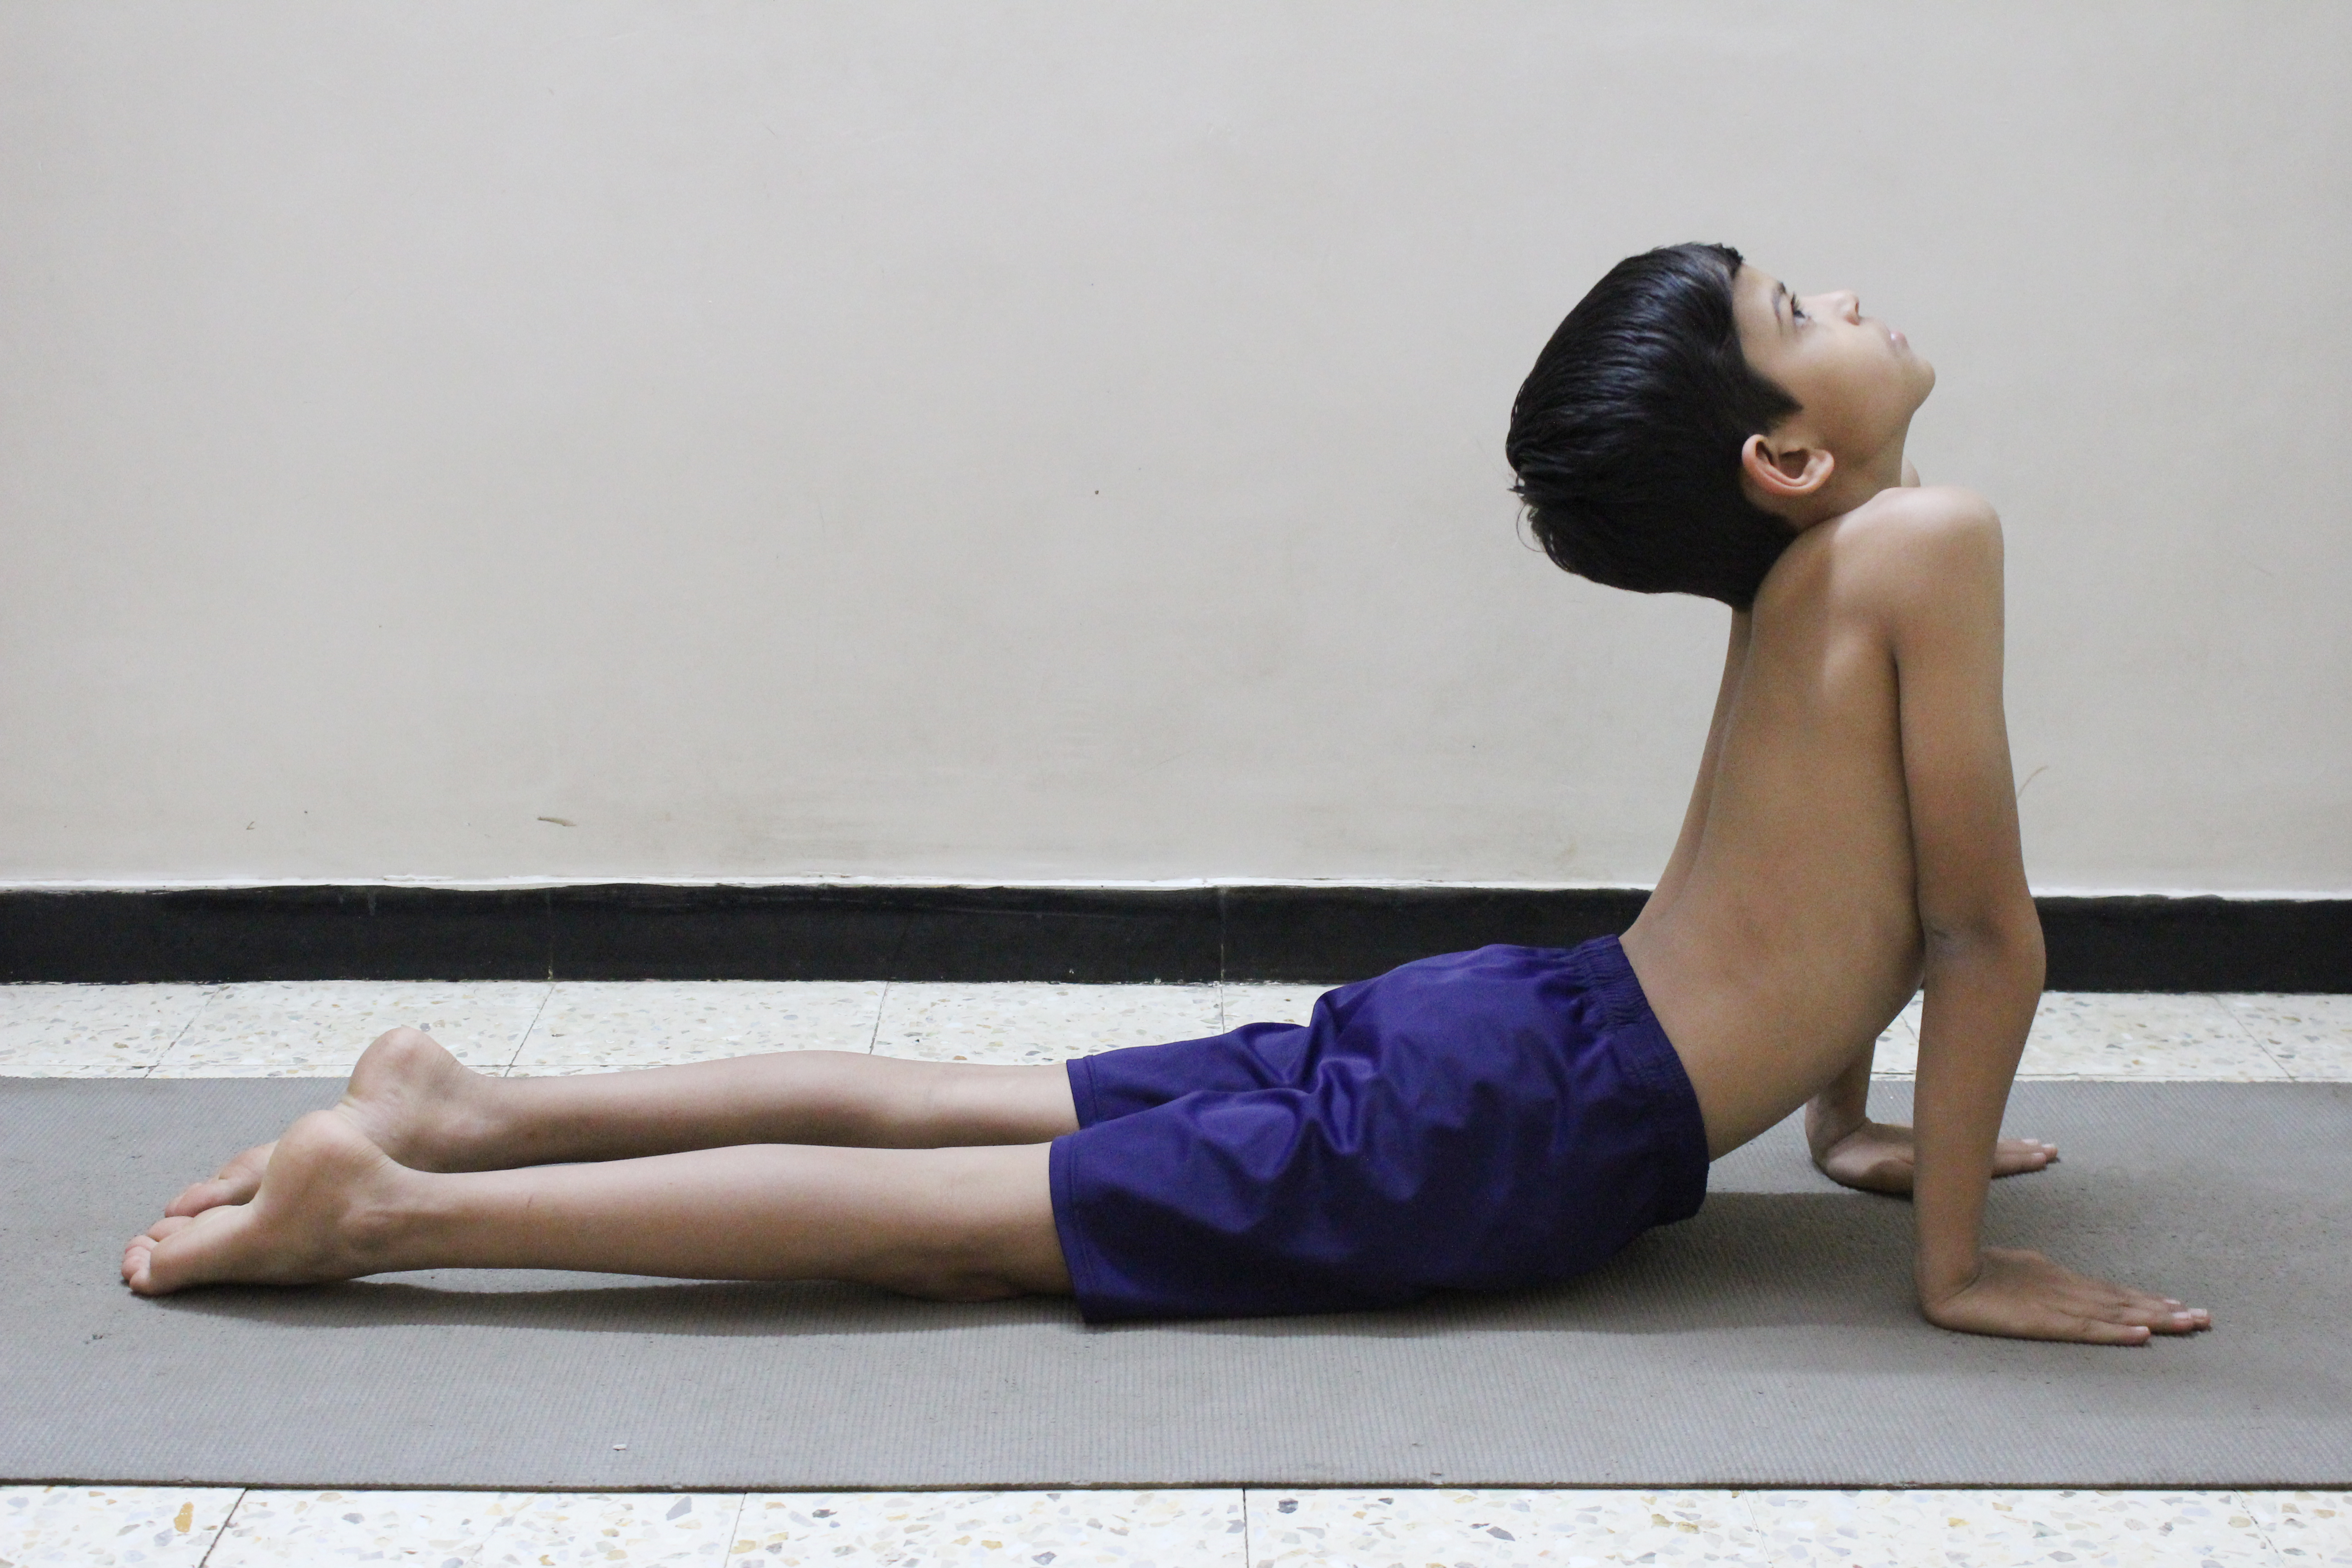
There are so many types of different Asans in Yoga, all the asans have their different – different body pose and benefits. Bhujangasan is one of them, it’s very easy but important Asans. First of all we described the meaning of the word “Bhujanga” The word Bhujanga is comes from the Sanskrit word Bhujanga, means snake and asana means pose, in English we called it as Cobra pose.
Pronounciation of this word is – “Bhu-jang-GAHS-anna. If you spent some time to doing this Asana daily, This can help to kicked out stress, anxiety and depression also from our Mind and it’s increases the capability of our body and strength also. This invigorating backbend was named such because Bhujangasana reflects the posture of a cobra that has its hood raised. If you spent some time on doing this Asana, this can helps you to make your mind free from Stress, depression, and anxiety. If you do this Bhujangasana daily this can helps to improve the strength and capabilities of your body and main thing is that it’s free of cost, just you have to add this to your habit and in your lifestyle also. This fundamental yoga pose stimulates the digestive and reproductive systems, strengthens the lungs and opens the heart. In this section we are trying to tell you simplest steps, benefits, cause and contradiction for this Asana.
Preparation steps for Bhujangasana : –
first of all you have to wear some comfortable clothes, remember don’t wear tight and uncomfortable clothes while doing any asana. Setu Bandha sarvangasana etc is preparatory poses Bhujangasana.
Start with lying down on the floor on your stomach in a comfortable level preferably on yoga mat. Keep your feet together with the tops of them against the floor.
Now spread your hands on the floor under your shoulders and hug your elbows against your rib cage. After doing this close your eyes, and inhale slowly but deeply. Imagine the stability in your pelvis, thighs and your feet tops. Imagine, that part rooted to the ground.
Exhale gradually before opening your eyes, continue breathing process (Inhale- exhale) slowly and deeply. As you inhale, your arm should be steadily straighten and this feels uncomfortable. Extend through and deepen your stretch to create a gracegul arc in your back. Use the stretch in your legs and back, in place of exerting yourself to gain height and risk overarching the spine.
Now press your tailbone towards your pubis and lift your pubis toward your navel, in this trying to narrowing your hips.
Keep your shoulders broad but in relaxed, with the blades low on your back. Now lift from the top of your sternum, but try to avoid pushing the front of your ribs forward. Puff your side ribs forward and keep your lower back in relaxed, and trying to distribute the stretch evenly along your spine. In the process of up and down, inhale when your bent upwards and hold your breathe for few seconds and in down position exhale. In upward position trying to hold and your breathe also for some seconds, and release your breathe while getting back to starting position or lying down position.
Upward Position
Benefits of Bhujangasana : –
This Asana helps to stretches muscles in the shoulders, chest and abdominal also. It decreases stiffness of the lower back, and it’s give strengthens the arms and shoulders.
It increases flexibility, improves menstrual irregularities in women. Elevate mood, and this can also helps in stress, depression, anxiety keep away from our mind. It firms and tones the butt area.
Improves the blood circulation and oxygen in body, heart and throughout the spinal and pelvic region especially, and it’s stimulates organs in the abdomen, like kidneys. It also opens the chest and helps to clear the passages of the heart and lungs.
Improves digestion. Gives strengthens to the spinal cord. Help to soothes sciatica. It also helps to cure the symptoms of asthma.
Caution and Contradiction : –
People who is suffering from back injury are advised to not to do this. Carpal tunnel syndrome, headache and in case of Pregnancy do not try this.
Bhujangasana Tips for Beginner’s : –
Do not over do the backbend, avoid straining your back to find the height at which you can feel comfortable, if you feel uncomfortable than take your hands off the floor for a few moment, by which the height you find will be through extension.
Note
Do or try this exercise in under the Yoga instructor.
Friends do this exercise daily. It will not do if you try this asana for once only. If you really wants to be fit and healthy and do it daily. Avoid late night working and fast food.
15
Bitilasana
Bitilasana
Bitilasana
{Cow Pose}
Asana type: – Chest opener, Backbend
Level of Asana: – Basic
-Steps And Benefits
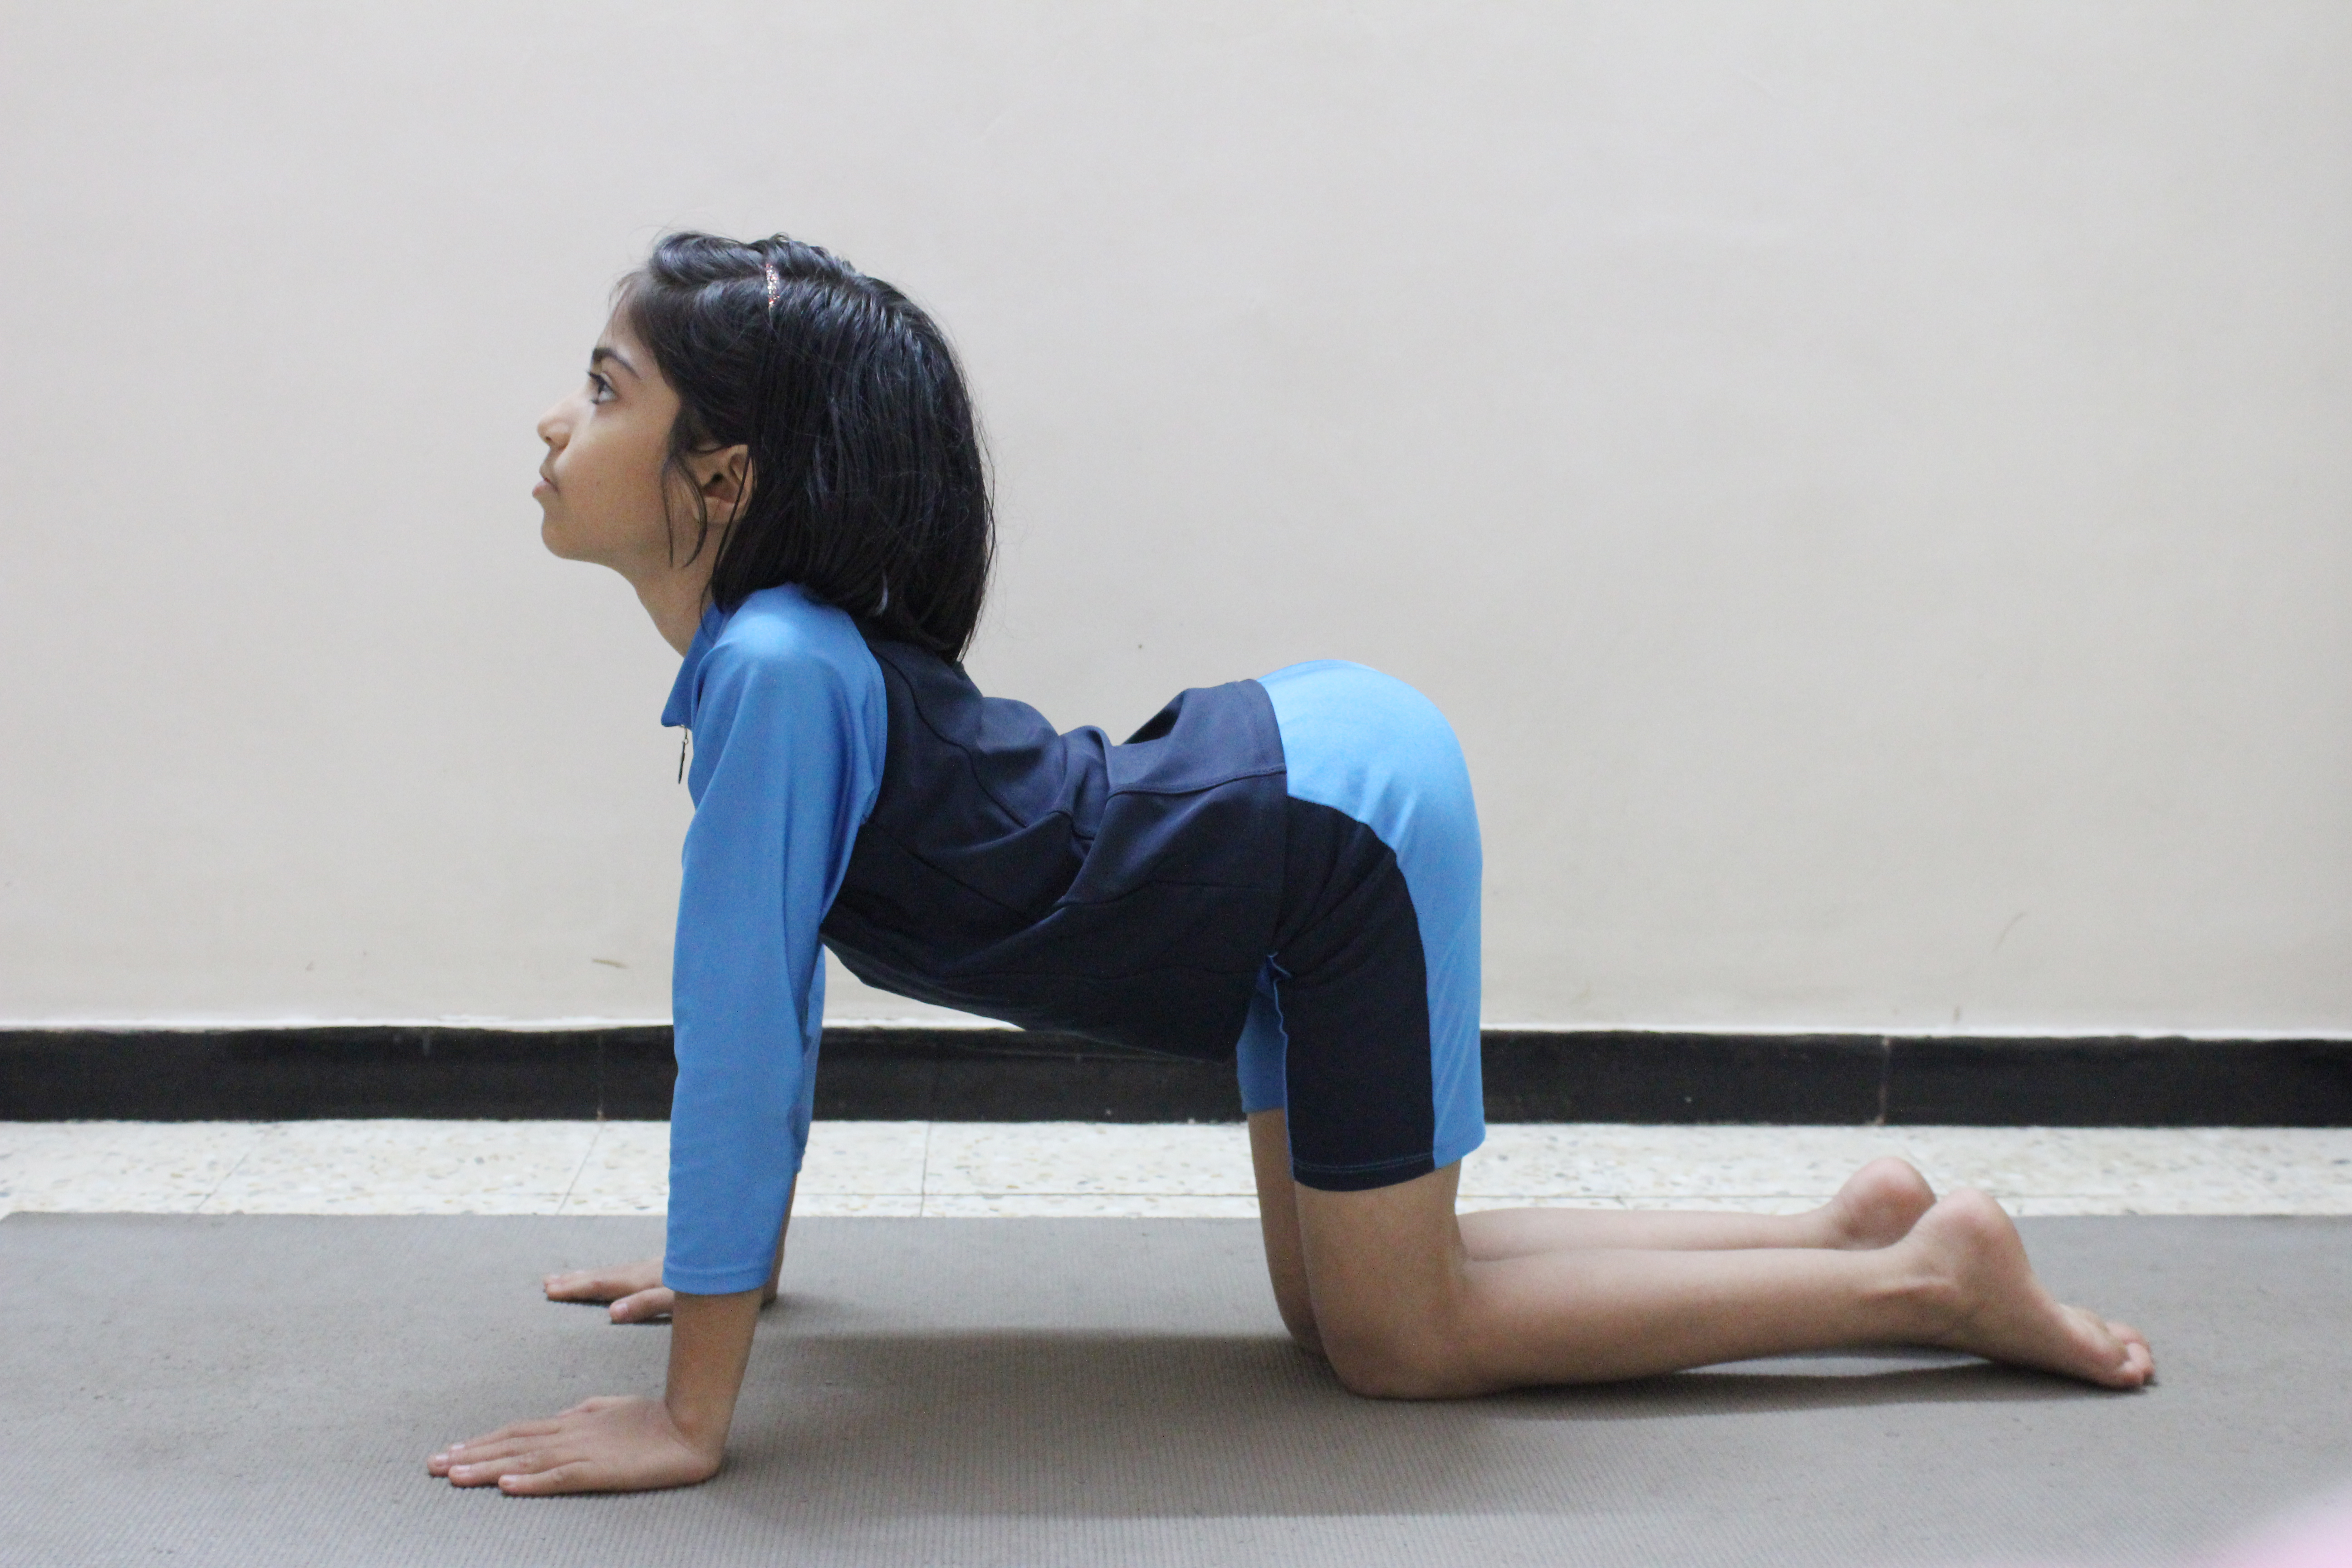
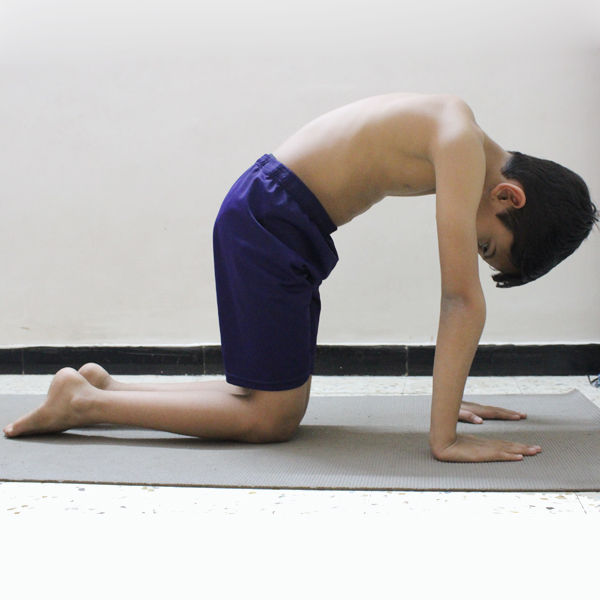
In Sanskrit the Word Bitila means “cow” and the meaning of Asana is Seat, pose or posture. If you practiced Marjariasana in earlier stage, then you easily perform this. Bitilasana is similar to the Marjariasana one of the two steps. In Marjariasana you moved up and down your back and tummy. But in Bitilasana you have to only keep down your spine and your head should be little bit lift up. You can also perform the Cow and Cat pose at the same time.
Steps of Bitilasana (Cow Pose)
First get into the position of Tabletop position.
Ensure that your knees are kept right under your hips.
Keep your wrists in the same line to your shoulders.
Keep your head in normal position, gazing towards the floor.
Breathe in, and raise your hips up towards the roof at the time that you open your chest.
Now let down your stomach towards the ground.
Raise your head up and gaze in forward direction.
Remain in the position for 15 to 20 seconds.
After that, exhale and come get back into the starting position.
(Bitilasana is a mixture of two movements. One movement is mentioned above and other is countermovement which is as follows: – Breathe out and down your chin towards your chest in the time that you arch your back and relax your buttocks same as the one step of Marjariasana).
Perform the movement and countermovement (Marjariasana step) about five to six times before you come to your initial position.
Benefits of Bitilasana (Cow Pose)
It stretches your chest and neck.
It strengthens your lower and upper back.
It stretches your abdominal area.
It increases the flexibility of your spine.
It gently massages the internal belly organs.
It helps to stretch your neck and the front part of your torso.
It is a stress relieving Asana.
Helps to increase the blood circulation throughout your body.
It tones and relieves the stress from your spine.
Best for back pain and sciatica.
Preparatory poses: – Viparita Karani
Follow-up poses: – Cat Pose or Car stretch (Marjariasana)
Tip for Beginner’s
As a learner, you have to protect your neck when you performing this pose. For this, widen your shoulder blades and pull down them, away from your ears.
NOTES
In severe neck pain or injuries avoid this asana. Don’t crunch your neck too much in upward direction if you have sensitive neck. For this, just look straight. First of all warm up your body and then perform Asana. Please perform Aasan and Pranayama under the supervision of an expert trainer, if you have some medical issue then consult a doctor before performing any exercise.
16
Chakrasana
Chakrasana
Chakrasana
{Wheel Pose}
English name: – Wheel pose
Sanskrit name: – Chakrasana
Pose type: – back bend, stretch, inversion, balance.
Body position: – Supine
Level: – Advanced
Another name: – Urdva Dhanurasana ( Upward-Facing Bow Pose).
Preparatory pose :-
Bhujangasana
Setu Bandha Sarvangasana
Urdhva Mukha Svanasana
Virasana
-Steps And Benefits
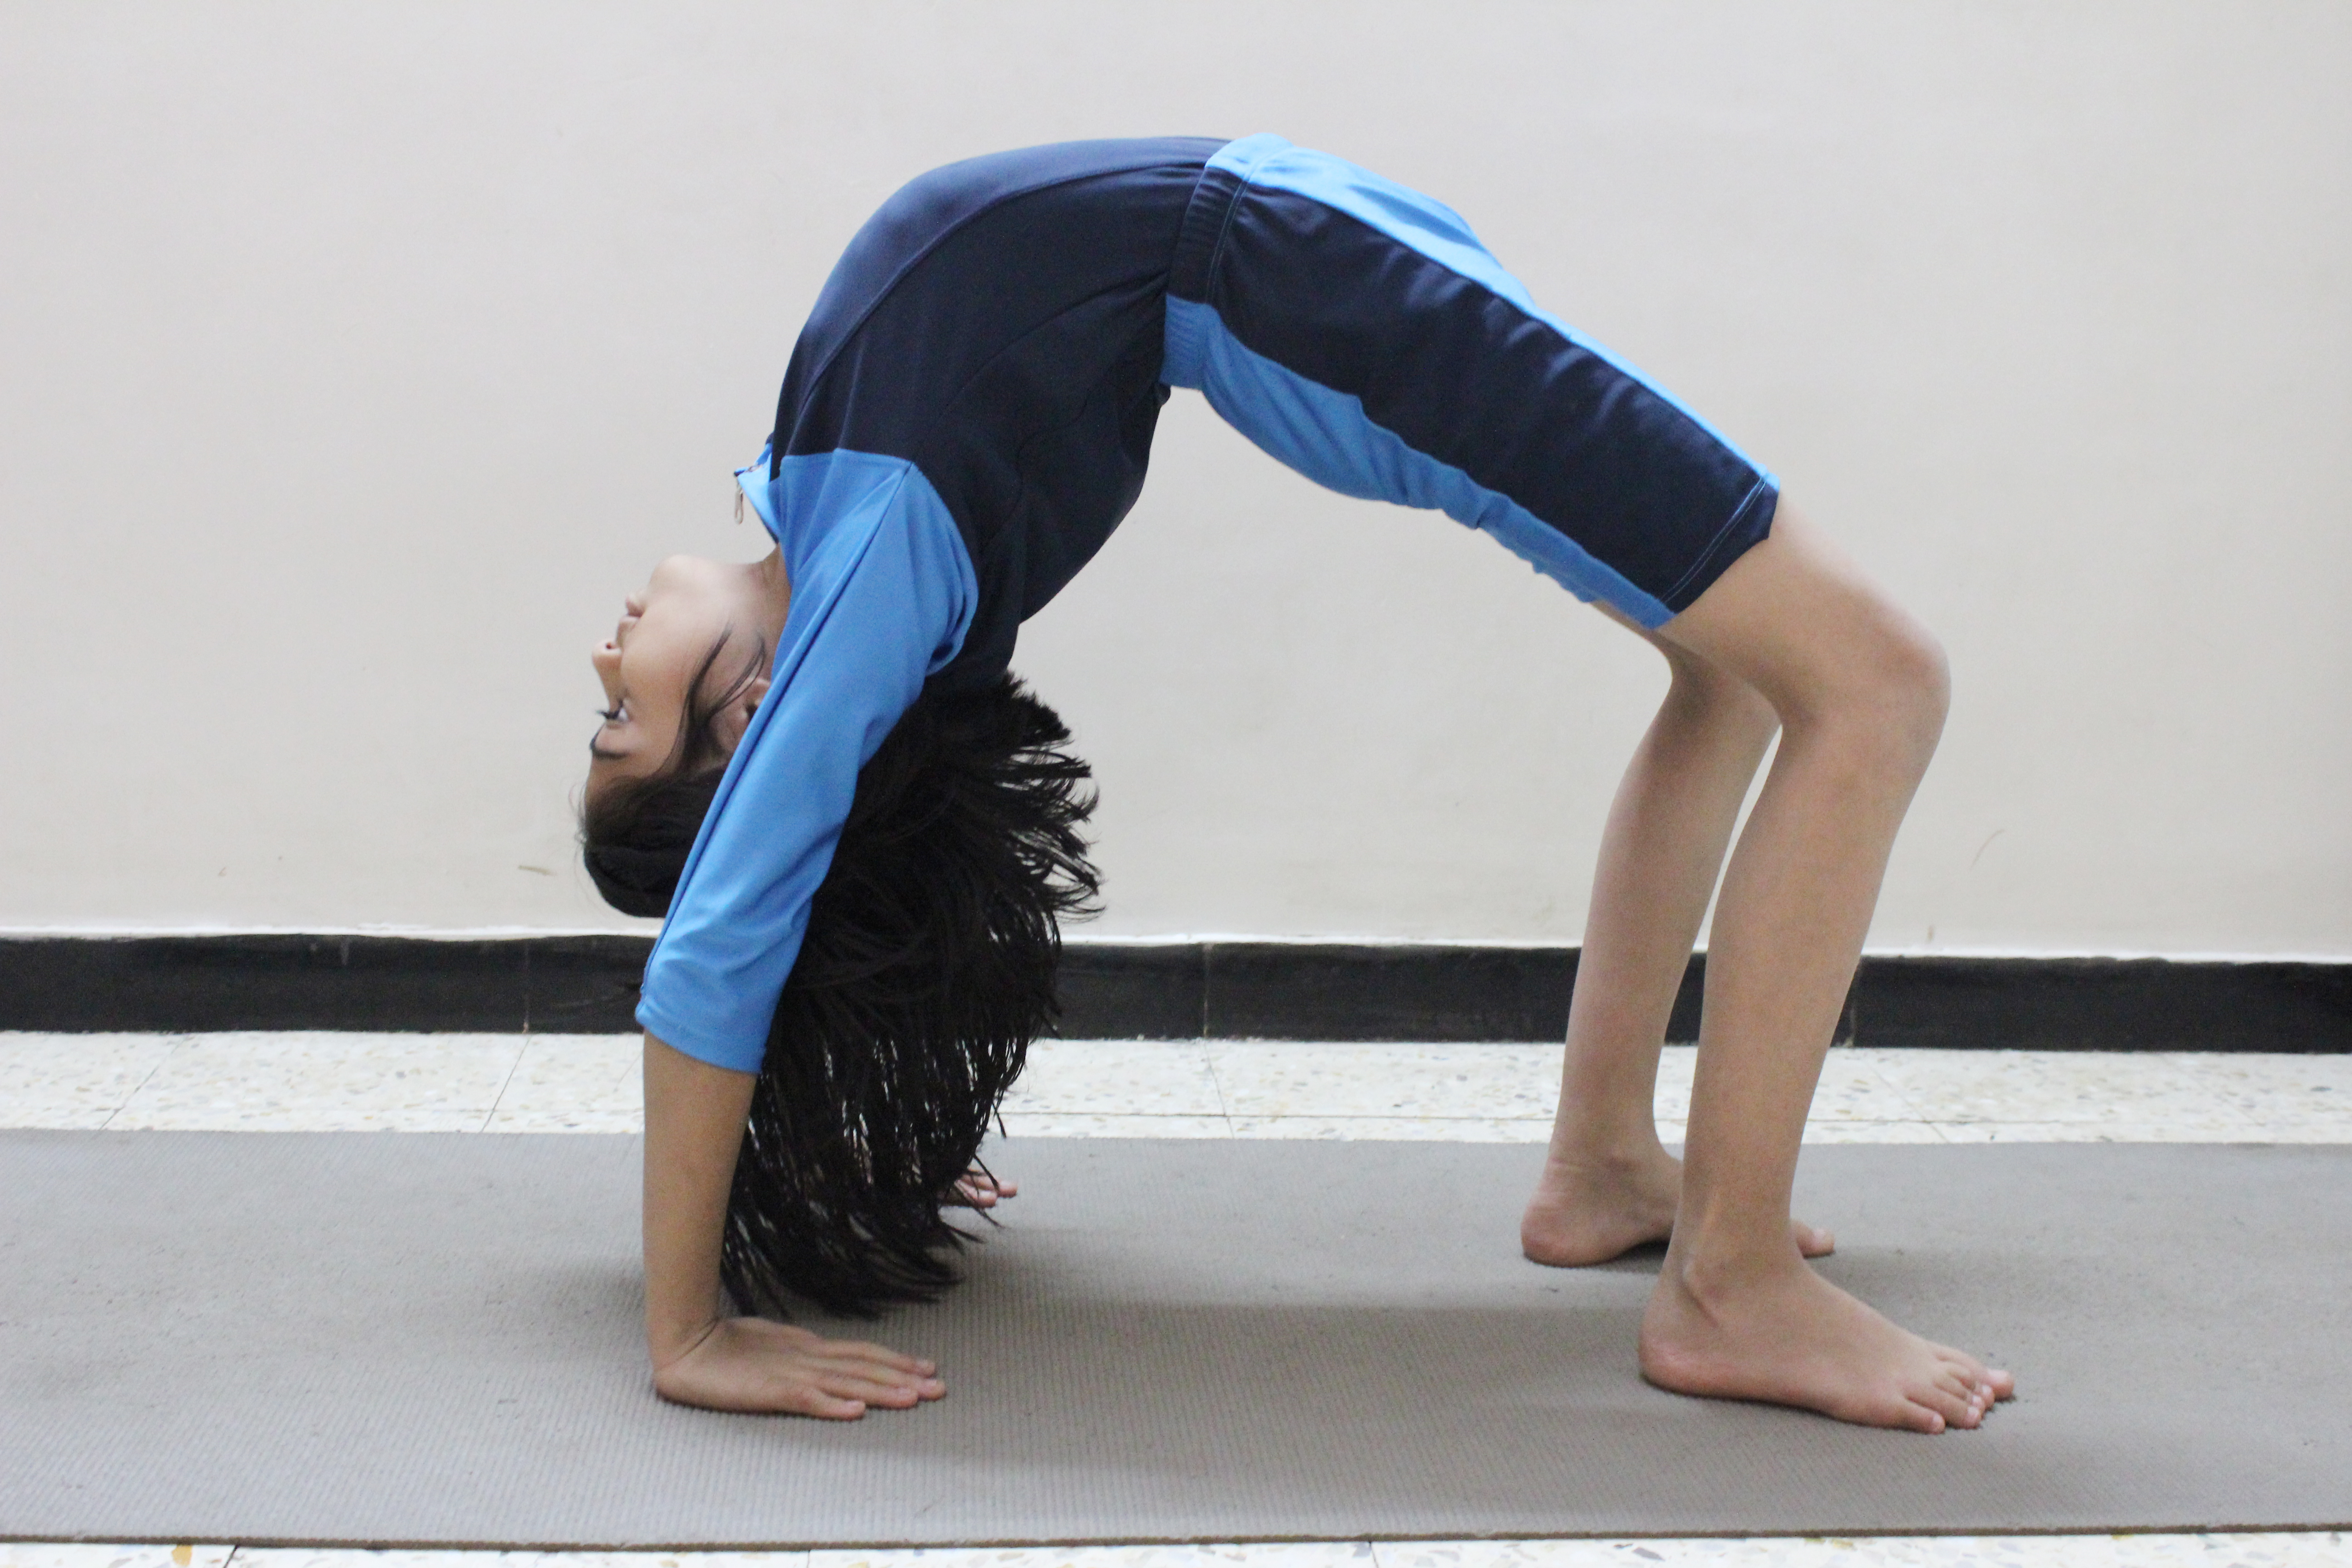
The name “Chakrasana” comes from the Sanskrit words “Chakra” which means wheel, and meaning of Asana is “Posture” or “seat”. Chakrasana or the wheel pose is a backward bending yoga asana. Chakra in Sanskrit means Wheel. In chakrasana, the final position looks like a wheel, hence the name. It gives great flexibility to the spine. It is called chakrasana since the body takes almost a wheel-like, semi circular posture while performing this asana.
Steps of Chakrasana
Lie down on your back with feet apart ,bend your knees and place your feet on the ground close to your body.
Now bring your palms under your shoulders such that the fingers point towards the shoulders and the elbows are shoulder width apart.
Inhale and press your palms firmly into the floor.
Lift your shoulders and elbow firmly into the floor
Your Feet should be pressed firmly into the floor.
Inhale and lift your hips up.
The spine should be rolled up so that it may seem to resemble a semi circular arch or wheel.
Straighten out your arms and legs as much as possible so that the hips and chest maybe pushed up.
Hold this pose for at least 15-30 seconds.
To go back to original, bend your elbows to lower your head and shoulders to the floor.
Then bend your knees and bring your spine and hips back to the ground and relax.
Benefits of Chakrasana
Strengthens liver, pancreas and kidneys.
Excellent for heart.
Good for infertility, asthma and osteoporosis.
Strengthens arms, shoulders, hands, wrists and legs.
Stretches the chest and lungs
Strengthens the arms and wrists, legs, buttocks, abdomen, and spine
Stimulates the thyroid and pituitary glands.
Increases energy and counteracts depression.
Cautions of Chakrasana
Do not try this Asana in case of back injury.
If you are suffering from heart problems, then don’t try this.
Headache, Diarrhea and carpal tunnel syndrome.
High or low blood pressure.
Do not perform this if suffering from any cardiac or spinal problems.
Avoid if suffering from hernia.
17
Chaturanga Dandasana
Chaturanga Dandasana
Chaturanga Dandasana
{Four-limbed staff pose}
Name: – Chaturanga Dandasana
Meaning: – Four- limbed Staff pose
Preparatory poses: – Phalakasana, Urdhva Mukha Svanasana, and Bhujangasana
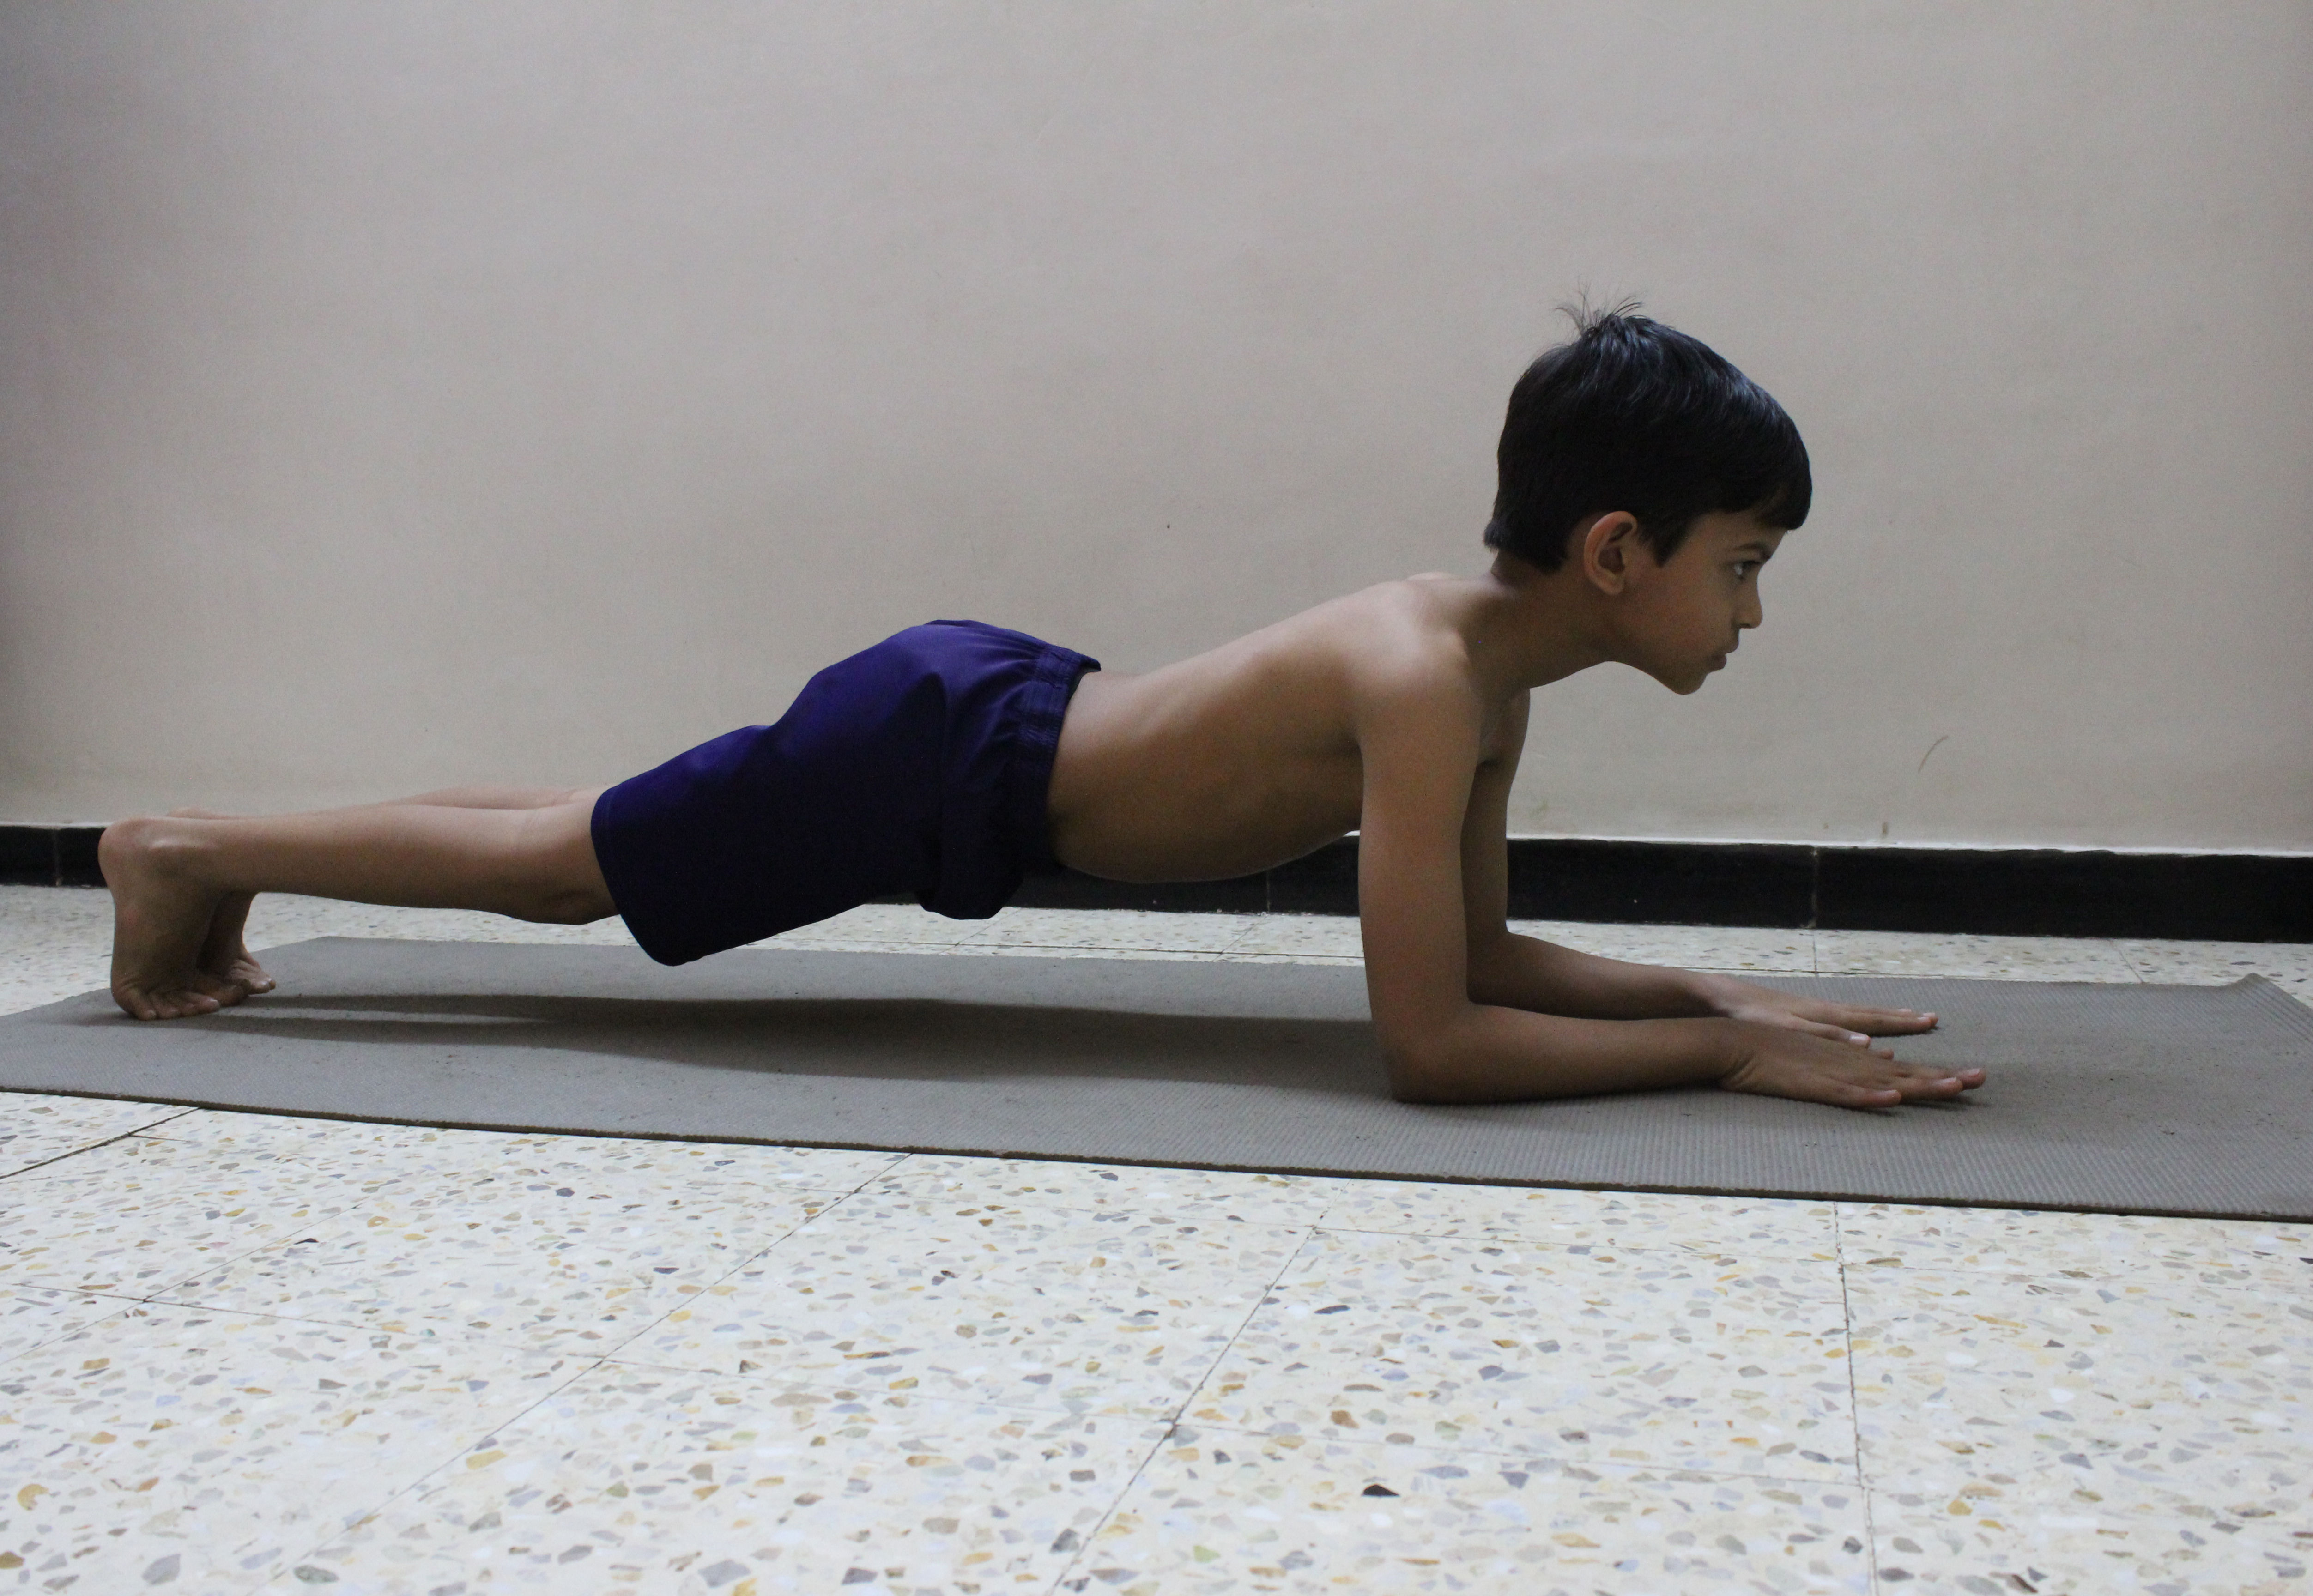
The word ‘Chaturanga Dandasana’ is comes from Sanskrit, in which the meaning of Chatur is “four”, Anga means “limbs”, danda means “staff” and meaning of Asana is seat, pose or posture. In this pose our both hands and both legs are used so that’s why this is called four- limbed staff pose and also known as low plank pose.
In this Chaturanga Dandasana you have to keep your body parallel to the floor and which is supported by your toes and palms with elbows at a right angle but not touching the floor. Chaturanga Dandasana looks much like a push up pose, but with the hands very low (simply over the pelvis), and the elbows kept in at the edges of the body.
Steps of Chaturanga Dandasana
First take a position of Downward facing dog pose (Adho Mukha Svanasana) after that come into plank pose (Note that your shoulder bones are pushed immovably against your back and that your tailbone is pushed towards the pubis.)
Keep your arms fully extended and keep your spine completely erect.
Breathe out, bend your elbows and keep down your lower body towards the ground but not touching it, stop at a point when you are few inches away from the floor or ground.
Keep your body parallel to the ground and your hips ought to be straight. Turn your legs inward during this position.
Keep wide space between your shoulder blades.
Your elbows ought not be spread outwards but rather be pushed back downwards towards the heel.
Assure that your neck is adjusted straight with the rest of body and press the base of your forefingers to the ground.
Remain in this position for around 10-30 seconds and after that breathe out and rests gently on the floor.
Repeat this process for 3 to 6 times.
(Try not to sink your middle beneath the elbow level since this puts a considerable measure of weight on the elbow joints. While doing this attempt to bring your mid-section up and convey the heaviness of the body just as between the upper and the lower body – push your heels back.)
Modifications: –
If you are unable to attempt this Asana properly, in that case you can keep your knees on the floor.
Benefits of Chaturanga Dandasana
Strengthens Arms, wrists and abdomen.
Beneficial for those people who are suffering from back problems because it strengthens the back muscles.
Boost the flexibility, balance and stability.
Makes your triceps and biceps strong.
Gives strength to the muscles of the wrists.
It tones the abdomen.
Gives strength to the core abdominal muscles.
NOTE
Pregnant women and people having wrist injury or in case of carpal tunnel syndrome avoid this. Do yogic activities in proper way under the supervision of expert.
18
Dandasana
Dandasana
Dandasana
{Staff Pose}
Sanskrit Name: – Dandasana.
English Name: – Staff pose.
-Steps And Benefits
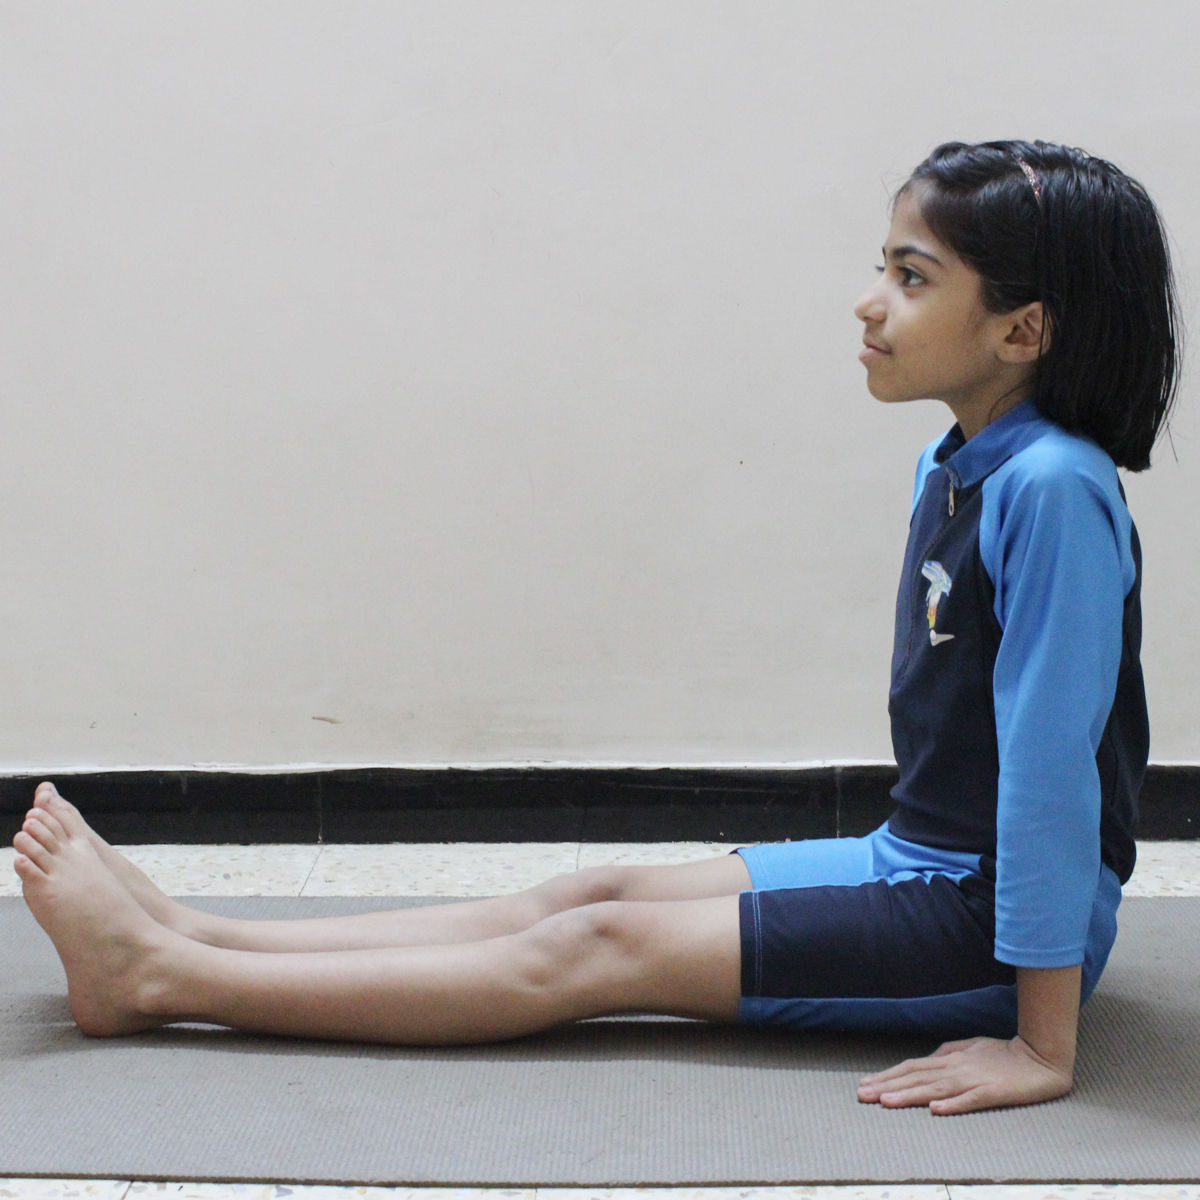
The word “Danda” comes from the Sanskrit word which means stick and the meaning of Asana is Posture. In this Pose you have to keep your feet straight in sitting position. This is the simplest Asana to do for all age groups. Dandasana is also known as Staff pose. It teaches you to sit down with correct posture. Daily practice of this often can create your hips and pelvis a lot of versatile and strengthen the lower back. Your higher body ought to be erect however relaxed whereas the lower portion ought to be grounded. You’ll be able to sit on a blanket to stop the stiffening of the hips still as preventing the rounding error of lower back and alignment of spine. You’ll be able to use the wall for supporting the rear if you’ve got back issues or realize it troublesome to carry the create
Steps of Dandasana
Sit on the ground with back straight and legs extended come in front of you. Your legs and feet ought to be hip breadth apart and parallel.
Press the sitting bones within the floor and purpose the crown of your head to the ceiling to lengthen and straighten the spine.
Flexing your feet, press out through your heels.
Keep your palms on the ground adjacent to your hips for supporting your spine and quiet your shoulders down. Keep your body part straight however relaxed.
Ground your lower half firmly to the ground by relaxing the legs.
Hold this pose for twenty to thirty seconds.
Variations to the exercise of Dandasana: –
Stretch the higher body during this pose, alter the pose as follows: interlacing the fingers, stretch out your arms forward, parallel to the ground. The palms ought to face far from you with thumbs in downward direction. Currently inhale and lift the arms upward until they reach slightly behind the ears. Shoulders ought to be relaxed. This helps in opening up the chest and stretches the front of the abdomen.
Benefits of Dandasana: –
Teaches you to sit properly.
It will increase the flexibility of the hips and pelvis.
It improves the posture of lower back.
19
Deviasana
Deviasana
Deviasana
{The Goddess Pose}
-Steps And Benefits
Deviasana is also known as Utkata Konasana or Fiery Angel. Practicing Deviasana will generate not only creativity, but also emotional stability. Utkata Konasana (Deviasana) plays a part in enhancing fertility as it balances out the chakra.
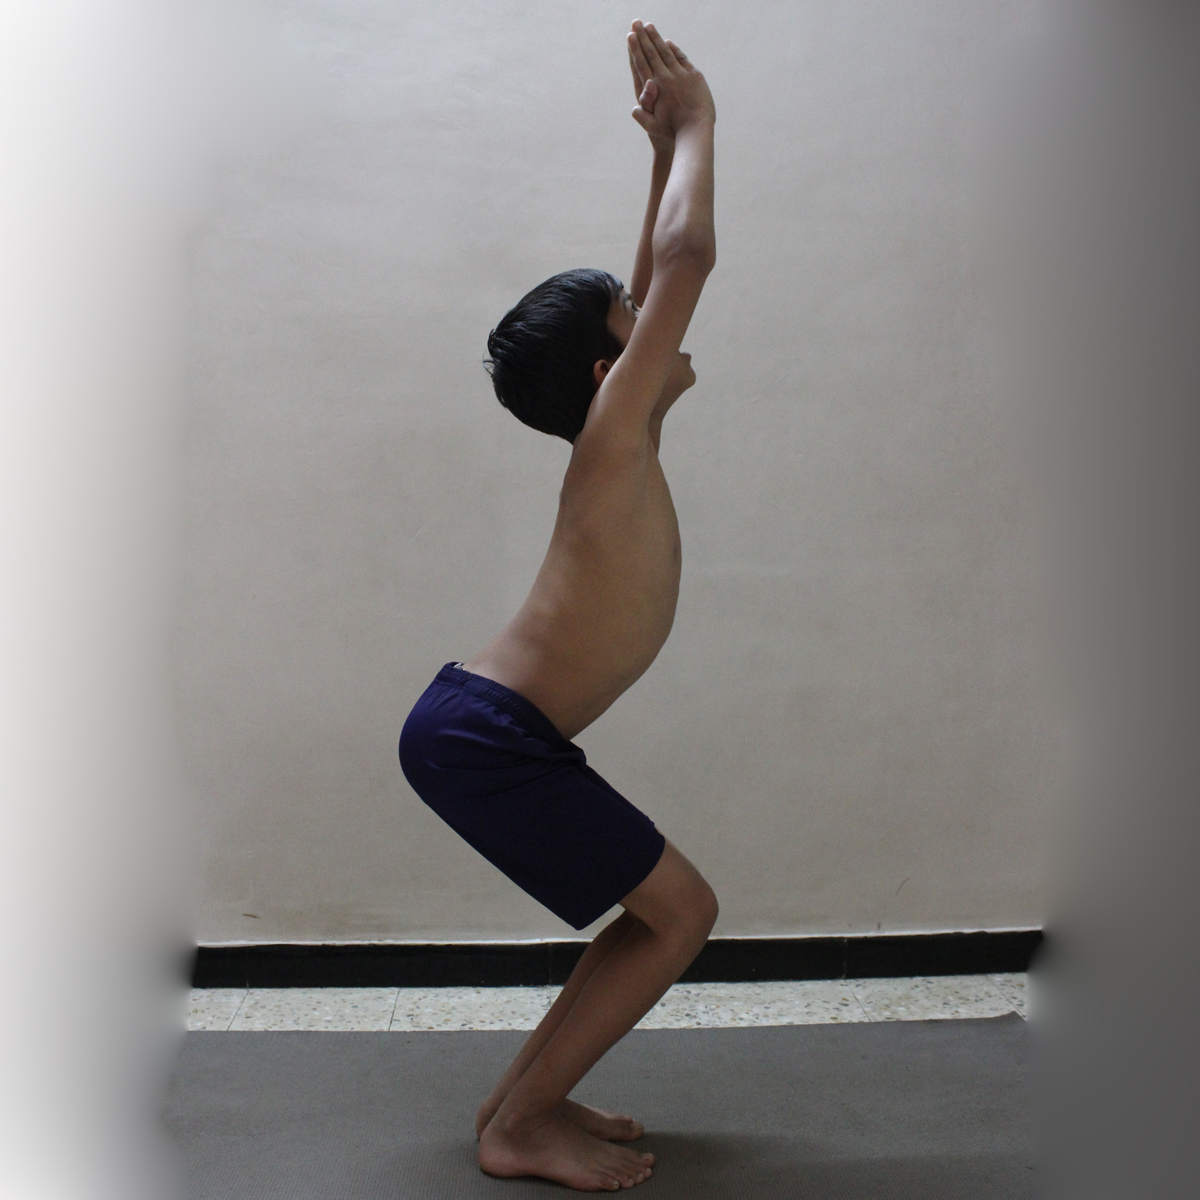
Steps of Deviasana (The Goddess Pose)
First get into the position of Tadasana (mountain pose or palm tree pose).
Keep your arms in the resting position to the side of your legs.
Stretch your feet and place a distance of four feet.
Now twist your both toes in an outward direction and take a long breath.
At the time that you breathe out, bend your knees, and ensure that they are over your toes.
Now lower down your hip into a squat. Keep your thighs parallel to the ground or floor. (This can be happen when you practice squatting, once you perfect with squatting you are comfortable with this.
Now spread out your arms to the side of your shoulders. (Try to keep you arms at your shoulder’s height). Your palms should face downwards.
After that, slowly put your palms together and make a Namaste mudra and keep them close to your chest. At that time keep your forearms at a 90-degree angle.
Ensure that the tailbone is tucked in along with your hips which are pressed forward at the time that your thighs are drawn at the back.
Your knees should be parallel with your toes.
Keep your shoulders softened at the time that you gaze into the skyline.
Remain in the pose around 30 to 60 seconds.
When you feel uncomfortable gently down your arms and get back into the starting position of Tadasana.
Repeat this for 4 to 6 times.
Benefits of the Deviasana (Goddess Pose)
It stretches groins, hips and your chest.
It tones and strengthens your core muscles.
It strengthens your muscles of inner thighs and quadriceps.
It strengthens your arms, upper back and shoulders.
It generates heat to your body and improves the blood circulation.
It creates more space in the pelvis which is beneficial for women during childbirth.
NOTES
If you got recent injury in your back, hips, legs or shoulders; then avoid this Asana. In high blood pressure don’t perform this asana coz this asana generates heat to your body. If you have medical issues; then it is best to consult a doctor before doing this Asana. Always perform Asana and breathing exercises under the supervision of an expert yoga trainer.
20
Dhanurasana
Dhanurasana
Dhanurasana
{Bow Pose}
English name: – Bow pose.
Sanskrit name: – : ??????? (Dhanurasana)
Pronounciation: – DAH-noo-RAH-sah-nah.
Another name: – Urdva chakrasana (Upward wheel pose).
-Steps And Benefits
The name “Dhanurasana” comes from the Sanskrit words Dhanura which means “bow” and Asana means “posture” or “seat”.
This body posture of this is named after the shape it takes-that of a bow. Dhanurasana is also sometimes linked with upward wheel pose or Urdhva Chakrasana. The Bow or Dhanurasana raises both halves of the body at once, combining the movements of the Cobra and Locust, and countering the Plough and the Forward Bend, same as like an archer stringing a bow. In this you use your hands and arms to pull your trunk and legs up together to form a curve. It tones back muscles and maintains the elasticity of spine, improving posture and increasing vitality.
Steps of Dhanurasana
Lie on your stomach
Hold your both feet with your hands making a back bend and positioning like a bow.
Pull your both feet slowly – slowly, as much as you can.
Look straight ahead with a smile in your face .
Keep the pose stable while paying attention to your breath.
After 1-20 seconds as you exhale, gently bring your legs and chest to the ground and relax.
Benefits of Dhanurasana
Dhanurasana strengthens the back and the abdomen at the same time.
Keeps you active and energetic.
It helps improve upon stomach disorders.
Bow Pose also helps in reducing fat around belly area.
It is beneficial specifically to women as it improves reproductive system and helps improve menstrual disorders. .
Helps regulate the pancreas and is recommended for people with diabetes
Expands the thoracic region of the chest
Helps alleviate hunchback
Increases the appetite
Bow Pose combines the benefits of the Cobra and the Locust postures.
Balancing the weight of the body on your abdomen also reduces abdominal fat and keeps the digestive and reproductive systems healthy.
Caution:-
If a Person suffering from high blood pressure, backpain, headache, migraine or abdomen surgery should not practice “Dhanurasana”.
Ladies should not practice this during pregnancy and in periods.
NOTE:–
Do Asanas in under the supervision of a yoga expert. For doing Dhanurasana have to expert or used to simple Asanas. Do Yog Asana as much as you can. Do not go beyond to our capabilities. Main and most important thing try simple and easy to do Asana, once you are perfect in basics then go for advanced Asana.
21
Eka Hasta Bhujasana
Eka Hasta Bhujasana
Eka Hasta Bhujasana
-Steps And Benefits
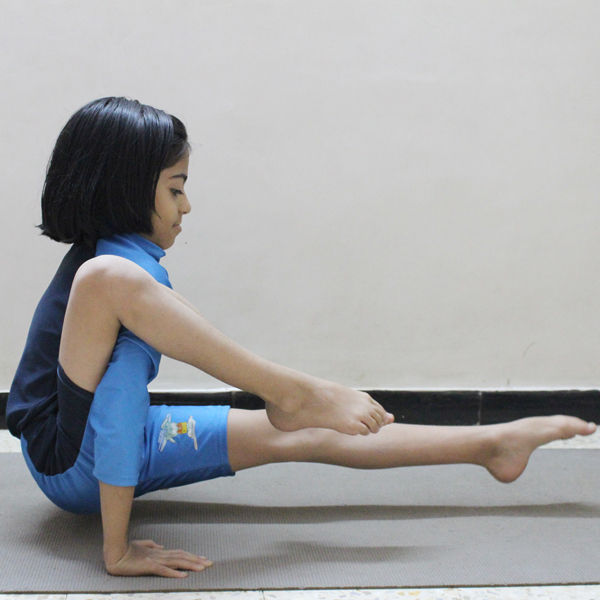
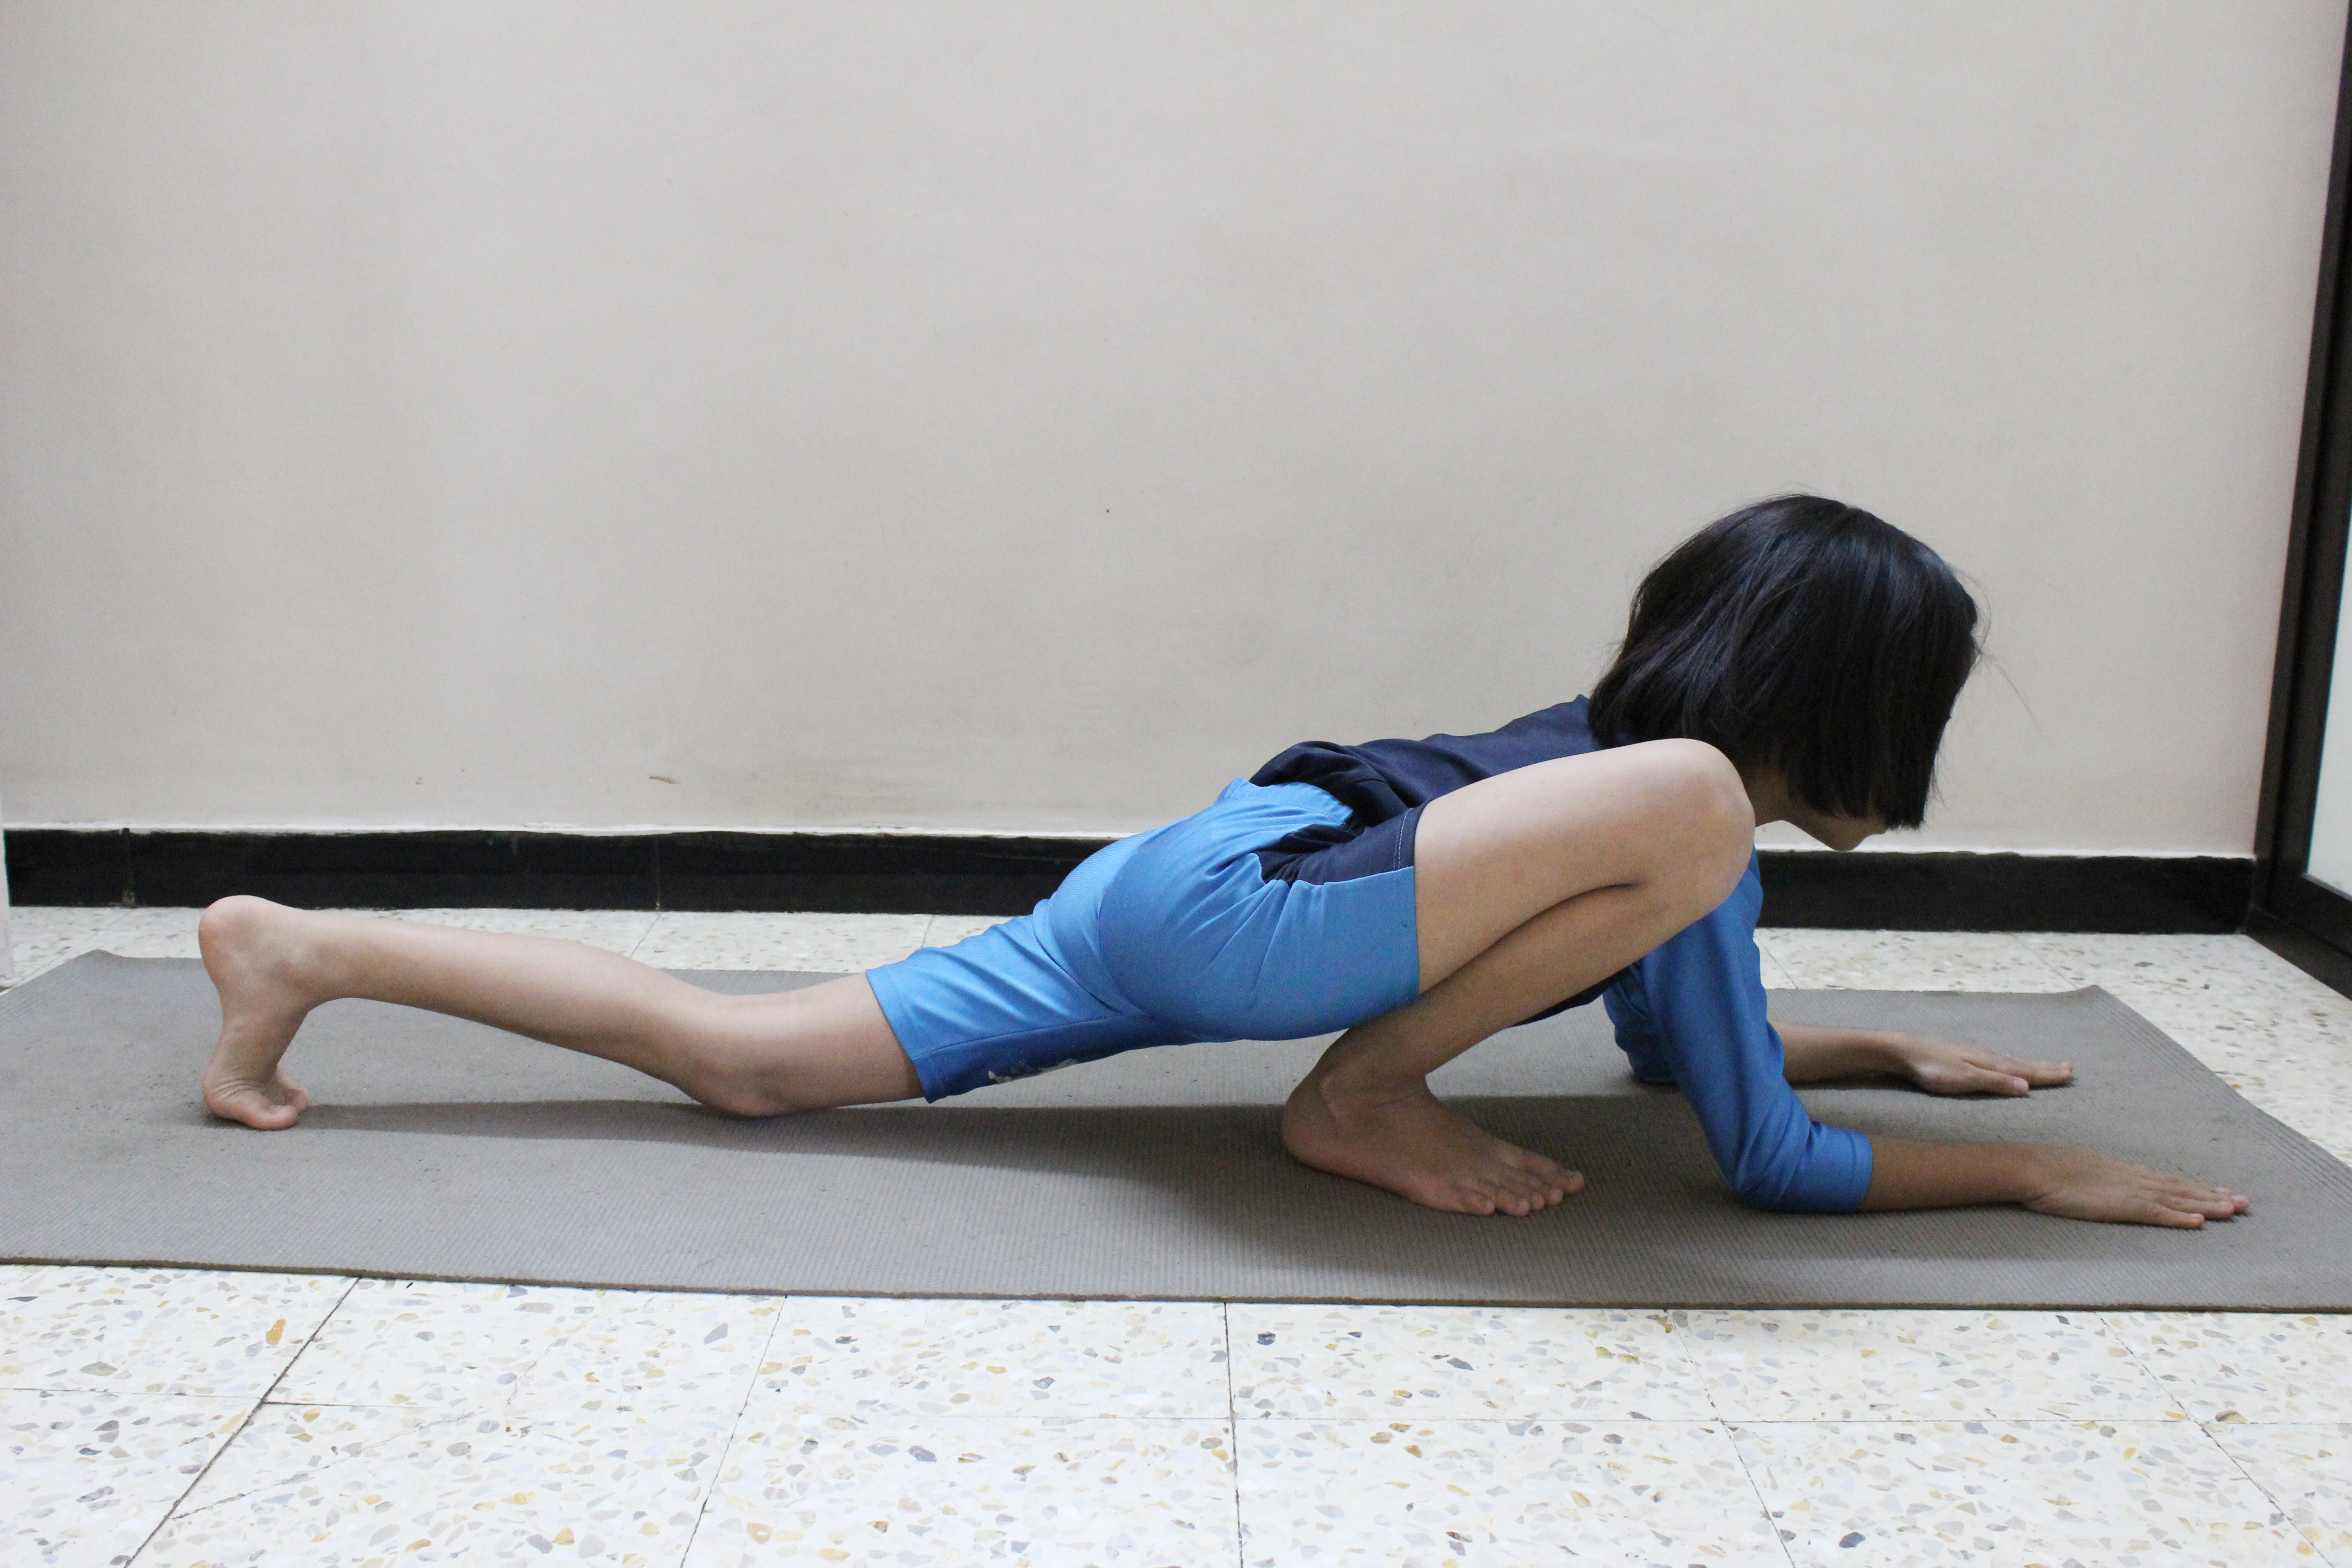
Eka Hasta Bhujasana is comes under the intermediate level means medium level. This Name is come from Sanskrit, in which Eka means one, single; Hasta stands for the hand; Bhuja represents the arm, hand, bending and Elephant trunk. In Elephant’s trunk pose (Eka Hasta Bhujasana), you put your leg on to your arms or shoulder and your body look same as an elephant trunk, so that’s why this asana named so and this Yoga Pose is also known as one leg over arm/shoulder. Elephant’s trunk pose is a little bit challenging and good for your hand, arms and wrists. Before performing this Yoga pose you should practice all the Follow-up and preparatory poses first, after that go for Eka Hasta Bhujasana.
The level of Asana: – Intermediate.
Focusing Point: – Muladhara chakra (The Root Chakra)
First, come into the Dandasana (Staff Pose). From this Yoga pose lift up your right knee to your (towards your) chest (In this, you have to only lift up your knee but rest of your foot ought to be on the floor).
Now, keep your right arm under the right knee and put your hand on the floor. At that time your fingers are pointing in forwarding direction.
After that, keep your left hand on the ground, little outside from your left hip.
Raise your right leg up on your right arm (until your right knee comes to the right-hand triceps).
During this bend your right knee.
Now, gently press your hands and try to raise your body from the ground.
Remain in this position for 30 to 60 seconds or as much as you can hold.
Discharge your pose, and comes to initial position rest for some time and repeat the same process with your other leg. Try to practice Elephant’s trunk pose twice with your both legs this will give you best result.
Yoga Tips for Beginner’s
You find some difficulties in Eka Hasta Bhujasana (Elephant’s trunk pose). So increase your strength and flexibility by practicing some basic asana before performing Eka Hasta Bhujasana like (Utthan Pristhasana (Lizard pose), Dhanurasana, and Surya Namaskar)
Benefits of Ek Hasta Bhujasana
Eka Hasta Bhujasana strengthens your arms, wrists, and shoulders.
This Yoga Pose opens your hips and stabilizes pelvic girdle.
It makes your core stronger, improves your coordination and balance.
Elephant’s trunk pose Boosts your endurance and improves your focus.
NOTE
In a case of hip, shoulder or wrist injuries avoid this pose. Eka Hasta Bhujasana (Elephant’s trunk pose) is an intense arm balancing pose that needs your palms strength. So use your all four corners of your palms to avoid serious wrist injuries. All the Yogic activities need supervision of an expert person, so it is strictly advised performs all the asana under the correct guidance to avoid injuries. Don’t put on jeans or tight clothes during performing the asana; wear comfortable and loose clothes. Take a 3 to 4-hour gap between your meal and practice. Benefits require practice so practice daily for best results.
22
Eka Pada Pranamasana
Eka Pada Pranamasana
Eka Pada Pranamasana
{one legged Prayer Pose}
Name:- Eka Pada Pranamasana
Pose type: – Balancing
Other Names: – One legged salutation Pose, one legged Prayer Pose
-Steps And Benefits
In Eka Pada Pranamasana, meaning of “Eka” is one, meaning of “Pada” is foot and the meaning of “Pranama” is Prayer in Sanskrit. This is a simple balancing Pose or one legged balancing pose.
Beginners must be acquainted with Pranamasana, the general supplication posture which is the beginning stance for the Sun Salutation. Here the main contrast is that one leg is raised and the sole of the feet is put beside the upper thigh. Eka Pada Pranamasana is an adjusting (balancing) posture which helps the learner to keep up a feeling of parity and balance furthermore fortifies the leg muscles. Once you master in this pose by regular practice, then you can easily perform Vrikshasana (Tree Pose).
Steps of Ek Pada Pranamasana
Stand straight on the ground with keeping your hands on the sides.
Now look forward and keep breathing normally.
Now raise your hands to your chest and keep the both palms together in Prayer pose or Namaskar pose.
After that, lift up your right leg and keep the sole of your right foot on the inner area of your left thigh.
Try to adjust the balance or maintain the balance and hold the position for as much as you can. Now this is the final pose and keeps breathing normally during this.
Look ahead on particular object for concentration. Attempt to keep up mindfulness alongside the breathing procedure.
Put down your raised leg on the floor, rest for a while and repeat same process with your left leg also.
Benefits of Eka Pada Pranamasana
Give strength to your foot, ankle and leg.
Best balancing pose.
It builds up the feeling of harmony as the whole weight is upheld on one leg.
This practice enhances mindfulness as the parity can be lost if the psyche falters amid the practice.
NOTE
If you got recent injury in leg, ankle or foot then avoid this asana. if you are not able to maintain the position by making Namaskar pose with your palms, then do this pose without making salutation pose with your palms. Once you used to it then perform the full Pose.
Remember one thing “Practice makes a men perfect” so keep practicing. Perform all the yogic activities in under the supervision of an expert trainer.
23
Garudasana
Garudasana
Garudasana
{Eagle Pose}
-Steps And Benefits
The name of garudasana comes from the Sanskrit words garuda meaning “eagle”, and asana meaning “posture” or “seat”.In Hindu mythology Garuda is known as the king of birds. He transports the God Vishnu and is eager to help humanity fight against demons. The word is usually rendered into English as “eagle,” though according to one dictionary the name literally means “devourer,” because Garuda was originally identified with the “all-consuming fire of the sun’s rays”.This standing asana may enhance concentration. It focuses on the ankles, calves, thighs, hips and shoulders.
Steps of Garudasana:
Stand straight on both feet. Raise the right leg and wrap it around the left leg
The right thigh should be over the left thigh and the right feet will touch the calf muscles from behind
Similarly wrap the right hand around the left hand.
Now place the palms together to resemble the beak of an eagle.
Try to maintain the balance and slowly bend the left leg and lower the body until right toes touch the ground.
Try to remain in this pose for long as you can maintain the balance.
Concentrate on balancing the body pose
Now straighten the left leg and unwrap the right leg. Also release the right arm and come to normal standing position,
Relax for sometime and repeat the same process.
Benefits of Garudasana :-
It enhances the sense of balance of the body.
It also strengthen the muscles of the legs.
It can loosen the joints of the legs
It alleviates sciatica and rheumatism in the leg joints.
24
Gomukhasana
Gomukhasana
Gomukhasana
{Cow Pose}
-Steps And Benefits
This name comes from the Sanskrit words Go meaning “cow”, Mukha meaning “head” or “mouth” and the Asana meaning “posture” or “seat”. This asana targets your hips and your shoulders – two of the most common sites for chronic pain and tension in the body This asana stretches several parts of the body simultaneously, including ankles, thighs, hips, chest, neck, arms and hands
Steps of Gomukhasana:
Pose in agnistambhasana(Fire log pose).
Slide your knees together in front of you,stacking the right knee directly on the top of left.
When aligned sit back in between your feet which should be equidistant from your hips.
Support your weight evenly amongst your sitting bones.
Now for the the upper body, extend your left arm up towards the sky. Then, bring your left hand down to the center of your back.
Reach your right arm out to the same side, parallel to the floor. Rotate the arm inward – your thumb will turn first towards the floor – until your palm faces the sky above.
Take a deep breath and, as you exhale, sweep your right arm behind and in the hollow of your lower back (as parallel to your spine as is comfortable).
Keeping your spine long, hook fingers or hold hands behind your back. If they don’t reach, hold a belt or strap in both hands. Then, lift your left elbow toward the sky and draw your right elbow toward the ground. Keep your left arm close to your head. Center yourself
Now release your arms, uncross your legs, and repeat Gomukhasana with the left knee on top and left elbow pointing down.
Benefits of gomukhasana (cow face pose)
Stretches your hips, thighs, ankles and chest, shoulders, anterior deltoids, triceps, inner armpits and lats
NOTES
Don’t attempt this Asana in case of Neck, knee,hip and shoulders injury.
Don’t fasten your hands behind the back.Don’t go beyond over your abilities.
25
Halasana
Halasana
Halasana
{Plow Pose}
-Steps And Benefits
The name comes from the Sanskrit words hala meaning “plow” and asana meaning “posture” or “seat”.So it is also named as plow pose. Halasana is one of the advanced yoga pose simple to practice and contains lots of benefit. Halasana rejuvenate the inner parts of one’s body and make it healthy again.It is also helpful for men to correct the sexual and semen related problems like premature ejaculation,spermatorrhoea, and night emission effectively.
Steps of Halasana:
Lie on the yoga mat or carpet and join the legs together
Raise your legs to make an angle of 90 degree.
Thrust the palms, raise the waist and legs, bending forwards curving the back and resting the legs on the floor above head.
Try to place the big toe on the floor and keep the legs straight.
Balance the whole weight on the shoulder blade, shift both the hands over the head,join the fingers and hold the head with it and relax the elbows on the floor.
Try to remain in the position till the the count of 100.
Then release the fingers above the head, pressing the pals on the floor taking back thumb toe gently bring the body and legs to the floor
Relax and practice for 2 round more.
Benefits of halasana:-
Practicing this asana regularly can avoid disease like diabetes,obesity,constipation,stomach disorder,Blood pressure and menstrual disorders
It makes your back bone elastic and flexible.
Halasana helps to reduce both belly and body fat.
It improves memory power.
NOTE
Those having neck pain,spondylosis and high blood pressure should not practice this yoga pose.
Pregnant ladies should not try this asana.
26
Hanumanasana
Hanumanasana
Hanumanasana
(Monkey Pose)
-Steps And Benefits
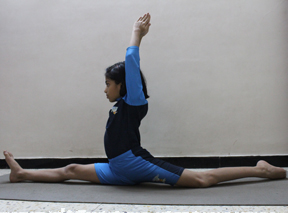
Monkey Pose or Hanumanasana is comes under the intermediate level of asana. It is an intense leg stretching exercise, in which your legs needs more flexibility and stretching. So, before attempting this pose, you must have master in basic level of yoga. This stance denotes the mammoth jump made by BajrangBali to achieve Lanka from India.
Hanuman is a Hindu god who looks like a monkey, According to Indian Mythology Lord Hanuman is a most strongest, intelligent and powerful character in Ramayana, and he is 11th Rudra incarnation of Lord Shiva, so Rudra, BajrangBali is an another name of Hanuman.
Level of Asana: – Intermediate
Steps of Hanumanasana (Monkey Pose)
First put down your both knees on the floor, note that your knees are flabbily apart. Now keep your right foot in forward direction and lift the inner sole. Make sure that your outer heel should touching the ground and Breathe in.
After that breathe out and slowly bend your torso towards forward direction, during this touch the ground by your fingertips.
Then, place your left knee backward till the front part of your foot and the knee touch the floor. During this, slowly move your right leg forward and it touches the ground.
To complete off the posture and come into a split position, keep sliding your right foot forward. Ensure the toes are indicating upwards. Move your left foot in reverse, ensuring the toes is touching the ground.
Lift up your arms over your head and combine your palms. Extend your arms and delicately curve your back until you are agreeable. During This breath normally.
Remain in the pose about 30 to 60 seconds or as long as you are comfortable.
Discharge the stance by moving your body weight on hands. Press your hands on the floor immovably, and but both your feet back to the initial stage.
Repeat the same process with your left leg in forward direction and right leg in backward direction.
Hanumanasana Beginner’s Tips
It is not a fundamental yoga stance, and it takes serious practice to play out the split. When you rehearse Hanumanasana (Monkey Pose) at first, you can utilize a cover under your lower legs and knees to make it more agreeable. Increment the length of the middle by squeezing the back foot into the floor. Daily practice is needed coz it is very intense pose, so without practices of basic asana don’t do this posture immediately.
Benefits of Hanumanasana (Monkey Pose)
Hanumanasana Stretches and strengthen groin region, hamstrings and thigh muscles.
It stimulates the digestive and reproductive organs, by boosting their functioning.
Monkey Pose Makes hips flexible if practice daily.
Stretches back muscles also.
Helps to release tension and stress.
NOTE:
Practice this pose under the supervision of an expert trainer coz it is not a basic yoga asana. If you don’t do it the right way then you might hurting yourself. Avoid this pose if you have groin injury or in hamstrings.
In starting split your legs as much as you can.
27
Janushirasana
Janushirasana
Janushirasana
{Head to Knee Pose}
-Steps And Benefits
Janushirasana is a Sanskrit word, in which the meaning of “Janu” is knee or Knee joint and “Shirsa” stands for head. The Pose is done by keeping your head with the knee joints or you have to touch your knee by your head. So Janushirasana is also known as Head to knee Pose. Head to Knee Pose is easy to do and best exercise for children. Before Paschimottanasana, practice this asana once you are master in it then go for Paschimottanasana.
Position: – Sit Upright
Level: – Intermediate
Steps of Janushirasana (Head to Knee Pose)
Stretch your legs in forward direction.
Now bend your left leg, by your left leg heel press your anus.
Breathe in; Lift up your both arms over your head.
Breathe out and bend forward. Hold your right feet big toe with your hands.
After that inhale in the upright position.
Now breathe out, during Breathe out bend forward and try to touch your crown of head (Forehead) to your knee. At that time, Pull your anus inward and draw your stomach and navel inward also.
Keep the right leg straight at the time. Hold the position for few seconds after that release the pose slowly.
Repeat the process with your other leg.
Repeat this around 4 to 6 times.
Benefits of Janushirasana (Head to Knee Pose)
Best exercise for reducing belly fat.
It is Beneficial in Constipation, seminal weakness, Dyspepsia.
It reduces the pain in the legs and waist.
It gently massages the internal organs (liver) abdominal organs and spleen.
It strengthens the rib bones.
This asana makes your spinal cord flexible.
NOTE:
In case of severe back pain or pain in the stomach, then don’t perform Janushirasana (Head to Knee Pose). Always concern the doctor and Yoga expert before doing any yogic activity.
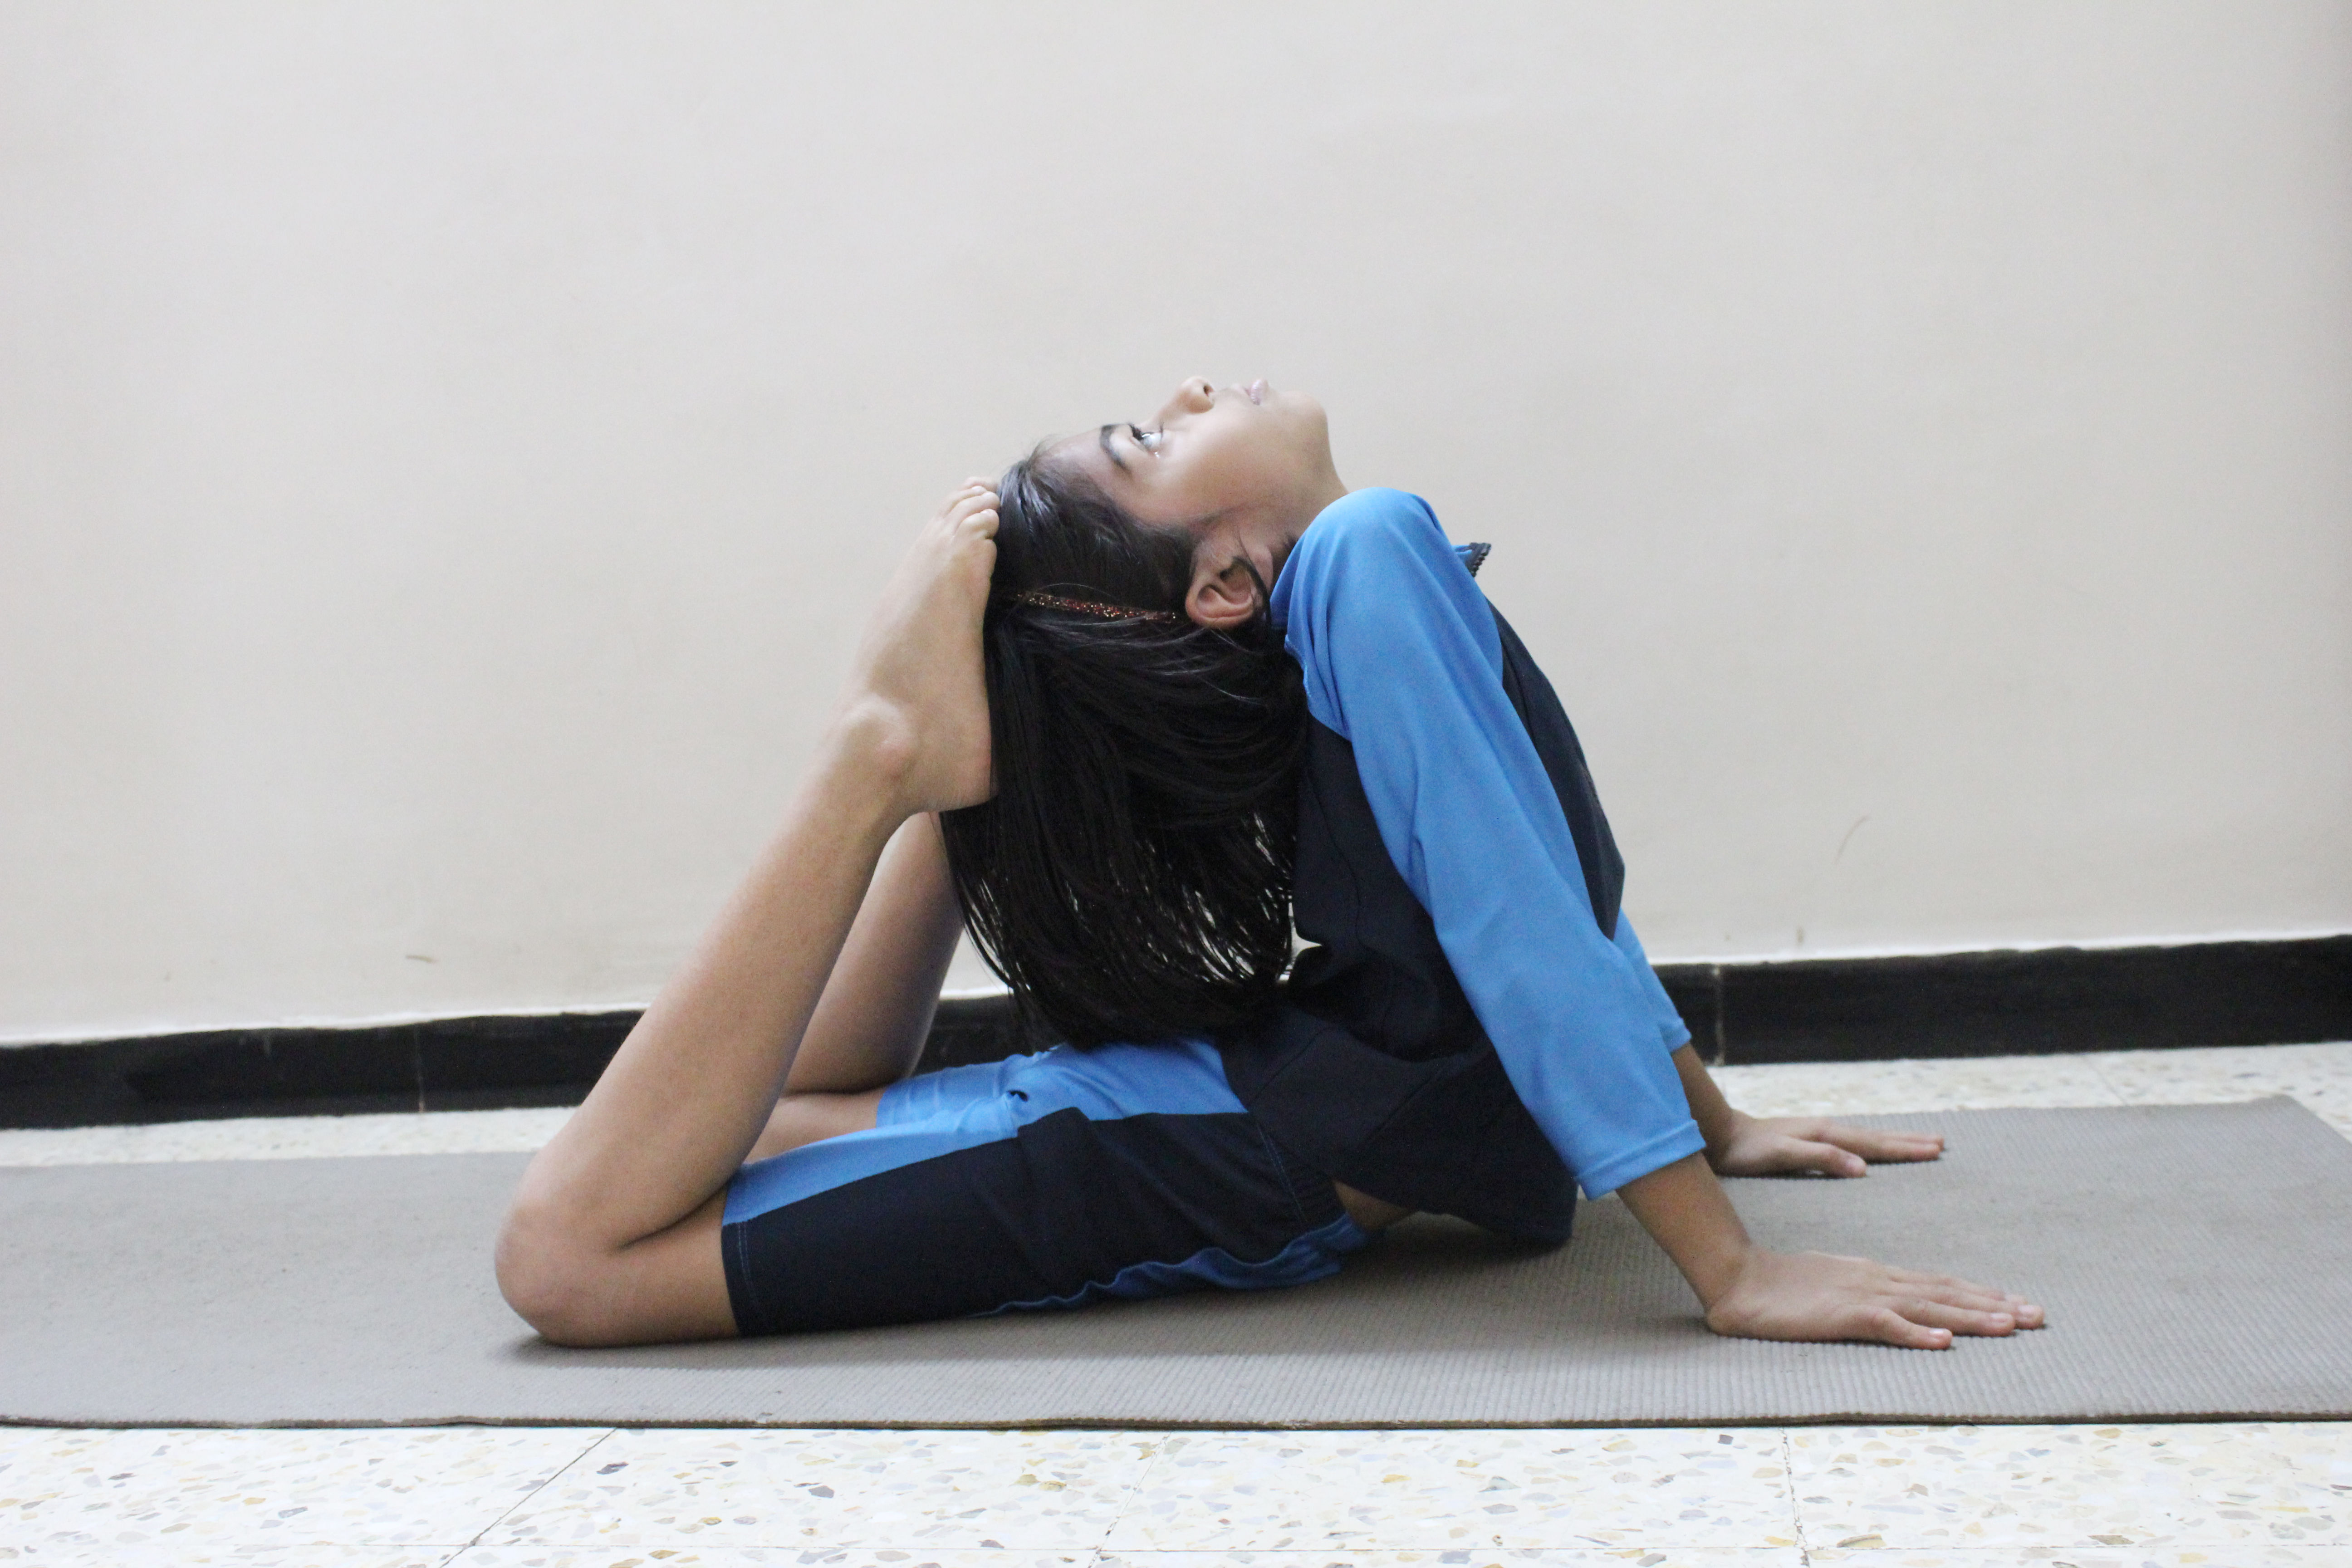
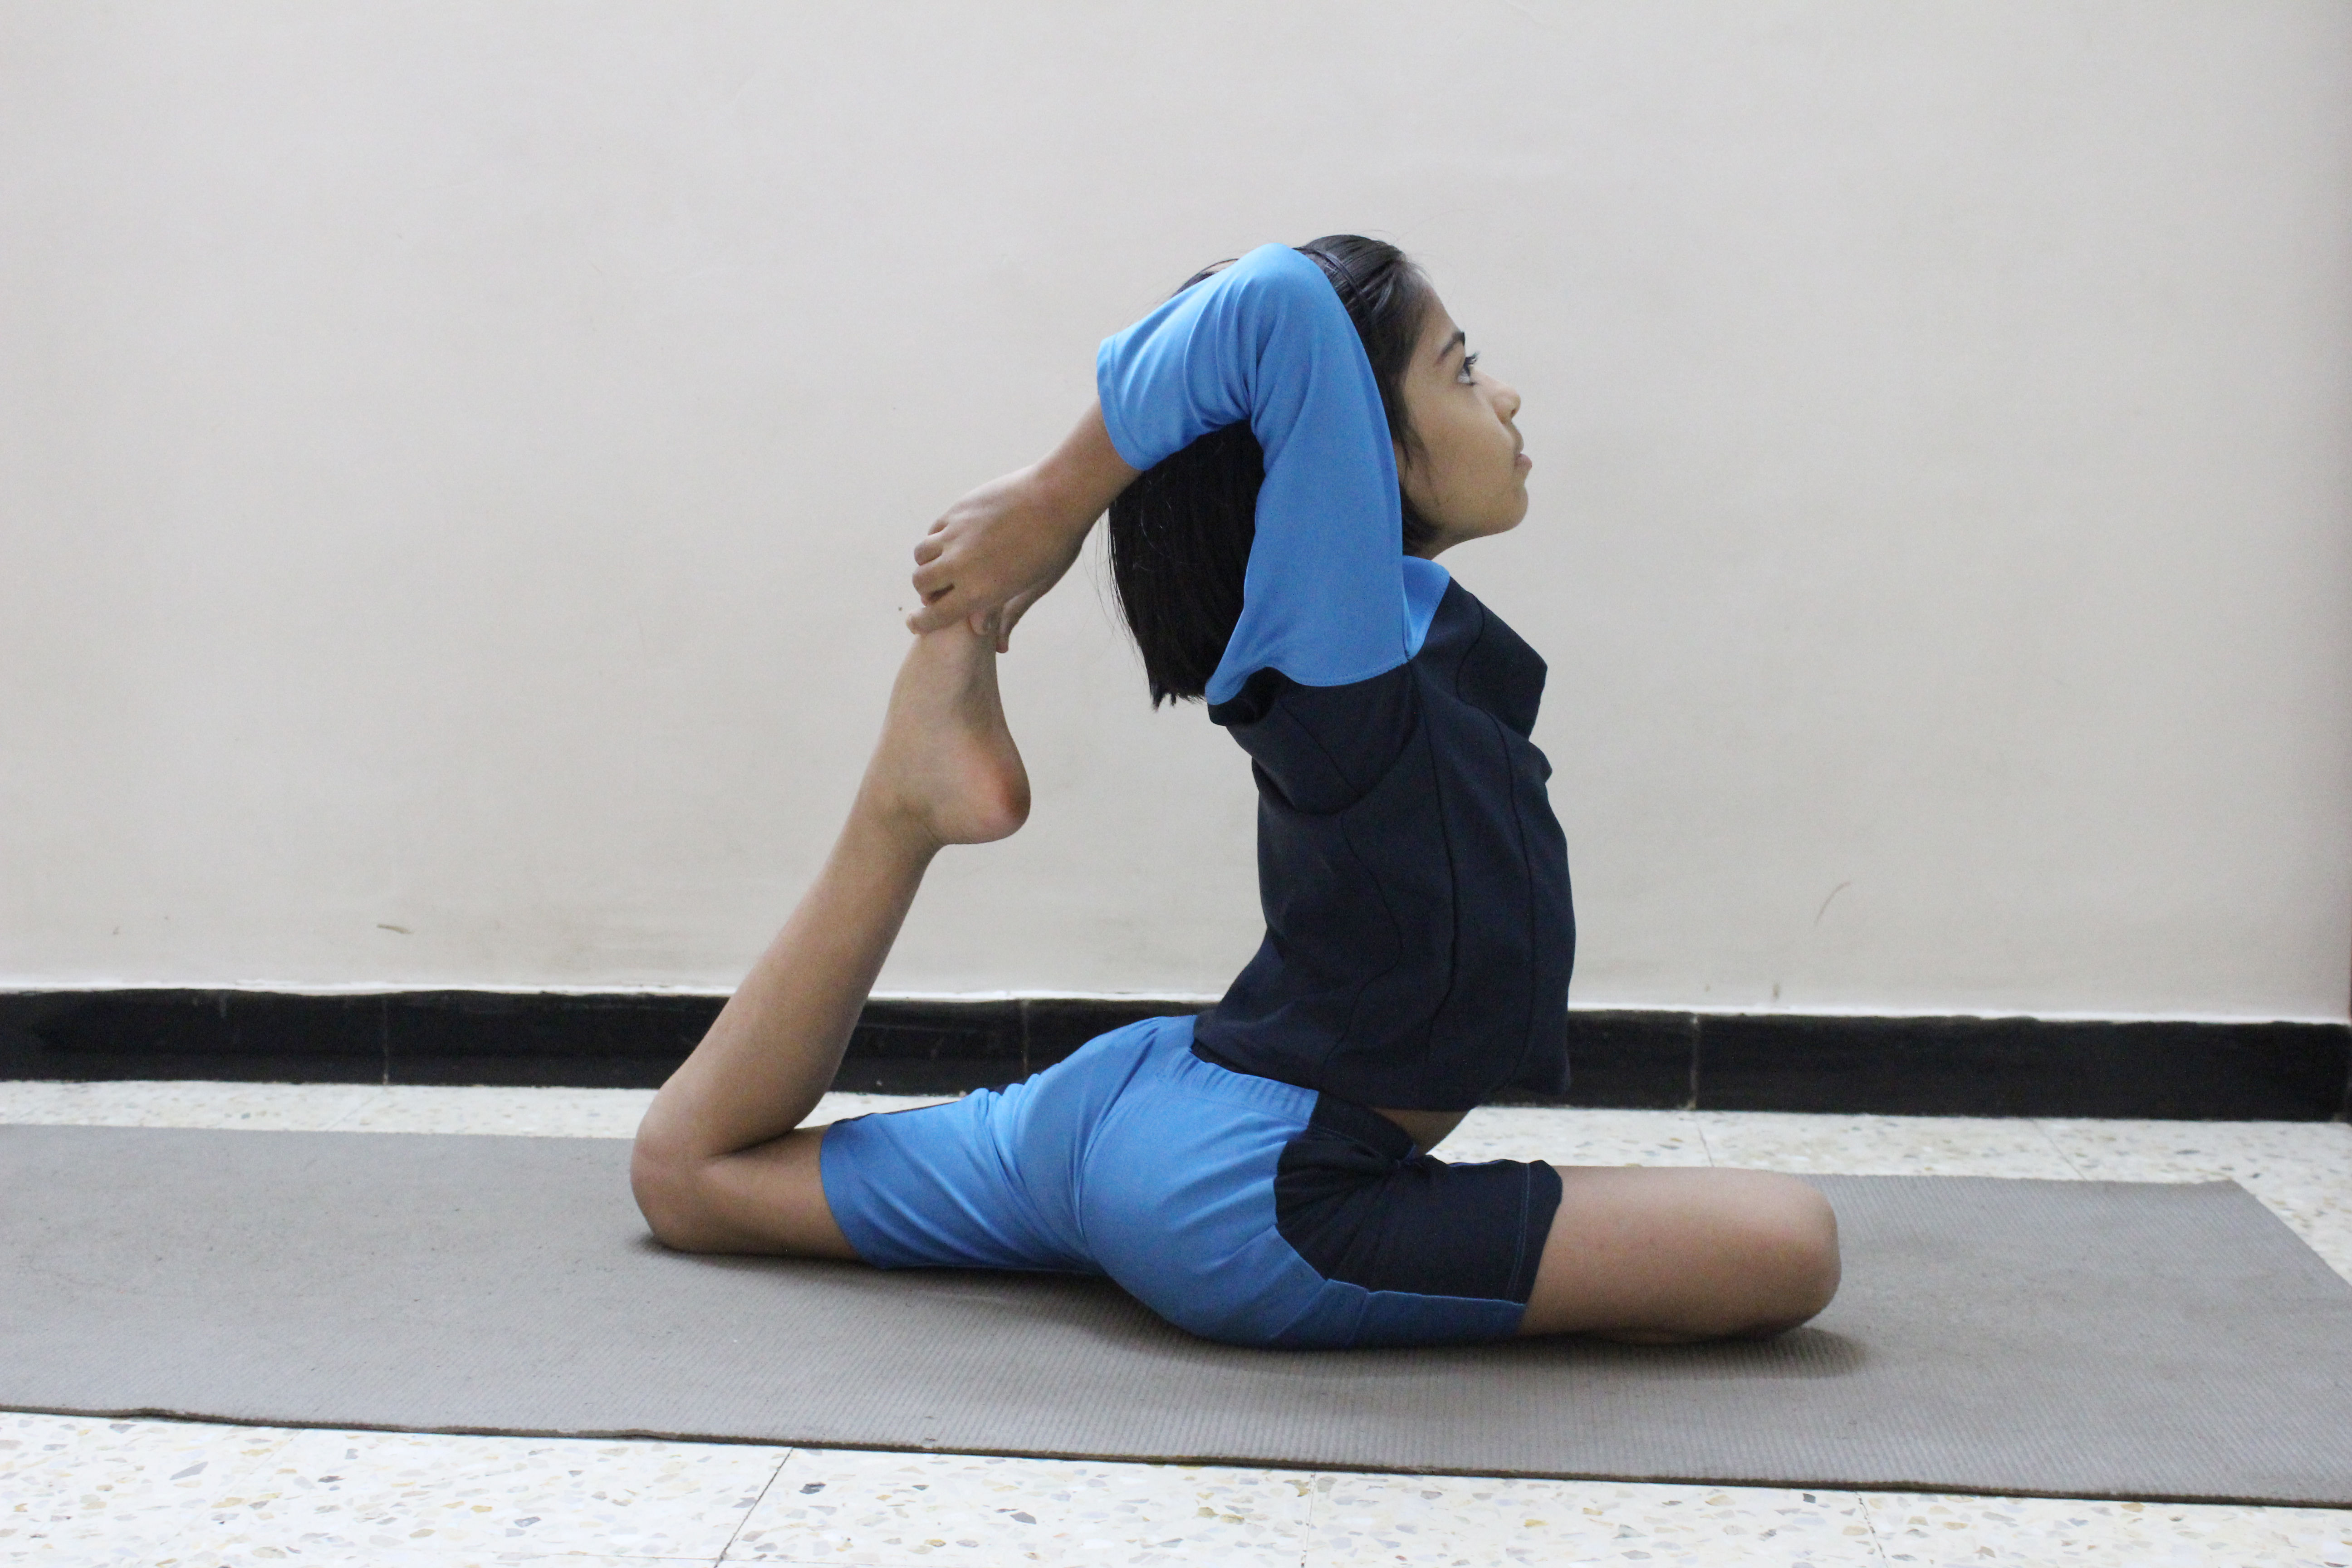
In Sanskrit the meaning of ‘Kapota’ is “Pigeon” and the meaning of Asana is seat, pose or posture. This Asana comes under the advance level. This is the advance level of Kapotasana. Advanced Pigeon Pose makes your body more flexible in ways you never imagined. You should consider including this Pose to your yoga regimen to experience its benefits. When you attempt this pose, your body looks just as the bird is. This asana gives you more energy and freedom in your mind and spine also. Advanced Pigeon Pose gives you a lot of benefits and also gives your body a good stretch.
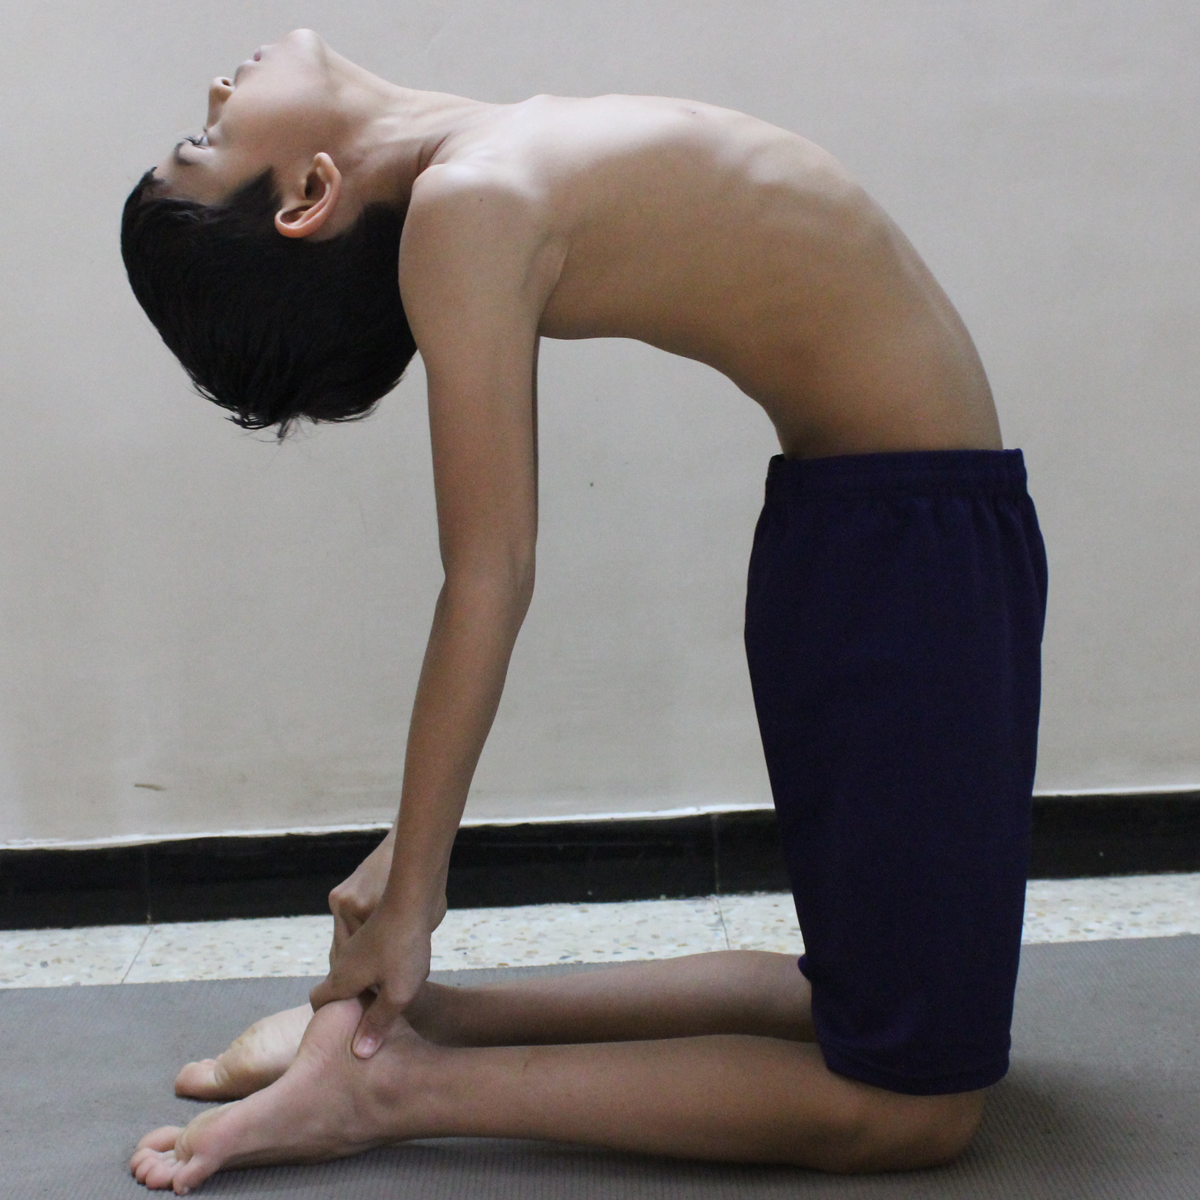
Steps of Advance Pigeon Pose (Kapotasana)
First get into the Ustrasana (Camel Pose).
Breathe in and raise your lower part of your belly up. Make sure you pull it in before you lift it.
During this, move your tailbone downwards to stable your lower back and slowly breathe out.
Breathe in, and lift up your arms, in a way that they are close to your ears. You may put your palms together if possible.
Breathe out and then turn backwards, ensure that your lower back is long but in stable positon. Note that there is no pain or strain while doing this Asana, if you feel some pain then do as much as you can.
Breathe out and then go further, sternum first.
Slowly raise your shoulders and crush your elbows towards each other. Put your head back, and remain in the pose for no less than five breaths.
Again breathe in, and keep your arms reach the floor.
Now press your feet into the ground or floor, and then twist your knees only as much as it is necessary to reach your palms of the hands, reaching outward each foot.
After that continue going in reverse as you check with your lower once more every once in a while.
Put your hands backward towards your knees in a way that your fingers touch your heels and clutch them tightly.
Presently as you hold both your feet, crush the elbows towards each other, and push the hip forward while keeping the gape and length of your lower back in place.
As you breathe out, twist your elbows and fix them on the floor.
Remain in the position for about 30 seconds to one minute, or as much as you can or comfortable.
Gently come out from the posture while keeping your breath normal. Roll on your spine and assume the Balasana or the child’s pose before you come back to normal.
Delicately turn out from the stance while keeping normal breathing.
Move on your spine and expect the Balasana or the kid’s stance before you return to ordinary.
Advanced Pigeon Pose Tips for Beginners
On the off chance that you are a learner, you could utilize the backing of a divider to get this posture right. Press your soles to the divider, and utilizing your head to grasp your hands, delicately incline in reverse. At that point put your crown on the divider and push your lower arms against it. This will make the practice a considerable measure less demanding.
The Benefits of Kapotasana (Advanced Pigeon Pose)
Advanced Pigeon Pose stretches and strengthens the groin and back.
Tones the muscles of the throat and ribcage, chest, and abdomen.
Improves the working of the digestive system.
Advance kapotasana increases the flexibility in your arms, thighs, spine, shoulders, hands and calf muscles.
Maintains blood pressure and lowers down the effects of chronic diseases.
Beneficial in urinary related disorders.
Reduces stiffness in the hips, shoulders, and back.
Beneficial in sciatica and makes your lungs stronger.
Gives calmness to the mind and the body.
It is a good stress buster.
NOTE
If you feel any pain in your shoulders or spine, then don’t attempt full pose. Daily practice makes you perfect. Remember that people with tight hips or thighs won’t not have the capacity to do Advanced Pigeon Pose effortlessly. In case of hypertension, migraine, insomnia and severe back pain avoid this Asana. Take a doctor advice before doing this asana if you have chronic back problems. Do all the yogic activities in under the supervision of an expert
29
Kapotasana
Kapotasana
Kapotasana
{Pigeon Pose}
-Steps And Benefits
In Sanskrit the meaning of ‘Kapota’ is “Pigeon” and the meaning of Asana is seat, pose or posture. Kapotasana (Pigeon Pose) comes under the medium level.
This is the best Asana, which opens up the mid-section (chest) furthermore fortifies the back and crotch. It increases the flexibility and opens the hips area, in the meantime fortifying the back, and extending the thighs and the crotch (Groin)
Kapotasana (Pigeon Pose) is a complete and good body workout. It enhances quality in your legs and your abdominal area. It is particularly useful for individuals who experience the ill effects of foot issues. This stance is useful for conditioning your thighs and releases tight hip flexors and thighs.
Steps of Kapotasana (Pigeon Pose)
First put down your Knee on the floor and your spine should be erect.
Now gently stretch your right leg in backward direction (behind you).
Keep extending your right leg until your left knee and foot are adjacent to the right hip.
Keep stretching your right leg until your left knee and foot are adjoining the right hip
Make sure that your toes ought to be pointed.
After that you have to lean forward and breathe in deeply.
Now push your mid – section (chest) outwards.
Remain in the position about 20-25 seconds.
Now switch (change) your leg and repeat the same process with your opposite leg.
After that sit in Padmasana and rest for while and repeat the process 4 times with your both legs.
Benefits of Kapotasana
Pigeon Pose stretches and strengthens the joints and muscles in your legs.
Helps to reduce stiffness in the back and hips.
Kapotasana balances the blood pressure and also reduces the effects of chronic diseases.
Releases stress and calms the mind and the body.
NOTE
Do all the yogic activities with empty stomach. Don’t go beyond over your capabilities. In knee pain avoid this Asana. This is the simple type of Pigeon pose; there are also other types of Pigeon Pose. First practice the simple form once you are master then goes for the advanced level.
30
Karnapidasana
Karnapidasana
Karnapidasana
{Knee to Ear Pose}
Sanskrit: – Karnapidasana
Other Names: – Knee touching to ear pose, Ear pressure pose, knee to ear pose
Follow –up asanas: – Eight-Crooks pose (Astavakrasana) Fish pose (Matsyasana), Four-Limbed staff Pose (Chaturanga Dandasana) and Firefly pose (Titibasana)
-Steps And Benefits
Karnapidasana is made up from the combination of karna+pida+Asana, in which ‘Karna’ means Ear , ‘Pida’ means pain and Asana means to seat, pose or posture.This Asana is also known as Raja Halasana (king plow pose). The Karnapidasana is referring to be very effective pose which can help in kick out all the problems related to ear. We can say this is the advance level of halasana and Sarvangasana. You have to first master in halasana (plough pose) and Sarvangasana (shoulder stand pose) after that attempt this yoga pose of Karnapidasana.
This Karnapidasana yoga posture is a total expansion of the spine, permitting the therapeutic liquids to wash every vertebra. Karnapidasana (Knee to Ear) Yoga Pose is a advance level of the Plow Pose (Halasana), the length from the knees to the toes is parallel to the ground. The skull turns into the foundation of the stance and takes into account a tender stretch of the neck.
Steps of Karnapidasana
In Karnapidasana yoga first lie down on the floor on your back in resting position, and your arms should be placed in resting pose at the sides.
Your legs should be straight in front of you.
Inhale and keep down your palms in the floor.
Now raise your legs in the air and try to exhale.
Try to keep your legs erect in the air. (Ardha halasana position, your legs should straight at 90 degree in the air).
Now try to place your legs over your head. (Full halasana pose).
Now try to lift up your butts and try to bend your legs over the head. (Bend or press your knee into the floor by your upper arms just near to ear., and try to press and place them just near to ear).
Your arms should be parallel to our body.
For supporting your hips try to lift up your hands and keep them under your lower back.
Try to grab your bend knees together.
After that put down your knees and take a deep breath.
Now lift up your butts and keep down your knees.
By this you will be able to placing yourself in an ear pressure posture.
After that open your bend knees and keep them on the ground.
Now keep your legs on the ground and try to stretch your arms in parallel pose.
Keep in your mind to place your palms open over the floor facing towards the ceiling.
Hold this position for around 6 to 8 breathes.
At last keep down your arms in the floor and get back in the initial position and rest for a minute and repeat the process about 3 to 5 times.
(Breathe out from The Plow, discharging the knees to both sides of the head and indicating the toes. With your toes on the floor, lift your top thighs and tail bone toward the roof and draw your inward crotches profound into the pelvis. Envision that your middle is swinging from the stature of your crotches. Keep on drawing your button far from your sternum and relax your throat.
To develop the posture, extend your arms along the length of the lower legs, then twist the lower arms behind the thighs and intertwine the fingers. Unwind here for no less than 30 seconds rehearsing profound relaxing).
Benefits of Karnapidasana
Karnapidasana Stretches and strengthens your back bone.
Gives strength to the lungs and beneficial for asthma patients.
Stimulates the abdominal organs, and thyroid gland.
Stretches the shoulders and spine.
Controls hypertension.
Reduce the symptoms of menopause.
Karnapidasana Helps to alleviate fatigue, stress, insomnia, and negative symptoms of menopause.
Helpful in backache, infertility, sinusitis.
Karnapidasana yoga posture gives deeper spinal flexion and an intense stretch of the hips.
Good pose for internal abdominal massage to the organs.
Karnapidasana tones the buttocks, hips and thighs during stretching the shoulders and neck.
NOTE
Avoid this pose in case of diarrhea, Menstruation, neck injury, high blood pressure. In Asthma and high B.P. use props for supporting your legs. Consult yoga expert and doctor before starting any yogic activities
31
Kati Chakrasana
Kati Chakrasana
Kati Chakrasana
{Standing Spinal Twist Pose}
SANSKRIT NAME: KATI CHAKRASANA
ENGLISH NAME: STANDING SPINAL TWIST
The Kati Chakrasana literally means rotation of the waist. The literal meaning goes as follows:
Kati = waist
Chakra = wheel or circular roatation
Asana = posture or pose
-Steps And Benefits
In this posture you need to twist your waist on both the sides. It gives a nice stretch to the waist and helps in making it more flexible. A simple yet very effective yoga posture which takes very little time to stretch and benefits in many ways. Very easy to perform hence very helpful for people who are not much flexible or aged. It is very easy to learn also.
This posture doesn’t need much effort to perform or practice. This posture can be practiced by almost every age group with respect to their health status.
Steps to do Kati Chakrasana:
Stand up straight with your feet together
Keep your spine erect keep the shoulders straight.
Keep your legs apart from each other equivalent to the shoulders
Stretch your hands to the front, palms facing each other.
Your hands should be in line with the shoulders.
First inhale and then while exhaling twist from the waist to the right and look back over the right.
Keep your breath out and stay in this position as long as possible.
Inhale and slowly come back to the center.
Exhale and twist from the waist to the left and look back over the left.
Keep your breath out.
Stay in this final posture as long as possible.
Come back to the center and relax.
In the twisted position if you want to stay for longer then you need slowly keep on breathing.
This is the complete cycle of this posture.
Practice can be repeated 10 to 20 times or even more than that as per the convenience.
Benefits of Kati Chakrasana:
Helps to remove lethargy.
Improves the flexibility of the spine and waist.
Strengthens the spine and waist
Good for relieving constipation.
Opens up the neck and shoulders.
Provides a stretch in different muscles of arm, abdomen and legs.
Helps to relive back pain.
Contraindications of Standing Spinal Twist:
Avoid practicing if you have recently undergone any abdomen or spinal surgery.
If you are suffering from hernia, slip disc or any abdominal inflammation.
Avoid the practice during pregnancy.
Note
This posture must be practiced from both the sides. One should not practice with only one side. The number of twists must be equal from both the sides.In case of any health issues, consult your doctor or yoga expert or therapist before your practice this posture.
32
Kukkutasana
Kukkutasana
Kukkutasana
{Cock or Rooster Pose}
-Steps And Benefits
In Sanskrit Kukkut means Cock or Rooster and Asana means sit, Pose or Posture. Kukkutasana or cock Pose is named so since it looks like a cock. cock or rooster yoga pose has been said in antiquated sacred yoga texts like the Gheranda Samhita and Hatha Yoga Pradeepika. It is a difficult Pose that requirements arms power to be completed well. practice well Tulasana and Bakasana before doing Kukkutasana.
Like other Asanas, it is important that your stomach is empty when you attempt this asana. Keep a gap between in your practice and meal, at least four to six hour because this will give you ample time to process your nourishment and create vitality for your practice. Do yog asana in the morning. In case you can’t rehearse yoga in the morning, then do your practice in evening.
Preparatory Poses:
Ujjayi Pranayama, Mula Bandha, Sun Salutation Pose and Uddiyana Bandha.
Follow-Up Poses:
Urdhva Kukkutasana (Head on the floor), Urdhva Padmasana in Sarvangasana, Shirshasana II, Hidden Lotus Pose (Gupta Padmasana).
Level of Asana: – Intermediate/ Advanced
Steps of Kukkutasana
First sit in the Lotus Pose (Padmasana).
Put your arms in-between the gape of your thighs and calf muscles, and your palms should touch the ground or floor through this gape.
Now spread out your fingers, pointing forward.
push your palms as much as possible. After that, breathe in while you try to lift your body.
You have to support your body weight by your palms. By daily practice, you will gain the ability to achieve balance.
Hold the Position for 1 to 5 minutes and breathes normally.
Breathe out and release the pose and get back to the ground.
As per your convenience repeat the pose as much as you can.
Benefits of Kukkutasana
It stretches your Arms, spine and strengthens your shoulders, Elbows and wrists.
Makes your chest broader.
Loosened up your legs.
This asana develops balance and strength furthermore increases your concentration level.
The perineum contracts amid this asana, in this manner, the muscles are reinforced.
This asana enacts and manages the Muladhara Chakra.
Invigorates your digestive system.
Stimulates the digestive system.
Beneficial in menstrual discomfort and hip pain.
Tips for Beginner’s
As a Learner or Beginner, it may be difficult to get this asana right. These pointers will help you keep up the stance easily.
Turn your look to a specific point of convergence at a separation and focus on it. This ought to help you look after equalization.
Ensure that your back is erect. Try not to slouch while you are in this asana.
If you think that it’s difficult to slip your arms into the crevice between your collapsed legs, you could oil your limbs to make it less demanding.
Pose Variations
Parshva Kukkutasana
Urdhva Kukkutasana
NOTE
This Pose is an advanced one. In the event that you have lung and heart issues, broadened spleens, or gastric ulcers, abstain from doing this asana.
In Sanskrit Kurma implies Turtle or Tortoise, in this Asana your body looks similar to tortoise in the final step of this pose on the ground. When we watch a tortoise, we see that just the hands and legs distend out from the shell. In the last position, this asana mirrors the tortoise. Kurmasana tones the whole stomach muscles, evacuates paunch fat and is useful for diabetes. This asana is specified in the Gheranda Samhita, however the prominent adaptation rehearsed today is somewhat unique in relation to what is said in the established content.
To perform Kurmasana you have to sits with the legs outstretched, feet as wide separated as could be expected under the circumstances. The knees are twisted marginally, keeping the heels in contact with the floor. The body is inclined forward from the hips and the hands slid under the knees. The body inclines forward (twisting at the hips) to permit the hands and arms to slide sideways and in reverse (under the knees) until the elbows lie close to the back of the knees. The heels are pushed forward and legs fixed however much as could be expected. The brow or button is conveyed to touch the floor. The arms are further taken around the back to interlock the hands under the butts.(If you are attempting this asana first time then don’t interlock your hands, after a 2 or 3 days you can try it. If you are unable to do that then do this asana without interlocking your arms).
Steps of Kurmasana (Tortoise Pose)
First sit comfortably in Staff Pose (Dandasana) place your hands on the floor close by your hips.
Now press your thighs into the ground or floor, your feet should flex, and try to lift your chest.
Keep your legs to the corners of the mat; keep your knee wide as your Take a couple of breaths here.
Now bend your knees with keeping your feet flexed.
Place them nearer to your hips. Expand your chest in forward down and keep your arms forward down between your legs.
Bend your legs significantly all the more, with the goal that you can put your shoulders one by one under your knees. (If this is difficult for you then keep going on with forward bend )
Stretch your arms out to the sides.
After that try to roll your thighs in inward direction and keep your inner heels extended, without making pressure in the feet.
Stretch the front part of your chest and collarbones in forward direction and keep them down with the assistance of the weight of your thighs on the shoulders or upper arms.
Try to push inner heels down and forward to extend and straight your legs, at that moment try to keep your inner thighs in contact with your side ribs.
Breathe in and keep on extending your arms and mid-section (chest) out to your sides.
Breathe out to extend your spine more distant forward. Try not to constrain your legs, breathe out and relax to release the pose.
On the off chance that you feel torment under your knees, take your arms marginally forward. Stay for a couple of breaths, and then gradually leave the posture. Rehash a couple times.
(If you are uncomfortable, then don’t interlock your fingers behind your back, just do this Asana with forward bend with shoulders under your thighs. Once you are comfortable in this then try this asana with interlock fingers behind your back)
Variations in Kurmasana
Upside-Down Tortoise Pose (Uttana Kurmasana).
Sleeping Tortoise Pose (Supta Kurmasana).
Half Tortoise Pose (Ardha Kurmasana).
Benefits of Kurmasana (Tortoise Pose)
It stretches your legs, back, shoulders and chest also.
It improves the functions of the respiratory and digestive systems.
It lengthens the back muscles.
The organs in the midriff (abdomen) are stimulated during this Asana.
The stance helps you to spread out both your shoulders and your hips.
The spine is stretched longer during the act of this yoga asana.
Anxiety buster.
Beneficial in Asthma, constipation and flatulence.
Useful in sleeping disorder like Insomnia.
Beneficial in the problems related to the back or spine.
Note
Don’t try to overstrain your muscles while performing this posture. Breathe in and inhale out the way you would under ordinary circumstances while you are in definite position of this stance. Avoid this Asana in case of any shoulders, hips or arm injury. (Consult a doctor and yoga expert before starting any Asana or Pranayama; don’t go beyond your capabilities during Asana.)
34
Makara Adho Mukha Svanasana
Makara Adho Mukha Svanasana
Makara Adho Mukha Svanasana
{Dolphin Plank Pose}
-Steps And Benefits
Makara Adho Mukha Svanasana, you have to master in basic Plank pose after that go for it. This is another type of Plank pose or Modification of Plank Pose. In Dolphin Plank Pose you have to lower down your body, in this you have to put down your forearms to the floor. Your body posture is look like dolphins so that’s why this pose is also known as Dolphin Plank pose or lower plank Pose. The Dolphin Plank pose is a sensible mix of the Dolphin Pose and the Plank Pose.
Preparatory poses: – Four limbed Staff Pose, Downward Facing Dog Pose
Follow-up poses: – Crane Pose (Bakasana), Adho Mukha Svanasana, Four Limbed staff Pose, Downward facing dog pose.
Type: – Core, Arm balancing.
Level of Asana: – Medium.
Other Names: – forearms Plank Pose, Lower Plank Pose
Steps of Dolphin Plank Pose
Lie down on the ground on your face side.
Now, keep your elbows down to the ground along with palms sturdily on the floor.
At the time lift up your hips, chest and toes towards the roof (ceiling).
Now try to tie your Navel towards the spine and tight your hips.
Your body should few inches off the ground in a parallel line from your feet to shoulders.
Gaze at the ground for keeping your head in neutral position. Remain in the position for 10 to 15 seconds after that get back to your initial position.
(You can also grasp your both hand in front of your head, in a way your forearms make an inverted shape like ‘v’, this is for your convenience)
Benefits of Lower plank Pose
Makara Adho Mukha Svanasana strengthens your forearms, arms, wrists and spine also.
Tones your abdomen.
Give strength to your upper body and core body.
It lengthens your spine, strengthens your lower back muscles.
Dolphin Plank Pose tones all the core muscles of your body.
Improves posture of the body.
It increases the endurance and stamina in your body.
NOTE
If you are suffering from Carpal tunnel syndrome, then perform this pose with your knee support or on your forearms. Patients of Osteoporosis strictly avoid this. Don’t go beyond over your limits and abilities. In medial issues, consult a doctor and Yoga expert before attempting any yogic activities.
35
Makarasana
Makarasana
Makarasana
{Crocodile Pose}
Posture Name: – Crocodile pose.
Sanskrit Name: – Makrasana.
Meaning: – Crocodile.
-Steps And Benefits
The meaning of Makarasana in Sanskrit is “Crocodile”, because this Pose resembles a Crocodile during resting with in the ocean. The crocodile keeps its neck and face above the water. A similar form is seen in this pose. Makarasana is a nice Asana for all spherical stretching of the body. Makarasana straightens and stretches the muscles of the rear, buttocks, legs, and also the back of the arms and legs. The crocodile posture in yoga is additionally an excellent pose to cut back stress and improves your body posture. The aim of Makarasana is to unleash strain caused by other Poses.
Steps of Makarasana (Crocodile Pose): –
Lie down straight on your stomach.
Now join your elbows, making a stand and place your palms under the chin.
Lift your chest up.
Keep your elbows and legs together.
During inhaling, first fold your one leg at a time and then both the legs together.
During folding, your ankles should touch the hips.
While exhaling, your feet should be straight and keep your head steady.
Repeat this for 20 to 25 times.
Benefits of Makarasana (Crocodile Pose): –
Beneficial in cervical, slip disc, spondylitis, sciatica.
Beneficial in all spine related problems.
Very useful in Asthama, knee pain, and other lungs related problems.
Stretches the muscles of legs and hips.
This pose is best for relaxing after doing other Asana.
Note
Don’t try this pose if you have serious back and knee injury. Those people who are suffering from neck injury may keep their head in a neutral position or use a folded blanket for supporting the neck during the process. Consult a doctor or yog expert before doing any yogasana and Pranayama.
36
Mandukasana
Mandukasana
Mandukasana
{Frog Pose}
Sanskrit Name: – Mandukasana.
Meaning: – Frog.
Position: – Sitting.
-Steps And Benefits
In Sanskrit the word “Manduk” means frog. In this pose your body posture is resembles to a frog, so that’s why this Asana is called Mandukasana. It is the simple Asana which can be done by anybody in all age group. In Yoga there are so many variations in Mandukasana, but in this we described two easiest methods to do Mandukasana.
Steps of Mandukasana (Frog Pose): –
Comfortably sit in Vajrasana (thunderbolt Pose)
Close the fists of your both hands.
While clinching the fists press your thumb inside with the fingers.
While pressing the navel with your both fists exhale and bend forward.
Hold the breath when you are in the position of bend forward and keep looking straight.
Stay in this position for some time (hold the position as much as you can), inhale and come back to starting position (Vajrasana).
Repeat this for three to four times.
Here is a second way or method to perform Mandukasana in simplest way, here the steps are follows: –
Steps of Mandukasana (Method -2): –
Sit in Vajrasana pose.
Place your right palm on your left palm; keep them on the navel.
Now press your stomach inwards.
Exhale and bend forward (same as method 1); and keep looking straight.
Hold your breath and position for some time.
Slowly inhale and come back to Starting Position.
Repeat this for 3 to 4 times.
BENEFITS OF MANDUKASANA:-
Increases the quantity of insulin so it is beneficial for curing diabetes.
Cure the problems related to stomach.
It is beneficial in cardiovascular diseases.
Useful for flexibility of thighs and legs.
Reduces extra fat from thighs and hips.
It improves the functioning of digestive system and excretory system.
It cures the pain of ankles, knees and back.
37
Marjariasana
Marjariasana
Marjariasana
{Cat Pose or Cat stretch}
-Steps And Benefits
Marjari means cat in the Sanskrit, while attempting this Asana your body looks like a cat, who is stretching its body up and down. So that’s why this Asana got this name.
Marjariasana or the feline stance in yoga is standout amongst the most broadly known and ordinarily performed postures in the world. An individual’s stance is thought to be a vital part of having the capacity to lead a cheerful and solid life and the feline stance is thought to be a standout amongst the best yoga postures with regards to amending pose. The apprentices’ stances will condition your body to have the capacity to perform the more complex ones, in this manner diminishing any odds of agony from some genuine ligament or muscle tissue harm.
Steps of Marjariasana
First get down to the floor on your hands and knees.
Keep your spine flat so that it’s equal to the floor.
Keep the position of your head in the center.
Next step is to breathe out, at the same time try to rounding your back (Spine) towards the roof. Make sure that hands and knees remain in the original position. Don’t move both at this time. (In breathing out you have to contract your tummy and pushing your navel up to the spine). Hold the position for 30 seconds.
Then breathe in and allow your tummy and spine to come down towards the floor. Push your spine downward as much as possible. (Keep your head towards the floor, avoid your chin forcing towards the chest). Remain in the pose for 30 seconds.
After that breathe in and return to your initial position.
Repeat the process as much as you can.
(Marjariasana is all about the process of lifting up and lowering down your spine).
Benefits of Cat Stretch (Marjariasana)
Gives firmness, flexibility to your spine.
It relieves tensions from your lower back.
Strengthens wrists and shoulders.
It is a good stress buster and relaxes the mind also.
It strengthens and tones your abdomen.
Massages the digestive organs and improves digestion
It is essential to learn and practice yoga Asana under the supervision of an expert of yoga. In case of any medical issue, consulting a doctor and Yoga expert also before practicing the Asana. Avoid this in case of neck injury, head injury, and knee injury.
38
Markatasana
Markatasana
Markatasana
{Monkey Yoga Pose}
Sanskrit Name: –Markatasana.
Meaning:– Monkey.
Position: –Lying Down.
-Steps And Benefits
In the Sanskrit language the meaning of word “Markat” is monkey so this Asana or pose named as Markatasana or Monkey pose. This is a great Asana for improving your spine flexibility and it is beneficial for the digestive system. Markatasana is best for strong hip-opening along with back bending actions. Markatasana may be an easy reclining twist that emphasizes relaxation and intentional respiration. There are three different ways to perform Markatasana, and each method has its significant value. In this section we described the Markatasana (monkey yoga pose) method or process.
Steps of Markatasana (Monkey yoga pose- method 1)
At first lie down straight and spread both hands at the level of your shoulders. Your palms should be open, facing towards the ceiling.
Now fold your both legs at the knees and keep them near to the hips.
After that turn your knees towards the right side, rest the right knee on the ground. Your left knee should rest on the right knee and the left ankle should rest on the right ankle.
Turn your neck to the left side.
During the process breathing normally.
Repeat this exercise from the left side and turn your neck to the right side as well.
Steps of Markatasana (Monkey yoga pose- method 2)
Lie down straight and spread your hands at the shoulder level. Your palms should be open and pointing the ceiling.
Fold your both legs at the knee and place them near the hips.
Keep a distance of one and a half feet between your both feet.
Bend your right knee towards the right side, rest it on the floor. Bend it to an extent that your left knee reaches the right toe and rest the left knee on the right side near the right knee on the floor.
Now turn your neck to the left side.
Repeat the same process with your other leg and turn your neck to the right side.
Steps of Markatasana (Monkey yoga pose- method 3)
Lie down straight and spread your hands parallel to the shoulders. Your palms should be open and facing the ceiling.
Raise your right leg at 90 degrees and slowly place it near to the left hand.
Turn your neck to the right side and stay in this position.
After holding the position for some time lift your right leg upwards up to 90 degrees and slowly rest it on the floor.
Repeat this process with your left leg and turn your neck in left side.
Benefits of Markatasana (Monkey yoga pose)
It increases the Flexibility of spine.
Good exercise for ribs and lungs.
It exercised the large intestine.
It is most beneficial in constipation and problems related to stomach.
It is very effective for relaxing mind along with body.
It enhances creativity.
Especially useful in backache, spondylitis, cervical, sciatica and slip disc.
It is beneficial in stomach pain and dysentery.
It makes the stomach light.
Beneficial for the pain in the hips and the joints.
Improves all the deformities of the spinal cord.
NOTE
Those People who are suffering from severe back pain do not perform this asana.
People who are suffering with hernia; should practice this Asana under the expert of yoga and doctor also.
If you really want to get all the benefits of Asana and Pranayama; for this you have to practice daily yog Asans and Pranayama.
39
Mayurasana
Mayurasana
Mayurasana
(Peacock Pose)
-Steps And Benefits
In Sanskrit, Mayur Stands for Peacock and meaning of Asana is Pose or Posture. As indicated by the Indian mythology, the peacock is a symbol of love and everlasting status. Mayurasana is said to take after a peacock when it struts around with its plumes down. Peacock Pose has a mess of advantages, and in spite of the fact that it looks entangled, with a little practice, Mayurasana (Peacock Pose) is very simple to do.
Style of Asana: – Hatha Yoga.
Level of Asana: – Intermediate.
Preparatory Poses: – Eka Pada Shirshasana, Chaturanga Dandasana.
Follow-Up Poses: – Balasana, Eka Hasta Bhujasana, Bhujapidasana, Adho Mukha Svanasana, Dwi Hasta Bhujasana.
Steps of Mayurasana (Peacock Pose)
Start this pose by sitting on your heels. Keep some distance between your both knees.
Keep your hands on the ground with fingers points towards your body. Slowly bend your elbows and press them towards your belly.
Keep your abdomen firm. For this place your head on the ground, and work up the quality in your stomach.
Now stretch your legs out, in a way that your knees are straight and your feet are facing the floor.
Keep your shoulder bones strong and pushed into your back. Fix your bum and lift your head and look forward.
Move your body weight forward and raise your legs from the ground. Lift your body by your hands and it should be parallel to the ground.
Remain in this pose about 30 seconds and you can increase the holding time about one minute by daily practice.
After that put your head and feet on the floor and release the pose.
Benefits of Mayurasana
Peacock Pose removes toxins and detoxifies your body.
Improves the function of digestive system and makes abdomen stronger.
Peacock Pose is beneficial in piles and diabetes.
Strengthens and tones your reproductive system.
Mayurasana Improves sexual activity.
Makes your elbows, wrist, spine, and shoulders stronger.
Mayurasana improves your posture.
Reduces anxiety and stress and give calmness to the mind.
Increases your focusing power of the mind.
NOTE:
If you have an injury in your shoulder, elbow or wrist, shoulder or elbow, then avoid this. In Hernia, High B.P., Heart-related diseases, brain tumor, infections in the ear, eye, nose ,during pregnancy and periods avoid this Pose. If you are uncomfortable during the asana, release the pose quickly. If you are a beginner, you feel it’s difficult to adjust yourself in this asana, so use blocks for supporting your head and ankle
The name Naukasana comes from the Sanskrit words “Nauka” which means “boat” and meaning of Asana is “Posture” or “seat”. So this asana is called as Naukasana. This boat pose is beneficial to cure many physical disorders. Basically Naukasana helps to strengthen the lungs, liver and pancreas. Helps to increases the circulation of blood and maintain the sugar level. Naukasana is a posture in which our body takes the shape of boat. It makes circulation of blood and oxygen around abdomen and lower back at a time much faster. Naukasana is good for those who wishes to reduce belly and wants to develop abs muscles.
In this section we discuss basic Naukasana pose, because other types of Naukasana is advanced in level. First of all do simple pose of Naukasana, Once you are perfect than go for advanced level of this Asana.
Steps for Naukasana (Boat pose):-
Lie on your back with your feet together and arms beside your body.
Take a deep breath in and as you exhale, lift your chest and feet off the ground, stretching your arms towards your feet.
Your eyes, fingers and toes should be in a line.
Feel the tension in your navel area as the abdominal muscles contract.
Keep breathing deeply and easily while maintaining the pose.
Hold the position for few seconds.
As you exhale, come back to the ground slowly and relax.
Duration 3-4 repetitions daily but should not overdo.
Benefits of Naukasana:-
Strengthens the back and abdominal muscles.
Tones the leg and arm muscles.
Useful for people with hernia.
It helps to remove belly fat.
It improves digestion.
Helps in developing six packs ABS.
Improves the circulation of blood.
Give strength to thigh, hips, shoulder and neck.
Regulates the function of liver, pancreas and lungs.
Maintains the function of kidney, thyroid and prostate glands.
Contraindications of the Naukasana:-
Do not practice this yoga pose if you have low blood pressure, severe headache, migraine, or if you have suffered from some chronic diseases or spinal disorders in the recent past.
Asthma and heart patients are advised to avoid this pose.
Women should avoid doing Boat pose (Naukasana) during pregnancy and during the first two days of the menstrual cycle.
41
Padmasana
Padmasana
Padmasana
{Lotus Pose}
-Steps And Benefits
In yoga There are so many different – different Asans. Padmasana is one of them. This is simple and easy Asan to do. Doing any asana there is a lot of importance attached to being conscious and alert of what is being done. Relaxation and concentration play an important role performing Yog Asanas. Padmasana is the most easy and suitable asana for contemplation and meditation.
The word Padmasana is a Sanskrit word which means “lotus flower” so it’s also known as the “Lotus pose”. It is so called because of the lotus- like formation which made by our legs during this asana. Another name of Padmasana is “kamalasan” The word Kamal is a hindi word which means a lotus flower. It is a yogic exercise in which one crosses the legs while maintaining a straight posture. It is a important position for meditation.
While continues working in the office or workplace most of the people are sitting in the chairs for long time. They don’t have a chance to sit folding the knees. Keeping legs in the same position is harmful, if it’s not possible to do Padmasana in your office than trying to move your feet in clock wise and anti clock wise direction at regular interval for a few minutes. Office workers don’t sit in the chair continuously for a long time. At regular interval trying to stand up and walk for a minute.
Padmasana provides a good workout, is good for your mind and breathing, conditions the body and core, and increases flexibility. If you want to build strength, muscles need to be challenged to their max and while yoga can be strenuous, it has its limits. Although using only your body weight can be challenging when you first start doing Padmasana and your muscles quickly adapt, so the benefits diminish over time. A regular practice of this posture aids in overall blossoming of the practitioner, just like a lotus and hence the name Padmasana.
Padamam means Lotus and Asana indicates the seat which in turn indicates sitting in a position without any movement. It’s very important to be alert and be conscious while doing any Asanas, and your mind must be relaxed and concentrate while practicing yoga.
Steps of Padmasana (Lotus Pose)
Sit on the floor and stretch your legs, your legs should be straight in front. Hold the right leg in both the hands, fold the legs slowly and place it on your left thigh. Ensure that your feet should touch your navel.
Same like earlier fold the left knee, and hold it with both hands and place it on the right thigh close to the other. At this point your both knees should touch the floor and the foot should face upwardly.
Your spinal cord should be straight at this point. If you feel some difficulty while sitting in the posture for a long time, you can change the legs and then sit on the same position.
Your spinal cord should be erect, your both hands should be together or put the palms facing upside on the knee joints and the thumb must touch your index finger and the other fingers should face the upward.
Breathing process should be slowly – slowly and deeply. ( Inhale and Exhale) and focus on your breathing. Do this asana for 2 to 3 minutes in the beginning stage, once you are used to it then increase the time 15 to 30 minutes. Remember one most important thing don’t bend our body or head while doing this Asana.
Benefits of Padmasana
Padmasana is the highly preferred asanas by yoga practitioner in the beginning stage for increase the focus of mind and concentration. It helps in improving the concentration power and it will calms the brain also.
This Asana helps to preserve vital fluids in the body and prevents abdominal diseases and female disorders connected with the reproductive organs.
Doing this Asana gives your mind peace, solitude and longevity to the practitioner. It increases the hungry and helps to relax the body.
It can also helps in the stretches the ankle and knees. This Asana is the base for all asanas and it strengthens the hip and knee joints of the female and can get painless peaceful mind.
You can reduce the unwanted fat of hip and the thigh. This is the simplest and easiest asana which can practice by all the age group of men and women they can get benefits of yogasana.
NOTE
People who are suffering from ankle injury should not practice this asana. In case you have undergone a recent knee surgery please avoid this asana. If you have sprain in the leg, then our advise is not to do this asana. Don’t perform this if you suffering from severe back pain.
Our goal is making your life healthy and happy, it’s our goal also. Please give some time to your health. And our advise is do Asana as much as you can, but do in the right and proper way. Remember one basic thing “Health is wealth”, this is simple statement but have a powerful impact on life. If you are healthy and fit you are able to do any work, if you are not healthy than it’s hard to do work properly. If you really want to become successful and happy than add the yoga in your life style. Be healthy and be happy.
42
Parighasana
Parighasana
Parighasana
(Gate Pose)
-Steps And Benefits
Here is an another awesome yoga pose called Parighasana (Gate Pose), in this Parigha means an iron rod or beam which is use to lock the gate and the meaning of Asana is seat, Pose or Posture. While doing this yoga pose your body looks like an iron beam which is used to lock the Iron Gate. Parighasana provides an entrance way for the oxygen to enter our body and reach those parts that are typically overlooked. Basically, this yoga posture contains a mickle of advantages for the digestive System, spinal and respiratory system. In simple words Parigha means an iron bar that close the gate.
Kneel down on the mat and your toes are curled under. By Gate Pose you will get stability and this will opens up your soles of the feet. Or you can keep tops of your feet flat on the ground or mat.
Now extend (stretch) right leg outward on your right side, also rotate your hip outwards in a way that your kneecap faces the roof.
Make sure your stretched leg should be parallel as the kneeling knee, and your kneeling knee must be right under the hip of the same leg.
Breathe in and extend your left arm over your head, same as your body is extended.
Keep your arm close to ear, during this your shoulder blade must be sturdily pressed opposing your back.
Breathe out and turn to right side and permit your right hand to rest on your ankle, foot or thigh.
Now look up towards the roof or look forward and note that to keep your neck long.
Remain in the pose and take a deep breath.
Breathe in and slowly release the pose.
Relax and repeat the same procedure to the other side.
Benefits of Parighasana (Gate Pose)
Stretches adductor muscle, calves and hamstrings.
Parighasana makes your body lightens and energizes your whole body.
Gate pose stretches intercostal muscles between ribs. Intercostal muscles help in breathing.
Opens your shoulders and chest; and also stretches muscles in torso.
Beneficial for your lungs and abdomen organs.
Parighasana is also helpful in problems like allergies, cold, flu and
Scientific Aspect of Parighasana (Gate Pose)
Parighasana energizes and lightens the side of the body. This pose permits the breath to become three-dimensional. “Parigha” means that the bar that close the gate, and after you assume this stance, your body really resembles that bar. After you have a cough or a foul posture, the intercostal muscles become tight. This condition constricts respiration and therefore the movement of the skeletal structure. This attitude not solely helps to stretch these muscles however additionally helps relieve metabolism issues like asthma attack, cold, flu, and allergies.
When you coordinate your respiratory with the attitude, it calms the nerves and additionally cleans the vascular system. It additionally provides nourishment to the abdominal organs, thereby up digestion. This coordinated respiratory additionally roots your body and relaxed your mind. To realize these advantages, you would like to breathe and build a wave from your pelvis to your higher chest. You would like to inhale through your belly and expand the skeletal structure and replenish your chest. This attitude helps you win that wave-like motion in your respiratory.
NOTE
Don’t perform this pose in case of Knee injury. For this, use chair to sit and practice this instead of kneeling down. If you are suffering from neck pain or feeling dizzy then keep your gaze forward instead of looking up.
43
Parivrtta Janu Sirsasana
Parivrtta Janu Sirsasana
Parivrtta Janu Sirsasana
(Revolved Head to Knee Pose)
-Steps And Benefits
Parivrtta Janu Sirsasana (Revolved Head to Knee Pose) is an intermediate level pose for yoga practitioners. It is an intense stretch which improves your limberness and flexibility. Parivrtta Janu Sirsasana is a Sanskrit word; in which the meaning ofParivrtta means Revolved, Janu stands for Knee and the word Shirsa represents the head. You have to master in basic stretching asana, after that practice Revolved Head to Knee Pose.
Steps of Parivrtta Janu Sirsasana (Revolved Head-to-Knee Pose)
Sit down on the floor with widely open legs in forwarding direction (in front of you).
Now bend your left leg and fold your foot in your groin.
After that bend your right knee on a small scale and move it close to your right hip.
Breathe out, during breath out turn sideways close to the right and permit the back part of your right shoulder press close to the inner part of your knee.
Permit your right lower arm (forearm) a chance to float along within the right knee and twist forward close to the foot.
Now try to grab your right foot with both hands, the right hand along within the right knee and the left hand connecting for the toes of your right foot.
During holding the right leg, make sure to keep the left folded leg stay to the floor. At the same time slowly expand and straighten your knee.
During straighten, your right knee keeps your torso towards facing the ceiling.
After that raise your left hand and place it above your head pressing it across the left ear.
Isolate your elbows additionally extending your middle (Torso) as you do it.
Remain in this pose for few seconds.
Then release the pose, make sure that before discharging release the stretch first and then your arms.
After that come upward and breathe in at the same time.
Repeat the same procedure with your other leg and opposite side.
Benefitsof Parivrtta Janu Sirsasana (Revolved Head to Knee Pose)
Parivrtta Janu Sirsasana stimulates the liver, kidneys and other vital abdominal organs.
Revolved Head to Knee Pose is a very good pose for that stretches your hamstrings, shoulders, and spine.
Beneficial for armpits and shoulders.
Give relief in general back pain.
Release stress and fatigue and reduces anxiety.
Beneficial in Insomnia.
Good in Headache.
NOTE
Don’t come upward quickly in the twisted position coz this results injuries. If you are suffering from mild digestive system problems or suffering from diarrhea, don’t perform this Asana. All the yogic activities need guidance, so practice all the Asana in under the supervision of an expert person. If you have a medical history then concern you doctor before practicing. In early stage you are not able to fully perform this asana, do as much as you can or per your capabilities. This Asana needs lots of practice, so for this, you are good in other stretching and flexibility Asana or Basic level of Asana.
44
Parivrtta Surya Yantrasana
Parivrtta Surya Yantrasana
Parivrtta Surya Yantrasana
(The Compass Yoga Pose)
-Steps And Benefits
Parivrtta Surya Yantrasana is a seated Yoga pose and it is an intense asana coz it stretches out your hamstrings and opens up your shoulders. It is performed by advanced practitioners because Compass Pose is a very challenging Yoga pose. Parivrtta Surya Yantrasana needs patience and reverence. Before performing this pose, your body needs a good warm up (warm up of hamstrings, groin, hips, spine, and shoulders). Before trying this Yoga pose, practice some warm up Asana such as Surya Namaskar then go for this Yoga pose. Without warming up your body don’t attempt this Asana.
In this Parivrtta means revolved, turned around; Suryarepresents the solar, sun; Yantra stands for device or instrument and the meaning of Asana is seat, pose or posture. When you perform Compass Pose, your body looks like an instrument same as Compass, so that’s why this asana named so.
First, sit in the Dandasana (Staff pose) keep your spine erect. Now slightly rotate your left leg in an outward direction and bend your left knee, Keep the sole of your left foot to the inner right thigh.
With your left leg pressed against the ground or floor and pointing your knee outwards the left.
Breathe out and pull your right foot towards the groin.
Bend your right knee directly up. After that, place your right knee inward and hold (same like a hug) it near to your chest.
Breathe In, raise your right foot up by your left hand, when you turn the leg in an outward direction in a way the back of the leg faces out toward the right.
During this, keep your right arm around the outside of your right leg and under the knee, putting the right fingertips on the ground or floor.
Raise and extend your right leg, bring your right knee high up to your right shoulder.
Place your left hand on the outside of your right foot. Pull your left arm back behind your head during you straighten your leg.
Now slowly open up your shoulders, twisting your torso gently to the left. Lift up by the spine as you leaning back little toward your lifted leg.
Keep your most of the body weight on your right hand and right hip bone. Slowly raise your head without compressing your neck and look up to your left elbow.
Remain in this Yoga pose and keep normal breathing about 30 to 60 seconds if possible.
For discharging the pose, release your left hand from the right foot, untwisting your body when you lower your leg down and get back into the position of Dandasana, relax for few seconds. And repeat the same steps with your opposite leg.
(This Yoga pose is an advanced pose and needs lots of strength and flexibility in hamstrings. So try to lift and hold your leg as much as you are comfortable. May be you are unsuccessful in the first time, not to worry about this; with daily practice will make you better and better day by day. As we mentioned earlier, body warm up is essential for this, so precede the pose with good warm-up Asana like Sun Salutation (Surya Namaskar). Use a yoga strap for knee support and breathing properly during the Asana).
Benefits of the Compass Pose (Parivrtta Surya Yantrasana)
Parivrtta Surya Yantrasana stretches out the groin, shoulders, spine, and hamstrings and opens up your hips.
Right execution the Asana may stretch the tissue of the lung meridian which is good for respiratory organs.
Strengthens your spine, lower back, and limbs along with improves the flexibility of your muscle.
Compass Pose Improves your digestion and cleanses your digestive organs.
Parivrtta Surya Yantrasana is beneficial for your liver and kidneys.
Improves muscle flexibility.
NOTE
Avoid Parivrtta Surya Yantrasana (The Compass Pose), in back, neck or knee injury. Don’t go beyond over your capabilities. Breathe deeply in each step.
45
Parivrtta Ustrasana
Parivrtta Ustrasana
Parivrtta Ustrasana
{ Revolved Camel Pose}
-Steps And Benefits
Parivrtta Ustrasana is a variation of Ustrasana and this is an intermediate backbend pose and targets your shoulders, quads and very good chest opener. The word Ustrasana is comes from the Sanskrit word. In which Parivrtta means turned around, revolved or twisted; Ustra stands for camel and the meaning of Asana is Pose, posture or seat.
According to the text of Asana, it is believed that; Parivrtta Ustrasana opens three chakras (Energy centers in the body) which are mentioned above. Anahata chakra is associated with compassion, forgiveness, and love. Sahasrara and Visuddha are well known as spiritual chakras. Activating Visuddha is associated with authentic expression, higher communication and the highest truth of Yogi’s and Sahasrara is belongs to the source of enlightenment and divine.
Level of Asana: – Intermediate
English Name: – Revolved Camel Pose
Focusing Chakra: – The Crown chakra (Sahasrara), the heart chakra (Anahata), The Throat Chakra (Visuddha)
Steps of Parivrtta Ustrasana (Revolved Camel Pose)
First come into the Virasana (Hero Pose), with bend knees underneath you. Now, take your hands to your soles of your feet.
Breathe out and raise your pelvis up and far from your feet, as you move your upper body forward tuck your tailbone.
Keep your upper legs straight (perpendicular) to the ground.
Put your shins and feet strongly rooted on the floor or mat. Keep your both hands firmly gripped on the feet.
After that, pull up your navel as you lift and you feel arch is forming naturally by your back.
You should keep a strong hold by right hand on your right feet; slowly try to lift your left arm up towards the roof or ceiling.
Draw through the arm and out of the fingertips; try to reaching up without raising your hips, feet or legs. When you lift, your body slightly bends, at that point keep your hips square as you try to align your shoulders upwards.
Remain in this pose around 30 to 60 seconds with your eyes focusing up at the left thumb.
Breathe out and puts down your arms back to your feet and repeat the same process with your other arm. After that return to your initial position.
(If your muscles are tight then this Yoga pose is too difficult for you, in this condition try to keep your hands on the floor or mat instead of the feet. You can also lower down your pelvis little bit. Place a folded blanket under your knees for reducing the pressure of the weight on your knees)
Benefits of Parivrtta Ustrasana| Revolved Camel Pose
Revolved Camel Pose stimulates your digestive organs and improves your posture.
Beneficial in menstrual discomfort and in mild back pain also.
Helpful in asthma and other general problems of the respiratory system.
Calms your mind and reducing anxiety, fatigue, and stress.
Parivrtta Ustrasana stretches and strengthens your hip flexors, shoulders, abs, Quads, ankle, and groin.
NOTE
If you have the recent knee injury and in the case of hypertension avoid this Yoga pose. In migraines or insomnia don’t practice this. An incorrect practice of Parivrtta Ustrasana can cause neck or back injury, so it is strictly advised that perform the asana in the correct manner and in front of an expert.
46
Parivrtta Utkatasana
Parivrtta Utkatasana
Parivrtta Utkatasana
(Revolved chair Pose or Twisted Chair Pose)
-Steps And Benefits
“Utkata” is a Sanskrit word, which means frightening, intense, furious, wild or heavy and the meaning of Parivrtta is revolved.
Revolved Chair pose is one of the best stances for detoxifying your body and making strength. The bowed knee draws in and fabricates quality in your quadriceps, and the turn is known for ringing out the poisons in the abdominal area. The point is to get your thighs parallel to the floor yet that capacity accompanies time and practice. The passionate advantages of this posture are feeling grounded, and giving you certainty.
Other Names: – Twisted chair pose, Revolved pose.
Level of Asana: – Medium
Steps of Parivrtta Utkatasana
Start from standing position.
Adjust your feet to parallel with your feet toes touching and your heels marginally separated, twist profound into your knees, and lift your arms up over your head.
Now keep your hands in front of your chest in Namaskar pose.
Turn from your shoulders to right side without moving your hips or knees.
Put your left elbow on your right knee and bend your chest towards the right.
Press your both hands into each other for stability.
Now look down, on the off chance that one of your knees is in front of the other, pull that relating leg once more into your hip attachment. Something else, your knees ought to be simply over your lower legs (ankles).
Inhale deeply, and look up.
Breathe out to draw your shoulder bones together and further down your back.
Try to remain in the position for one to three minutes.
Exhale and get back to your initial position.
MODIFICATION: – You can keep your hand in “T” position and look up.
BEGINNER TIPS
On the off chance that your elbow doesn’t make it outside of your thigh, take in any variety of the turn that feels great.
BENEFITS of Parivrtta Utkatasana
Parivrtta Utkatasana improves digestion and increases metabolism.
Relieves stiffness in shoulders, spine and neck.
Twisted Chair Pose strengthens and stretches calf muscles.
Opens your shoulders, chest, and upper back.
Revolved chair Pose improves the motion in your ankles.
Stimulates your abdominal organs and your heart.
NOTE
This pose is not for those who are suffering from insomnia, low blood pressure, headache or those with ankle or knee injury. Pregnant women don’t attempt this.
In Neck Pain/Dizziness – Do not turn upward towards the hands. Rather, look straight ahead.
In case of Low Back Pain – Only dive as deep into the posture as you can while as yet keeping up your regular lumbar bend. Stop before your low back levels or adjusts in reverse. Keep on drawing in the lower midsection to bolster your spine.
In shoulder Injury – Only move inside your torment unfenced, ceasing before your ribs bulge forward, and keep the arms shoulder width separated.
47
Paschimottanasana
Paschimottanasana
Paschimottanasana
{Forward Bend Yoga Pose}
SANSKRIT NAME: PASCHIMOTTANASANA
ENGLISH NAME: FORWARD BEND POSE
-Steps And Benefits
The word Paschim literally means west, Uttana means stretched out and asana is pose. Here the word paschim (west) doesn’t mean the west side rather it indicated the back of the body. The back of body is referred as paschim here. Hence a posture in which back of the body or spine is stretched out is called paschimottanasana (forward bend pose).
Technique of Paschimottanasana:
Sit up with the legs stretched out straight in front of you on the floor.
Keep the spine erect and toes flexed towards you.
Bring your respiration to normal.
Breathing in, slowly raise your both the arms straight above your head and stretch up.
Slowly breathe out and bend forward from the hip joint, chin moving toward the toes keeping the spine erect.
Place your hands on your legs, wherever they reach, without putting much effort.
If possible hold of your toes and pull on them to help you go forward.
Stay in this position as long as possible.
After the exertion limit reached inhale and raise up stretching up your arms straight above your head.
Breathe out and bring your arms down placing the palms on the ground.
Relax for a while and try to feel the changes occurred in the body.
Note: it important to know that while bending forward it is important to move forward towards the toes, rather than down towards the knees.
Benefits of Paschimottanasana:
Stretches the whole spine specifically lower back, hamstring and hips.
Massages and tones the abdominal and pelvic organs.
Improves the circulation.
Stretches and strengthens the calf and thigh muscles.
Activates the spinal nerves
Tones the arms
Reduces abdomen fat
Therapeutic applications of Paschimottanasana:
Obesity
Indigestion
Less height
Useful for people who feel less energetic.
48
Pawanmuktasana
Pawanmuktasana
Pawanmuktasana
{Wind-Relieving Pose}
SANSKRIT NAME: PAWANMUKTASANA
ENGLISH NAME: WIND-RELIEVING POSE
Pawan = wind, air, gas
Mukta = relieve, release
Asana = posture, pose
The etymological meaning suggests that by performing this asana wind or gas (from abdomen) is released.
Technique of Pawanmuktasana:
From one leg alternatively
-Steps And Benefits
Lie down on your back with your feet together and hands by the side of your thighs.
Do not tighten your body just feel relaxed in this position.
Inhale and raise your left leg, exhale and bring your left knee towards your chest and press the thigh on your abdomen with clasped hands.
Breathe in again and as you exhale, lift your head and chest off the floor and touch your chin to your left knee.
Hold in there, as you take deep, long breaths in and out.
Try to be in this posture as long as possible.
Inhale and bring back your chest and head on the floor then exhale.
Inhale and lift your leg up straight along the knee then exhale and bring the leg back on the floor and rest in the supine position.
Repeat the same procedure with the other right leg also.
From both legs together:
Lie down on you back with your feet together and hand by the side of your thighs.
Just feel relaxed in this supine position.
Inhale and raie your both legs, exhale and bring your both legs towards your chest and press the thighs on your abdomen with clasped hands.
Breathe in again and as your exhale, lift your head and chest off the floor and touch your chin to your left knee.
Hold in there, as your take deep, long breaths in and out.
Try to be in this posture as long as possible
Inhale and lift your leg up straight along the kne than exhale and bring the leg back on the floor and rest in the supine position
Preat the same procedure with the other right leg also.
Benefits of Pawanmuktasana:
Strengthens the back
Massages the abdominal muscles.
Helps in digestion
Reduces belly fat.
Therapeutic application of Pawanmuktasana:
Indigestion
Constipation
Acidity
Arthritis
Contraindications:
One should avoid practicing this posture if following health issues are there: high blood pressure, heart problem, hyperacidity, hernia, slip disc, testicle disorder, menstruation, neck and back pain problem.
NOTE
in case of any health issues one should consult a yoga expert and it is also necessary to not exceed our own limitations while practicing
49
Adho Mukha Dandasana
Adho Mukha Dandasana
Adho Mukha Dandasana
{Plank Pose}
-Steps And Benefits
Adho Mukha Dandasana (Plank Pose) is an exceptionally essential posture utilized both as a part of the yoga world and in the sports world. In spite of the fact that this stance appears to be an irrelevant move, it is basic to survey your body. Adho means “down”, Mukha means “face” and the meaning of Dandasana is “staff”. This asana is famous as Plank Pose. In Sun Salutation Plank Pose is one of the positions.
Type: – Core, Arm balance
Other Names: – Phalakasana, Santolasana, Kumbhakasana, high Plank Pose
Steps of Adho Mukha Dandasana (Plank Pose)
First get into the position of Downward facing dog (Adho Mukha Svanasana) or lie down on the floor.
Now put your palms on the ground next to your shoulders.
Keep your feet flexible with the bottoms of toes on the ground.
Now breathe in deeply and press up to a pushup.
Your body ought to be in a straight line from your heels to the top of your head.
Press your navel toward your spine at the time tighten your buttocks.
Now look down at the floor to maintain your head in the neutral pose and breathe normally.
Remain in the position for 10 to 20 seconds. After that lower down your body to the ground and rest for a while then repeat the process 5 to 6 times.
Here are some other Variations of Plank Pose, which you should try. These are given below
Steps of Side Plank Pose
Get into the Plank Pose, which is mentioned above.
Pivot (rotate) your body to your left side and try to maintain the balance on your right arm, with your left feet stacked to your right side.
Keep your left hand on hip or broaden it toward the roof. Remain in the position for 10 to 15 seconds, come back to the full plank pose and lower yourself to the floor.
Rehash the activity on the other side.
Benefits of Plank Pose
Mukha Dandasana gives strength to your spine, arms and wrists.
Tones your abdomen.
Give strength to your upper body and core body.
Plank Pose lengthens your spine, strengthens your lower back muscles.
If you are suffering from Carpal tunnel syndrome, then perform this pose with your knee support or on your forearms. Patients of Osteoporosis strictly avoid this. Don’t go beyond over your limits and abilities. In medical issues, consult a doctor and Yoga expert before attempting any yogic activities.
50
Prasarita Padottanasana
Prasarita Padottanasana
Prasarita Padottanasana
(Wide-Legged Forward Bend Pose)
-Steps And Benefits
In Prasarita Padottanasana (Wide-Legged Forward Bend yoga Pose), Prasarita means spread, stretched out or outstretched limbs, in Sanskrit meaning of Pada is “foot” and Uttana means intense or stretched out.
Level of Asana – Basic
Also Known As – Wide Leg Forward Fold
Steps of Prasarita Padottanasana (Wide-Legged Forward Bend Pose)
First take a position of Tadasana, keep your feet wide separated. Keep your feet parallel to each other. Possibly heels somewhat out contrasted with the toes.
Now lift your inner curves, by drawing internal lower legs up, firm external edge of feet and big toes of feet into floor. Connect with your thighs by drawing them up.
After that you can join your palms together towards to your back and interlock your fingers. If this is too hard, simply seize an inverse elbows with your hands.
Breathe in stretch the front of the body, breathe out overlap forward from the hips, holding the back straight and the mid-section open, and keeping the hips over the heels.
Now bring your head towards the ground, and if your hands are caught, take your arms the distance towards the floor, while you keep up the vibe of the shoulder blades on the back.Take a couple of breaths here.
At the full forward curve you discharge the head down, you can put your head on the floor.
Remain in this position about 6 to 12 breathes.
Make sure that your back should be straight as much as you can, and not to overstretch your hamstrings.
To release this stance, breathe in and lift move down as you press into your feet.
Returned into Mountain Pose.
Benefits of Prasarita Padottanasana (Wide-Legged Forward Bend Pose)
Prasarita Padottanasana stretches your back and legs.
Wide-Legged Forward Bend Pose is best exercise for opening the hips.
Stretches your shoulders, chest and spine.
Prasarita Padottanasana relaxes your body and calms your mind.
Beneficial in mild backache problems.
NOTE
Ask a Trainer before doing any Asana and Don’t go beyond over your abilities.
51
Purna Bhujangasana
Purna Bhujangasana
Purna Bhujangasana
{Advance Cobra pose}
Sanskrit Name: – Purna Bhujangasana.
English Name: – Full Cobra pose (Advanced Cobra pose).
-Steps And Benefits
In term of Sanskrit the word “Bhujanga” stands for cobra and the Asana means sit, posture or pose. Full Cobra pose or Purna Bhujangasana is the advanced level of Bhujangasana. This Asana is called Bhujangasana coz in this your body is raised in a very manner that resembles a snake. Purna Bhujangasana is typically not simply done by everybody. Your spine ought to have a good quantity of flexibility if you wish to accomplish this posture. However, it’s always smart to start out practicing for it, just in case you’re not affected by any back pain. Attempting to try and do this posture, you may be ready to unleash the stiffness of your entire back- cervical, middle and lumber back, as well as build your neck free. Bhujangasana is the simpler version of Purna Bhujangasana – within which only the upper body is raised and also the legs stay at the ground. Doing this posture, our spine becomes as versatile as that of a snake. Besides the back, we have a tendency to conjointly stimulate our heart, chest.
Steps of Purna Bhujangasana (Advanced Cobra pose)
First lie down on your stomach. Your forehead should be Relax and resting on the ground.
Keep your legs join together and keep your arms near the body.
Keep your hands beside the chest, palms pointing to ground.
Now inhale and slowly raise your upper part of body along with chest, till the navel. (Don’t do a jerky movement. Be gentle and slow).
Now exhale and bend your spine backwards.
Now release your neck.
Try to hold this position for thirty seconds.
Now gently elevate your legs along with bending knees, and try to place your feet as near the head as doable.
Try to touch your head with your feet’s toes. (as much as you can).
Try to hold this position for thirty seconds.
Breathe out (exhale) and come back to the initial position.( slowly down your legs first, and also the torso.
Now take a rest for sixty seconds.
Repeat this process for 4 to 5 times in one session.
Benefits of Purna Bhujangasana (Advanced cobra pose)
It removes stiffness from the neck, chest and shoulders.
It stretches the abdominal muscles.
Helps to remove flab from the abdomen.
Beneficial in many male urino-genital problems and female gynecological problems.
Reliefs in back pain by strengthening the muscles of the back.
Makes spine strong and flexible.
It stimulates the endocrine and digestive system.
Strengthen abdominal and back muscles.
Beneficial in problems of cervical spondylitis, and all kinds of spinal problems.
NOTE
People with severe back pain, spinal injury and pregnant women strictly avoid this pose. Not to practice this pose in case of abdomen surgeries, ulcers and hernia. Don’t go beyond over your capabilities. Always concern a expert before starting any yogic activities.
52
Rajakapotasana
Rajakapotasana
Rajakapotasana
{King Pigeon Pose}
-Steps And Benefits
Rajakapotasana (King Pigeon Pose) is the Advanced level of Pigeon pose, In Sanskrit “Raja” means King and the meaning of kapot is Pigeon and Asana means Pose, posture or seat. king pigeon Pose is rehearsed in a situated position. It is a reclined or backbend pose that makes the mid-section puff up, in this manner taking after the position of a pigeon. This is the way this asana is named Raja (lord) kapot (pigeon) asana (posture). Rajkapotasana is a propelled yoga posture. This is the second level of Kapotasana and also known as Ek Pada Rajakapotasana (One – legged King Pigeon Pose). Before doing this practice its basic level.
Also Known As: – Ek Pada Rajakapotasana (One – legged King Pigeon Pose)
Steps of King Pigeon Pose (Rajakapotasana)
Begin off on your fours, ensuring your knees are set directly under your hips and your hands somewhat in front of your shoulders.
After that tenderly slide your right knee forward, with the end goal that it is simply behind your right wrist. During this, keep your right shin under your torso, and acquire your right foot front of your left knee. The exterior of your right shin must lie on the floor.
Gradually, slide your left leg to the back. Rectify your knee, and drop the front of your thighs to the floor. Bring down the exterior of your right backside on the floor. Place your right heels before your left hip.
You can also point your right knee towards the right, to such an extent that it is outside the line of the hip.
Your left leg ought to broaden itself straight out of the hip. Ensure it is not turned or bent to your left side. Now rotate it inwards, with the end goal that its midline is squeezed against the floor.
After that, take a long and deep breath; while you breathe out bend left leg from the knees. At that point, push your middle back and extend as much as you can so that your head touches your foot.
Raise your arms, tenderly collapsing them at your elbows. Utilize your hands to bring your foot towards your head.
Keep up the upright position of your pelvis. Push it down. At that point, lift the lower edges of your rib confine against the weight of the push.
For lifting up your mid-section (Chest), push the highest point of your sternum straight up and towards the roof.
Remain in this position around 30 to 60 seconds.
Now put down your hands back to the floor and put your left knee down. Slowly slide your left knee forward.
Breathe out and get into the Adho Mukha Svanasana.
Rest for sometime; returned on your fours and relax. As you breathe out, do the asana with your left leg forward and right leg at the back.
Repeat this process with your right leg forward and once with your left leg forward.
Benefits of the King Pigeon Pose (Rajakapotasana)
Rajakapotasana stretches your entire lower body.
It massages your abdominal organs, thereby improving digestion.
Strengthens your back and it relieves in back problems like sciatica.
KIng Pigeon pose opens up your hips and makes your hips more flexible.
The profound stretch calms the body of anxiety and tension.
It opens up the mid-section (chest) and reinforces the crotch.
king pigeon pose likewise enhances the working of the urinary and regenerative frameworks (reproductive systems).
NOTE
Practice this pose under the supervision of an expert yoga trainer coz it is an advance pose. One false stretch could harm you. If you are a beginner then don’t attempt this Pose, do this pose after one or two months regular practice of yoga.
In case of ankle, sacroiliac, or knee injury avoid this. Pregnant women and people who have tight thigh also avoid this.
53
Sarvangasana
Sarvangasana
Sarvangasana
{Shoulders stand Pose}
Sanskrit Name: – Sarvangasana
Other Names: – Salamba Sarvangasana, Niralamba Sarvangasana
Preparatory Poses: – Virasana, Halasana
-Steps And Benefits
In Sanskrit Sarvangasana is the combination of two words (Sarva and anga) when these two words are combined together and form Sarvangasana. (Sarva + anga). In Sanskrit Sarva means all and anga stands for limbs or body part. In this Pose every part of the body is involves so that’s why it is known as Sarvangasana yoga pose. You can perform Sarvangasana yoga pose in two ways one method is called Salamba Sarvangasana yoga pose and another is
Niralamba Sarvangasana yoga pose. In Salamba Sarvangasana yoga pose, you use fold blanket and lie down on the blankets for your shoulder support and this is called Salamba Sarvangasana yoga pose. In second way, you have to perform this without the support of blankets and performing Sarvangasana yoga pose without support is known as Niralamba Sarvangasana. Here we described the Sarvangasana without support means Niralamba Sarvangasana. It is acknowledge as the best Asana among the all Asanas.
Steps of Sarvangasana yoga pose
Lie down on your back straight.
Breathe in and breathe out, lift your both legs in the upward direction.
Stop at that point when both legs make a 90 degree angle with the floor.
Make the Uttanpadasana Posture.
While exhaling lift your waist; push your legs to backward over the head.
Use your both hands for supporting waist.
Get your legs, back and waist in one straight line.
Stretch your toes towards sky, keep your eye on your toes.
Hold the position for some time, keep normal breathing.
Slowly get back to initial position.
Repeat this for three to four times.
Benefits of Sarvangasana yoga pose
Controls and cures the issues related to genital organs.
Beneficial in constipation.
Cures varicose veins and hemorrhoids.
Useful in problems related to Ears, nose and throat.
Vivified the blood circulatory system, digestive system and respiratory system.
Freshen the thyroid gland; coz during pose lots of blood flows towards throat.
Cures sexual disorders.
Control and helps to restore seminal fluid loss through night wetting or Masturbation.
Beneficial in Asthma, diabetes, liver disorders and intestinal disorders.
Controls shrinking of skins and wrinkles in face.
NOTE
Avoid this pose, in case of High blood pressure, Spondylitis, slip disc, middle ear problem and in weak or old people. Old people or weak people try Viparitakarani as alternate for this Asana and get all the benefits of Sarvangasana yoga pose. Use pillows when you are not able to raise body.
54
Shalabhasana
Shalabhasana
Shalabhasana
{Locust Pose}
Pose Name: – Shalabhasana
Sanskrit Name: – Shalabhasana.
Meaning: – Locust or grasshopper.
-Steps And Benefits
In Sanskrit the word “Shalabh” stands for Locust or grasshopper which is a one type of insect, basically found in grass. While doing Shalabhasana the complete body shape seems like a locust or grasshopper structure thus this posture is additionally known as Locust pose. Shalabhasana advantages to strengthen back muscles and curing ailments like sciatica and back ache. There are total three methods for practicing Shalabhasana. We describe these methods one by one in a correct manner. This Asana is simple to do and suitable for everybody. This is the special Asana for the spine.
Steps of Shalabhasana (Locust Pose) Method 1
Lie down on your Stomach; place both hands underneath the thighs.
Breath in (inhale) and lift your right leg up, (your leg should not bend at the knee).
Your chin should rest on the ground.
Hold this position about ten to twenty seconds.
After that exhale and take down your leg in the initial position.
Similarly do it with your left leg.
Repeat this for five to seven times.
After doing it with the left leg, inhale and lift your both legs up (Your legs should not bend at the knees; lift your legs as much as you can).
With both legs repeat the process for two to four times.
Steps of Shalabhasana (Locust Pose) Method 2
Lie down on your stomach; straighten your right hand while touching the head and the ear. (Keep your right hand straight in the ground in resting position).
Keep your left hand on the back.
Now inhale; lift your head and your right hand up along with lift your left leg above the ground level.
Hold this position for some time.
After exhale and slowly- slowly come back to normal position.
Similarly repeat this process with your alternate hands and legs.
Steps of Shalabhasana (Locust Pose) Method 3
Lie down on your stomach.
Take your both hands behind and hold the wrists of one hand with the other.
Now inhale; at first lift your chest as much as you can and look upwards.
Slowly lift your body from the both sides.
Now exhale and come back to your initial position.
Benefits of Shalabhasana
It is beneficial in all the disorders at the lower end of the spine.
Most helpful for backache and sciatica pain.
Useful for removing unwanted fats around abdomen, waist, hips and thighs.
Daily practice of this Asana can cures cervical spondylitis and spinal cord ailments.
Strengthening your wrists, hips, thighs, legs, buttocks, lower abdomen and diaphragm.
Toughens back muscles.
NOTE
Don’t practice this asana in case if any surgery has done. First of all practice Ardha Shalabhasana then practice entire Shalabhasana posture. Control your breathing while doing this pose.
55
Shashankasana
Shashankasana
Shashankasana
{Rabbit Pose}
SANSKRIT NAME: SHASHANKASANA
ENGLISH NAME: THE RABIT POSE
-Steps And Benefits
Shashankasana or the Rabbit pose is so called as the asana resembles a Rabbit in the final position. There are many benefits of this asana including relaxation, relieving of depression and much more. Age or flexibility is one of the barriers to perform or practice asana but Shashankasana is one of those which is very easy to perform and can be done by anyone regardless of age.
How (steps) to practice Shashankasana?
Sit down on the floor with a simple or yoga mat.
Stretch your leg in front and keep your spine erect.
Bend your right leg by your knee, bring it back and keep your right buttock on your foot.
Now bend your left leg by your knee, bring it back and keep your left buttock on your foot.
Keep your right foot big toe on the left foot big toe.
This position is named as vajrasana.
Sit comfortably in Vajrasana and keep your palms on your thighs.
Inhale and raise your hand straight upwards and stretch.
Now exhale and bend forward.
Try to touch your nose or chin to the ground.
Keep your arms stretched and palms on the ground.
Stay in this position as long as possible.
Keep your breath out.
But if you want to stay for longer then start breathing normally.
Then slowly inhale and rise up with straight arms.
Exhale and bring back your hands down and keep your palms on your thighs.
This is a complete cycle of shashankasana.
The practice can be repeated 5 to 10 times as per the convenience of time and comfort.
Benefits of Shashankasana (Rabbit pose):
Relaxing posture.
Tones the pelvic muscles.
Stimulates the abdomen organs.
Massages the abdominal muscles.
Can help in sexual disorders.
Gives a good relaxing stretch to the spine.
Variations:
There are some variations of Shashankasana. One of the popular variations is done by placing the hands behind the back, instead of taking it all the way to the front.
How to do this variation?
Start in Vajrasana.
Take your hands to your back and hold your left hand with the right hand.
First, inhale and with exhalation bend forward till your head touches the ground (or as much as possible).
Remain in this for as long as possible. Slow and relaxed breathing can be done in the final position.
Inhale and raise the body up and then relax.
56
Shirshasana
Shirshasana
Shirshasana
{Headstand Pose}
Name: – Shirshasana
Sanskrit: – ????????
Meaning: – Headstand Pose
Pose Type: – Upside down
-Steps And Benefits
Shirshasana is comes from the Sanskrit word “Shirsha” which means ‘Head’. There are so many variations in Shirshasana, in this we describe Salamba Sirshasana (supported headstand pose) and this is a simple type of Shirshasana among all the variations of Shirshasana. In this the body is totally inverted and held upright bolstered by the lower arms, and the crown of the head lies lightly on the floor.
Sirshasana is also known as the ‘king of all Asanas’ due to its various medical advantages, is an inverted stance. Its physiological impacts can be felt in the whole organism, yet all the more particularly at the level of the blood circulation, assimilation and endocrine system.
Steps of Shirshasana (Headstand yoga pose)
At first go to the Child Pose (Balasana) from this pose snatch your elbows and interlock your fingers to shape an equilateral triangle. (It’s a base to the pose for your head support).
Now bring down your crown of the head to the mat on the floor and the back side of your head is touching your hands. (Which you interlocked in earlier step, support your head by your hands).
Try to straighten your legs and slowly-slowly place your legs towards the direction of head. Your back should be straight.
Now bend your knees and keep your heels near to the butts.
After that slowly- slowly raise your legs straight at the angle of 90 degree.
Breathe normally without any strain.
Hold the position as much as you can.
Now gently bend your knees and keep your heels near to the butts and come into the child pose.
(In the starting stage hold the position for a few moments, day by day increase the duration, if you feel uncomfortable leave the pose as soon as possible).
Benefits of Shirshasana
Helpful in stress and increases the concentration.
It improves the blood flow to the Eyes.
Gives strength to arms, shoulders and core muscles.
Slows down the aging problems.
Improves the blood circulation to the head and scalp.
Improves the digestion and elimination process.
Reduces fluid build-up in your feet, ankles and legs.
Increases the level of hemoglobin in the blood.
Gives a gentle massage to the internal organs.
It balances and stimulates the process of the endocrine glands, mainly the pituitary and pineal glands.
There are so many variations in Shirshasana and if you want to perform variations, first you have to master in basic pose of Shirshasana (Salamba Shirshasana).Once you are master in basic then try these variations according to your comfortable level.
This Asana should be avoided in the case of neck injury, severe headache. During menstruations avoid this. People who are suffering from high B.P. problems, heart problems, brain injury, conjunctivitis, glaucoma, hernia, obesity and hypertension are strictly advised not to perform this Asana. Consult an expert and doctor also before doing any yogic activities.
57
Adho Mukha Vruksasana
Siddhasana
Siddhasana
{The Accomplished Pose}
Sanskrit Name: – Siddhasana (The Accomplished Pose)
Meaning: – Accomplish, achieve.
Position: – Sitting
-Steps And Benefits
Siddhasana is a Sanskrit word in which the meaning of ‘Siddha’ is achieve, accomplish or finish and the meaning of Asana is sit, pose or posture. Siddhasana is another simple meditative pose use for meditation or other yogic activities. In term of Hath Yoga Pradipika (Yoga text) Siddhasana is the fourth very effective sitting poses which suited for Dhyan (meditation). In Hatha Yoga Pradipika there are 84 different- different Asanas are mentioned; in this text it is said that every yoga learner must attempt Siddhasana, among the eighty four Asanas. According to the meditation practitioners, Siddhasana is the second best sitting asana after Padmasana (Lotus Pose.)So some yoga practitioners assume Siddhasana is the most effective of all Asanas for meditation. According to Hatha yoga Pradipika, the practice of this pose purifies all the 72,000 nadis or energy channels or energy gateway within the body, by which the prana flows. This Asana is simple to perform and suitable for everybody.
Steps of Siddhasana (The accomplished pose)
First sit comfortably on the floor, keep your legs close to each other.
Now keep your left foot at the perineum. (The area is that the soft tissue between the anus and also the male reproductive gland). Females ought to place their left foot within the labia majora of the vagina.
Now keep your right foot over your left foot.
To create the pose steady, slide your right foot toes into the gap between the left calf muscles.
Your knees ought to touch the ground.
Keep your spine erect during the process.
You can press your chin against the chest.
Keep focusing in the space between the eyebrows.
You have to attentive to your respiration process.
Breathing should be natural and deep.
Place your hands on the knees, or you can make Jnana gesture of Chin gesture with the fingers.
Remain in this position for as long as you can.
Benefits of Siddhasana (The Accomplished Pose)
It is one of the important Asana used for meditation. One can maintain this position for a long duration.
Makes spinal column straight and steady.
In Siddhasana, the heel is kept pressed against the Muladhara This ensures that the energy currents flow upwards towards the spine.
This Asana gives the control over sex urge and the sexual functions.
It stabilizes the nervous system.
NOTE
Step by step increase the time period of sitting in this Asana. Don’t go beyond over your abilities. Ask an expert before attempting any Yogic activities.
58
Adho Mukha Svanasana
Siddhasana
Siddhasana
{The Accomplished Pose}
Sanskrit Name: – Siddhasana (The Accomplished Pose)
Meaning: – Accomplish, achieve.
Position: – Sitting
-Steps And Benefits
Siddhasana is a Sanskrit word in which the meaning of ‘Siddha’ is achieve, accomplish or finish and the meaning of Asana is sit, pose or posture. Siddhasana is another simple meditative pose use for meditation or other yogic activities. In term of Hath Yoga Pradipika (Yoga text) Siddhasana is the fourth very effective sitting poses which suited for Dhyan (meditation). In Hatha Yoga Pradipika there are 84 different- different Asanas are mentioned; in this text it is said that every yoga learner must attempt Siddhasana, among the eighty four Asanas. According to the meditation practitioners, Siddhasana is the second best sitting asana after Padmasana (Lotus Pose.)So some yoga practitioners assume Siddhasana is the most effective of all Asanas for meditation. According to Hatha yoga Pradipika, the practice of this pose purifies all the 72,000 nadis or energy channels or energy gateway within the body, by which the prana flows. This Asana is simple to perform and suitable for everybody.
Steps of Siddhasana (The accomplished pose)
First sit comfortably on the floor, keep your legs close to each other.
Now keep your left foot at the perineum. (The area is that the soft tissue between the anus and also the male reproductive gland). Females ought to place their left foot within the labia majora of the vagina.
Now keep your right foot over your left foot.
To create the pose steady, slide your right foot toes into the gap between the left calf muscles.
Your knees ought to touch the ground.
Keep your spine erect during the process.
You can press your chin against the chest.
Keep focusing in the space between the eyebrows.
You have to attentive to your respiration process.
Breathing should be natural and deep.
Place your hands on the knees, or you can make Jnana gesture of Chin gesture with the fingers.
Remain in this position for as long as you can.
Benefits of Siddhasana (The Accomplished Pose)
It is one of the important Asana used for meditation. One can maintain this position for a long duration.
Makes spinal column straight and steady.
In Siddhasana, the heel is kept pressed against the Muladhara This ensures that the energy currents flow upwards towards the spine.
This Asana gives the control over sex urge and the sexual functions.
It stabilizes the nervous system.
NOTE
Step by step increase the time period of sitting in this Asana. Don’t go beyond over your abilities. Ask an expert before attempting any Yogic activities.
59
Sukhasana
Sukhasana
Sukhasana
{Easy Yoga Pose}
-Steps And Benefits
The Sukhasana is very simple to perform for people of all ages and levels of physical wellness. The term ‘Sukhasana’ is gotten from the Sanskrit word “Sukham” which signifies “delight” or “bliss” and “asana” signifies ‘posture’. All the Asanas are categorized into three parts – Basic Asana, intermediate and advanced. As an amateur (Beginner) you are not able to attempt the advanced asanas. So this fundamental Asana is best for beginner to begin their yoga session. This is meditative and relaxing pose. Sukhasana is easy to perform.
There is no preparatory poses for this, because this asana is preparatory pose for other asanas.
Steps of Sukhasana (Easy Yoga Pose)
Sit down normally on the floor. (If you are not used to sitting on the floor or you are uncomfortable, then keep one thick folded blanket on the floor for firm and flat base for sitting). Stretch out your legs ahead in front.
Now cross your legs and broaden your knees, in order that you can slip your both foot under the opposite knee.
After that you have to bend your knees along with fold your legs.
Keep your feet loose, in order that the external edges lay on the floor and the inner curves are settled beneath the inverse leg.
Your thighs and crossed legs ought to frame a little triangle. Keep some space between your feet and pelvis.
Now sit with your buttock in a neutral position. (For this, you have to press your hands opposing the ground and lift your sitting bones a bit). Attempt to hold for a breath or two and after that gradually bring down yourself back on to the floor.
Balance your tail bone and pubic bone in a manner that they are equidistant from the floor.
Keep your hands on your knees with palm facing down and expand your tailbone against the floor. (You can keep your hands in Gyan mudra).
(You might need to rotate the cross of your legs, particularly in the event that you attempt this stance consistently. You ought to hold this pose for whatever length of time that you are agreeable).
Benefits of Sukhasana (Easy Yoga Pose)
It stretches and Lengthening your spine.
Broadens your collarbones and chest.
It calms your mind.
Enhance your condition of peacefulness and serenity.
Kick out anxiety, stress and mental tiredness.
It helps in improving body posture.
It opens your hips.
It helps in reducing fatigue.
It strengths your back.
It stretches your ankles and knees.
It gives gentle massage to your knees, calf muscles and your thighs also.
NOTE
As the name proposes, the Sukhasana yoga stance is known as a simple stance and comfortable Asana. Therefore it doesn’t have excessively numerous contraindications. Individuals who are experiencing backache or back agony shouldn’t stay in this position for over 5 minutes. People who have experience the knee injury are advised not to sit in this position for long time. Avoid this in case of joint or knee related problems. Always consult a yoga expert before doing Asana and Pranayama.
60
Supta Padangusthasana
Supta Padangusthasana
Supta Padangusthasana
{Reclined Hand to Big Toe Pose}
-Steps And Benefits
Level of Asana: – Basic Style of Asana: – Iyengar Yoga Preparatory Poses: – Baddha Konasana, Uttanasana, Adho Mukha Svanasana Follow-Up Poses: – Seated forward bends and Standing Poses Also Known As: – Reclined Hand to Big Toe Pose
Supta is a Sanskrit word which means Reclining, Pada stands for foot, Angustha represents the Big toe of foot and the meaning of Asana is pose.
This pose gives you a deep stretch along with it opens up your legs completely. It is additionally said to enhance both your general physical and psychological wellness. Many individuals wind up honing this asana as extend without knowing the name of the pose; however this posture has a ton to offer.
Steps ofSupta Padangusthasana
Rests on your back with your legs extended and flexed your feet. Now press your feet by your heels.
Breathe out and pull your right knee towards your mid- section (chest), and circle a strap around the curve or ache of your right foot. On the off chance that you are a prepared yoga expert, utilize two fingers and snare them onto the enormous toe
After that, raise your right leg up to the roof or ceiling and keep your leg straight in a way that your arms are parallel to each other, and press your shoulders towards are the floor.
Continue pushing and stretching your left leg, pushing the highest point of your left thigh down with the left hand. The augmentation of the right leg must make an agreeable extend in the back of the leg.
You may hold the posture here or turn your right leg out, keeping that leg down on your right side. Yet, in the event that you do this, you should guarantee your left hip is grounded on the floor.
Remain in the pose about 30 to 60 seconds or as much as you can.
Repeat the same process with your left leg.
Benefits of Supta Padangusthasana
It stretches thighs, hips, hamstrings, calves and groin.
Supta Padangusthasana Makes your knees stronger.
Stimulates the prostate gland.
Vitalize your digestive organs along with improves digestion.
Gives relief in backache, sciatica and menstrual related discomfort.
As an apprentice, you should attempt this pose with the heel of the leg pressed against a divider or a wall. In any case, if your body is still too firm, you can put a piece under the hip of the raised leg (the support under the thigh relaxes the internal crotch), and after that, when you bring your leg as an afterthought, you can lay it on the block.
Pose Variations
On the off chance that you can utilize your fingers rather than a strap to hold your toes and do the asana, it is the propelled adaptation of this stance. This accompanies exceptional practice and steadiness.
NOTE
Abstain from doing this asana on the off chance that you have a migraine or the runs (diarrhea). On the off chance that you have circulatory strain, raise your head and neck utilizing a collapsed blanket, and after that attempt the pose.
61
Supta Vajrasana
Supta Vajrasana
Supta Vajrasana
{Reclined Thunderbolt Pose}
-Steps And Benefits
Sanskrit Name: – Supta Vajrasana
English Name: – (Reclined Thunderbolt Pose).
Preparatory pose: – Vajrasana.
The meaning of Supta in Sanskrit is ‘reclined’ and Vajra means ‘thunderbolt’. This is the important and very useful Asana for improving the digestive system and Stamina.
Although there are fourteen variations during this Supta Vajrasana, practicing one and mastering it’s enough to tone your body.
Supta Vajrasana is a advanced and reclined version of Vajrasana where the higher body reclines backwards, so the rear rests on the ground. The arms rest on the ground to either aspect of the trunk, with the palms facing up.
It is additionally referred to as ‘Supta Virasana (Reclined Hero Pose)‘ and has minor variations like Eka Pada Supta Vajrasana (One-Legged Reclining fastened Firm Pose) or Ardha Supta Vajrasana (Half Reclined fastened Firm Pose) involves one leg folded below the body whereas the opposite is being stretched.
It is additionally practice together with ‘Pavan Muktasana for rising the entire gastrointestinal system and intestine.
Steps of Supt Vajrasana
Sit comfortably in Vajrasana.
Keeping your palms on the floor beside the buttocks, your fingers pointing to the front.
Slowly bend back, putting the proper forearm and also the elbow on the bottom so the left.
Slowly bring down your head to the ground while arching the back. Place your hands on the thighs.
Try to stay the lower legs connected with the ground. If necessary, separate the knees.
Make certain that you simply don’t seem to be overstraining the muscles and ligaments of the legs.
Close the eyes and relax the body.
Breathe deeply and slowly within the final position.
Release within the reverse order, inhaling and taking the support of the elbows and also the arms raise the top higher than the bottom.
Then shift the weight on the left arm and elbow by slippery the body, then slowly returning to the beginning position.
Never leave the ultimate position by straightening the legs first; it’s going to dislocate the knee joints.
Repeat this process for 3 to 5 times and once you master it increase the time for 8 to 10 times.
Benefits of Supta Vajrasana
It tones the spinal nerves, makes the rear versatile and realigns rounded shoulders. The nerves within the neck, the thyroid and parathyroid gland glands square measure notably stirred.
It massages the abdominal organs assuaging digestive ailments and constipation.
The ribcage is stretched and dilated totally, that helps to fill the lungs to its piaximum capability and transportation additional element into the system.
It enhances courageousness and confidence level within the temperament.
It is useful for those stricken by respiratory disorder, and different respiratory organ ailments.
It loosens up the legs and strengthens them in preparation for sitting in meditation Asanas.
It enhances ability and intelligence.
This posture stretches the rear muscles and separates the individual vertebrae from one another, emotional pressure on the discs.
Often nerve connections emanating from the neural structure square measure squeezed by these discs, giving rise to numerous styles of aching.
This posture helps to alleviate this downside and encourages the discs to resume their correct position.
It regulates the functioning of the adrenal glands.
It tones the girdle muscles and also the sciatic nerves and it is useful for girls who have an underdeveloped pelvis.
It helps to alleviate disorders of each the male and feminine procreative organs.
Regular follow relieves constipation.
It helps to eliminate anger, aggression and relax the mind.
62
Supta Virasana
Supta Virasana
Supta Virasana
{Reclining Hero Pose}
-Steps And Benefits
Meaning of “Supta” is reclined and it is a Sanskrit word and the word “Vira” is derived from the word of Sanskrit. In Sanskrit the meaning of “Vira” is hero or a warrior; and Asana stands for Pose, posture or sit. Supta Virasana is a reclined form of Virasana in which your upper body reclines backwards in a way that your back rests on the floor or ground. Your arms rest on the floor to the side of your trunk, with palms facing upward. Supta Virasana is the next level of Virasana. Before practicing this Asana you have to perfect in simple form of Virasana. Once you master in Virasana then go for Supta Virasana.
The Supta Reclining Hero Pose (Virasana) is viewed as an intermediate level posture. It is not an extremely well known posture as the stance itself is marginally troublesome. Be that as it may, acing this stance has numerous advantages for ranges, for example, the crotch, thighs, mid-region, knees, and lower legs et cetera.
Breathe out and lean backwards towards the ground.
Put your weight on to your hands and after that your elbows and lower arms.
When you are inclining toward your elbows, place your hands at the back (on the pelvis)
Then discharge the buttocks and lower back by forcing/pushing yourself downwards towards your tailbone.
You may finish reclining by going towards the floor or by reclining with support.
You can use two blankets of same height for your support. These blankets help you while you are leaning downwards.
Remain in the position for about 30 to 60 seconds or up to 60 seconds.
Once you are master in it, you can hold it for 5 minutes..
Benefits of Supta Virasana (Reclined Hero Pose)
Strengthens your aches and stretches your quadriceps.
Supta Virasana is beneficial in the treatment of sciatica.
Reclined Hero pose helps in sleeping disorders like insomnia.
Improves digestion.
It helps to relieve menstrual pain symptoms.
Stretches your abdomen, deep hip flexors, ankles and thighs.
Asthma and other diseases like arthritis can also be treated by this pose.
It is beneficial in headaches, colds, flat feet, infertility, and menstrual problems e.t.c.
NOTE
If you have any problems related to knee, ankle and spine then avoid this pose. Perform all the yogic activities in under the supervision of certified yoga teacher, and concern doctor before doing any Asana.
Try to do all the Yogic activities in early in the morning. And keep a 6 hours gap between your meals and your practice.
63
Swastikasana
Swastikasana
Swastikasana
{The Auspicious Pose}
-Steps And Benefits
Sanskrit Name: –Swastikasana.
English Name: – The Auspicious pose.
Position: – sitting
Swastikasana is a Sanskrit word and which is made up from combinations of Su+Asti+ka, in this ‘Su’ means good, meaning of ‘Asti’ is ‘existence’ and “ka” stands for to make. Swastikasana is a simple meditation Pose. People who feel difficulties to perform Asanas like Siddhasana or Padmasana, Swastikasana is best for them. In India Swastika is a symbol of Happiness, good luck or Auspiciousness. In this Asana the position of the legs resembles the symbol of the Swastika, so that’s why this Asana is named as Swastikasana or Auspicious pose. Swastikasana (The Auspicious Pose) is simple to attempt and this is one of best Asana for meditative activity or for long sitting. This position may be described as one that helps to understand the unity of existence.
Steps of Swastikasana (The Auspicious Pose)
First sit comfortably on the ground or floor and spread out your legs in front of you.
Fold your left leg; keep the sole of your left leg against the inner thigh of your right leg.
Now bend your right leg and keep your right foot in the space between left thigh and calf muscles.
Catch your left foot by the toes and try to pull it up and place it between the right calf and thigh.
Your knees have to firmly touch the floor.
Maintain the pose so that you feel relax.
Your body and trunk should erect.
Place your hands on your knees in any mudra.
Control on your breath. Breathing slowly and normally.
You may also focus on the tip of your nose or center of eye brow it’s depending on the type of meditation technique.
In the beginning try to sit for 10 to 15 minutes in this meditative pose, day by day increase the time of sitting.
Benefits of Swastikasana (Auspicious Pose)
It is a best meditation Asana for those people who cannot sit comfortably or find difficulties in classical poses like Padmasanaand Siddhasana.
Those people who are suffering from varicose veins and pain in the leg muscles can perform this Asana.
Daily practice of this meditative pose increases the concentration level.
Give calmness to the mind.
Suitable for everybody in any age group.
NOTE
Avoid this Asana in case of sciatica and sacral infections, concern a doctor or well educated yoga expert before doing this Asana in any medical problems.
64
Tadasana
Tadasana
Tadasana
{Palm Tree Pose}
-Steps And Benefits
English Name: – Tadasana (Mountain pose or palm tree pose)
Sanskrit Name: – ??????/ ????????? (Tadasana or Samasthitih)
The word “Tada” is come from the Sanskrit word, which meaning is “Palm tree” or another meaning is “mountain”, and meaning of asana is “posture” or “seat”. So this asana is called Tadasana. Depending on the lineage practiced, Tadasana and Samasthitih may refer to the same asana or another similar asana. So the meaning of Sama is straight, level, upright or balanced and sthiti means stand or stay. Tadasana is the beginning and ending Asana of Surya Namaskar according to Ashtanga yog.
You can do this asana in two different positions:-
In standing position.
In Suspine position.
You can try one of them or both as your comfort ability level.
Steps of Tadasana (In standing position)
Stand straight on the ground, and take a small gap between your feet.
With deeply breathe (inhale), raise your both arms.
Keep your arms upward by interlocking your fingers.
Now come on the toes by raising your heels simultaneously
Feel the pressure of stretching from toes to fingers.
Try to maintain this pose as long as you can with slow and deep breathing.
Now come to the original position with deep breathing (exhale).
You can perform the number of rounds as per your convenience after having relaxation for a while.
Steps of Tadasana: – (In Suspine Position or lie down position)
Lie down on the floor to your back in Suspine position.
Keep your hands by the side of your body and palms should be facing downwards.
Try to keep your Legs, waist and neck all in straight line.
Inhale, and raise your both arms slowly upwards and place the arms behind your head.
Your both arms should parallel to each other, and palms facing upwards.
Retain your breath.
Now stretch your hands and feet in the opposite directions as far as possible.
Try to keep your legs and arms straight (not bend).
While exhaling, slowly bring down your hands to the starting position.
Repeat this for four times, and try to increase the duration you can stay in this asana.
Benefits of Tadasana
Due to deep breathing it provides strength and expansion to the lungs.
This is the best exercise to increase the height.
Develops and activates the nerves of the entire body.
It gives strength to vertebral column and heart.
Also Good for regulating the menstrual cycle in women.
Cures the problems related to the indigestion.
Give strength to arms and legs.
Helps to remove lethargy from body.
It reduces the problem of flat feet.
Cautions: –
Person who is suffering from headaches, low blood pressure and insomnia are advised to do this asana after consulting the yoga instructor.
During pregnancy skip this asana.
Beginner’s tip: – If you feel difficulty to maintain the pose on toes by raising the heels, than perform this exercise without coming into toes. And day by day try to maintain this pose on toes by raising your heels.
NOTE
Do asana as much as you can, do not go beyond your limitation or do not test your capability while doing Yog asana.
65
Tittibhasana
Tittibhasana
Tittibhasana
{Firefly Pose}
-Steps And Benefits
Tittibhasana is a Sanskrit word and made from the combination of Tittibha+ Asna. In Sanskrit Tittibha means small insect, fly or Firefly. Firefly Pose gets its name in light of the fact that the position that you come into while playing out the stance is like that of a flying firefly. This pose needs quality of the abdominal area and hamstrings that are adaptable. Be that as it may, regardless of the possibility that you have not faced these two, you can even now hone this testing stance.
Tittibhasana is an arm adjusting stance that joins the legs adaptability with center quality. At the point when the lower body is raised from the tangle, the stance reinforces the shoulders and wrists facilitate. In this, it’s important that you stay in elevated position by balancing your lower body in dispersing vitality and weight back forward similarly. This stance is one of the stances that should be polished reliably in order to immaculate them. Lamentably, the Tittibhasana or Firefly Pose is not instructed frequently in the daily yoga classes. Ashtanga yoga is the special case, where this Asana is a piece of the essential arrangement, giving a decent chance to play out this stance in each session.
Nonetheless, in the event that you are prepared to practice this posture, you ought to try to practice it consistently to encounter the advantages. It is additionally basic that you keep up a legitimate eating regimen to get the most out of this posture.
Follow-Up Poses– Downward facing dog pose, Uttanasana, Upward facing dog.
Level of Asana: – Advanced
Steps of Firefly Pose (Tittibhasana)
Start the Asana with Adho Mukha Svanasana.
Now walk towards your hands with the end goal that your feet are before your hands. At that point, let your hands through your legs, and press them behind the calves, with the end goal that you slither further through your legs.
After that keep your arms and shoulders as long ways behind your thighs as you can put them. Immovably put your palms behind your feet to such an extent that your heels are held with your thumb and pointer finger (index finger).
Delicately twist your knees and squat as you rest the back of your legs as near your shoulders as you can.
Once your fingers and palms are spread, make sure you shift your body weight onto them. Lift your feet off the floor. Straighten your legs first. Then, once you stabilize, straighten your arms. Squeeze your thighs against the upper arms to gain more height. At that point spread your fingers and palms, ensure you move your body weight onto them. Raise your feet off the floor. Rectify (straighten) your legs first. After that squeeze your thighs against the upper arms to acquire stature.
Remain in the pose about 30 to 60 seconds. In this there is no repetition, you want to repeat this process then do it for 2 or 3 times.
Benefit of Tittibhasana (Firefly Pose)
Tittibhasana (Firefly Pose) Makes your wrist stronger along with improves the strength of the arms.
It tightens and tones the area of the belly.
Stretches your back torso, inner groins, and hamstrings.
The Yoga pose also helps in bringing an overall sense of balance and improves core strength.
Firefly Pose gives the back torso and inner groins a good stretch.
Tittibhasana Good for your mind.
Improves digestion.
NOTE
Avoid this pose in case of Lower back injuries, wrist injury, and shoulder injury also.
Tittibhasana or Firefly pose needs more practice, so practice this in front of an expert person along with taking healthy diet, avoid junk food.
66
Tulasana
Tulasana
Tulasana
{Scale Pose}
-Steps And Benefits
Tula or Tola means “balance” or “measuring scale” by which we can measure or balance the weight of an object or body weight. Tulasana is also known as raised Lotus Pose or elevated lotus pose. This is an extraordinary stance performed in yoga that has its attention on the improvement of various parts of your body. Your knees, spine, and midriff (abdomen), alongside your shoulder muscles are enormously profited by performing this yoga posture. It is best done once you are perfect in the Lotus Pose or Padmasana. Your legs can be best kept in a cozy fit toward your body while you do Tulasana.
Avoid this Asana, in shoulder, wrist, Ankle and knee injuries. If you have tight hips and thighs, then avoid this. First, make your hips and thighs flexible by doing other asana for flexibility. If you feel any difficulty then use a block under your both hands for increasing the length of your arms, it helps to lift your legs. Always perform Yog Asana and Pranayama in a right way, if you really want to get the benefits of specific asana or Pranayama.
67
Upavistha Konasana
Upavistha Konasana
Upavistha Konasana
{Wide Angle Seated Forward Bend}
-Steps and Benefits
Here is an intense leg stretching Yoga Pose, which is named as Upavistha Konasana and Wide Angle Seated Forward Bend pose in English. In which Upavistha means sitting, seated, Kona stands for Angle. In simple words, this Asana is forward bending with leg stretching. This Asana seems to like easy but doesn’t take it this pose easily. This yoga pose needs more stretching and flexibility in your legs.
It is a very important stance, coz this pose used in many seated bend and twists related Asana as a preparatory pose. If you are comfortable performing this pose, it means you can attempt other seated bend, leg stretching poses easily. There is no repetition for Wide Angle Seated Forward Bend pose and it’s very beneficial for your legs and spinal.
Steps of Upavistha Konasana (Wide Angle Seated Forward Bend)
First, sit straight with your legs open in a way that they make 90- degree angle with your pelvis.
Now, keep your toes pointing up as you flex your feet and align your knees.
At that point, you feel curve in your lower back (for curve you may use prop; Place a firm cushion under your pelvis. The cushion gives your pelvis more stability to tilt forward).
Then, Keep your palms on the ground, behind your hips.
Take a long and deep breath in such a way that the sides of your body lift, by making a space in the spine.
Hang on for a few seconds if you feel a well stretch in your legs at that point.
Then, support your lower back and sucking your belly in, breathe out and fold.
Slowly place your hands in front of you. Stretch as much as you can, if you feel uneasy then stop. Breathe deep and long during holding the pose about 30 to 60 seconds.
Breathe out and slowly get back to your initial position.
(If you are performing Wide Angle Seated Forward Bend pose easily then go for variations by modifying the pose. On the off chance that you need to increase the extent, you should take the position, and reach for your huge toes (right to right and left to left) as you twist forward. Bolt your fingers around the toes and draw on the enormous toe as you lean in. Be that as it may, as you do Upavistha Konasana, you should likewise push through the base of the toes to keep the external and inward piece of your lower legs even. Twist your elbows on the sides, and lift them off the floor as your middle touches the ground.).
Benefits of Upavistha Konasana (Wide-Angle Seated Forward Bend)
Activates your core muscles and stretches your hamstrings.
This Yoga pose stimulates and toned your abdominal organs, makes your spine stronger.
It also stretches your adductor muscles of the groin.
Wide Angle Seated Forward Bend stretches the inside and back muscles of your legs and strengthens your vertebral columns.
Upavistha Konasana calms your mind and relaxes your body.
Helpful in arthritis and sciatica along with detoxifies your kidneys.
NOTE
Don’t perform this stance if you are facing problems related to hamstrings or groin. In the case of lower back injury and in the condition of pregnancy avoid this. Use folded blanket for sitting if you are facing lower back pain during this Wide Angle Seated Forward Bend pose. Stretch your legs wider as much as you can.
68
Urdhva Anjaneyasana
Urdhva Anjaneyasana
Urdhva Anjaneyasana
{Upward Crescent Moon Pose}
-Steps and Benefits
Urdhva Anjaneyasana comes under the basic level of Asana and it is performed in standing position. This Yoga pose targets your shoulders and the lower back. The word Urdhva Anjaneyasana is taken from the Sanskrit word, in which Urdhva means – Elevated, up, erects; Anjaneya is the name of Lord Hanuman and Anjana is the mother of Lord Hanuman and the meaning of Asana is Pose, seat or Posture.
Lord Hanuman is the most powerful, strongest, intelligent character in the Epic of Ramayana. We can say that this Yoga pose is inspired by Hanuman. And that’s why this Asana named so; this Asana is also known by the name of Upward Crescent Moon Pose.
Urdhva Anjaneyasana (Upward Crescent Moon Pose) is a Very easy and simple Asana for all age group of people.
Level of Asana: – Basic
English Name: – Upward Crescent Moon Pose
Steps of Urdhva Anjaneyasana (Upward Crescent Moon Pose)
First, come into the position of Tadasana (Mountain Pose), step your left foot about 2 feet back and raise the heel of your left foot. At this time, your both feet should be facing forward.
Raise your hands to your chest with palms pressing together like Anjali Mudra.
Now gently take your hands up towards the ceiling and your palms are joining each other (Namaskar or Anjali Mudra) and take deep breaths.
At this point, Visualize lengthening your spine in the upward direction along with tailbone towards the ground.
Make sure to keep your shoulders little down to make a space between your ears and arms.
When you reaching by your fingers, embrace (hug) your shoulder blades in towards your back to help stop your shoulders from moving in the direction (towards) of your neck.
Keep going on to actively reach up with your arms and by your pinky-sides of your hands.
Slowly try to arch your back to form a shape of crescent through your upper body along with your left leg.
Don’t take this Yoga pose as a deep backbend, so keep in mind not to bend too much, coz this can be injured you or put the strain on your lower back.
After that, gently tilt your head back without pressing your neck and look towards the ceiling.
Remain in this position about 30 to 60 seconds and keep controlled breathing.
For releasing the pose, keep your spine straight and put your hands down to your sides. Repeat the same steps with your other leg.
Benefits of Urdhva Anjaneyasana Pose
Upward Crescent Moon Pose improves your posture and beneficial in back pain.
It stretches and strengthens your shoulders, lower back, hamstrings, calves, chest, and ankles.
Urdhva Anjaneyasana Calms your mind and keeps stress away from your mind.
NOTE
If you are suffering from hypertension or any type of heart problems. Keep deep breathing in each step. In the case of Shoulder pain than putting your arms slightly parallel to each other instead of keeping the palms together in Namaskar/ Anjali mudra. In the condition of neck pain, don’t tilt your head back, but keep it straight.
69
Urdhva-Mukha Paschimottanasana
Urdhva-Mukha Paschimottanasana
Urdhva-Mukha Paschimottanasana
{Upward Facing Intense Stretch Yoga Pose}
-Steps and Benefits
First of all, you have to know the meaning of this Asana. Urdhva – Upward, up, Raised, Mukha – face, Paschima – west, back, back of the body, Tana – stretched, Uttana– straightened, intense stretch and the meaning of Asana is seat, pose or posture. Upward Facing Intense Stretch Pose is very much similar to Ubhaya Padangusthasana, but the difference is the stretch level. It improves blood circulation from head to toe and lengthens your entire backside. Best pose for kids for increasing their height. It is a very intense stretch Asana, so before doing Upward Facing Intense Stretch Pose perform the simple Paschimottanasana for increasing the stretch.
Start the Asana by sitting in the Dandasana (Staff Pose), after that lay down gently on the floor.
Breathe in and raise your arms to overhead. Breathe out and raise your legs straight off the floor.
Lift up your hips and take your feet to the hands, grab your big foot toe or the sole.
Inhale and keep your spine straight (during the process, it’s important that your spine should be erect).
Exhale, curl in and roll forward to maintain the balance.
Breathe in, as you balance well, set your eyes upwards (gaze upward).
Breathe out, fold your midsection (torso) to the legs (completely try to touch your torso to your legs, same as in Paschimottanasana). Use your limbs strength to maintain the balance and remain in the pose with five breath and it’s a final position of this pose.
(Don’t bend your knees, keep your legs and back straight and try to touch the shins with your forehead).
Benefits of Upward Facing Intense Stretch
This Yoga pose strengthens your hip flexors and abdominals; lengthens your hamstrings also.
Beneficial in mild depression, stress and calms your mind.
Urdhva-Mukha Paschimottanasana stretches your legs, shoulders, and spine.
Improves your digestive system; stimulates your kidneys, ovaries, uterus, and liver.
Increases your appetite, cure general diseases and helps to reduce obesity.
Upward Facing Intense Stretch Pose Lengthens your leg muscles intensely.
Relieves in back aches, it tones your internal organs.
Upward Facing Intense Stretch Pose Improves your concentration level.
NOTE
In the case of a knee injury, back injury and in hamstrings don’t perform this stance. This is a very intense leg stretching pose; so it’s important to practice the basic leg stretching Yoga Pose first. Benefits take time and need daily practices, therefore you have to practice daily for benefits
Follow up Poses: – Virasana, Dhanurasana, Tadasana, Matsyasana, Natarajasana
In this Asana, Urdhva stands for ‘Upward’ and Meaning of Mukha is ‘face’, meaning of Svana is ‘dog’ so it is called Upward facing dog pose or Urdhva Mukha Svanasana. While performing this asana your body posture is very similar to the dog. The Upward-Facing Dog or the Urdhva Mukha Svanasana is a basic resting posture which is fundamentally the same to the Bhujangasana or the Cobra posture. This is a learner’s stance which can be performed by any individual who has begun to learn yoga. This is a intermediate level of Asana but this posture is extremely easy to perform and advantages your wrists and additionally the lower back area.
Steps of Urdhva Mukha Svanasana
Lie down on your stomach, on a yoga mat. Place your legs extended back and in a straight line with your hips.
Keep your feet tops on the floor in resting position. Place your forearms perpendicular to the floor and twist your elbows keeping your palms right other than your waist.
Take a full breath and apply pressure on hands as though you are forcing yourself along the floor.
After that keep your arms straight and raise your upper body to upwards.
Feel the pressure discharging in your lower back and focus your weight on your wrists and hands.
You are currently in the Cobra Pose, Breathe out. (Remember one thing in cobra pose your navel area is touched to the floor but in this pose raise your navel area.
Again take a deep breath; gradually raise your thighs off the floor. Now your body will be supported on your hands and on the tips of toes. To help in your posture, roll your thighs inwards so that the weight on the calves is facilitated.
Lift your pubis in upward direction, pushing it towards your navel and narrow your hips points. Be that as it may, don’t strain your butts.
Try to keep your shoulder bones firm and permit the weight to be focused around your sternum.
Now lean your head in backward position.
Breathe frequently and remain in the posture for around 15 to 30 seconds. You can also hold this stance anyplace between 5-15 breaths.
Now breathe out and come down to your initial position. Rest for a while and repeat this 3 to 6 times.
Benefits of Urdhva Mukha Svanasana
Best exercise for your wrists.
Beneficial for lower back coz this pose stretches the lower back muscles.
Stretches the muscles of the shoulders and chest also.
It tones and stimulates the abdominal muscles and organs
It improves the posture of the body.
Beneficial for chest, heart and lungs.
It stretches the upper back and front of your body
Gives strength to your shoulders, wrists, arms and back bone.
Helpful in mild depression, fatigue and sciatica.
Very therapeutic in asthma problem. Because it stretches and give strength to lungs and chest.
Neutralize the problems related to bad posture.
NOTE
Those who are suffering or nursing a back injury don’t perform this asana and in case of carpal tunnel syndrome avoid it. If you are pregnant or having problems like migraine or headache please avoid this pose. Please concern a yoga specialist and Doctor before doing any yogic activities.
71
Urdhva Padmasana
Urdhva Padmasana
Urdhva Padmasana
{Lotus Pose in Headstand}
-Steps And Benefits
This Yoga pose is a variation of headstand Pose (Sirsasana) or you can say it next level of Sirsasana. In this Urdhva means – Inverted or upward, Padma– Lotus. This asana is a combination of Sirsasana+ Padmasana while doing this you have to perform both poses at the same time and that’s why it is named as Louts in Headstand Pose. Before doing this Yoga pose, you have to practice or master in some basic asana like – Urdhva Dandasana, Dolphin Pose, Dolphin Plank Pose and Sirsasana (Headstand). After practicing these asanas or mastering in it goes for Lotus Pose in Headstand.
First, practice headstand with the support of wall and slowly try to bend your legs one by one into the position of Lotus pose, but you have to master in Sirsasana first before performing Urdhva Padmasana. Urdhva Padmasana comes under the list of difficult Yoga pose so be careful because any fall can cause serious injury.
Level of Asana: – Advanced.
Steps of Urdhva Padmasana (Lotus Pose in Headstand)
First, place the yoga mat with folded blanket for your head safety and support. After that, get into the position of Sirsasana (Classical headstand Pose).
In the beginning, you may take the support of wall for your comfort; take your colleague or a friend help for preventing you from any fall and for your safety also.
After that, gently bend your right leg and put it on your left thigh, and place your left leg on your right (interlock both legs same as lotus pose or during Sirsasana perform lotus pose).
After performing Lotus pose, hold the position along with try to maintain your balance as much as you can. During the final position, breathe normally.
For discharging the Asana, straighten your legs and put down slowly on the floor.
Now take some rest in the Corpse Pose (Shavasana).
(Use folded Blanket and places it under your head, First, clear the basic level yoga poses and master in Sirsasana then go for Urdhva Padmasana (Lotus Pose in Headstand). Be Patience keep your mind calm during practicing asana. Perform asana in a correct way and in a systematic manner and daily practice is a very important part of any Yoga pose)
Benefits of Urdhva Padmasana – Lotus Pose in Headstand
In Ancient age, it is said that many Rishi’s performed this pose for “Tapasya” (Austerity).
Best for celibacy (Brahmacharya in Hindi) or who obey the rules of Brahmacharya.
Good for your brain, coz the flow of blood is increased towards brain during this pose.
Lotus Pose in Headstand gives all the benefits of classical headstand or you get same benefits like Sirsasana.
Beneficial in many nervous related problems and in glandular disorders also.
Urdhva Padmasana can help to improve memory and remove tiredness during mental work.
Lotus yoga Pose in Headstand Kick out tiredness and improves your memory.
NOTE
Avoid Lotus Pose in Headstand if you have Shoulder, hip, knee, wrist or back injury. Pregnant women, people having high B.P. or heart condition strictly avoid this. Try to sit in the lotus pose when you are comfortable then practice Sirsasana after that try this. Perform all the Yoga poses in front of trained person.
72
Urdhva Prasarita Eka Padasana
Urdhva Prasarita Eka Padasana
Urdhva Prasarita Eka Padasana
{Standing Split Pose}
This Yoga pose is the standing split pose, which tones your body. In yoga, split is used for giving you a good stretch. Before Practicing this Asana, you have good flexibility in your legs, neck, and back. The word Urdhva Prasarita Eka Padasana is coming from Sanskrit. In this, Urdhva= Elevated, upright, erect. Prasarita= Spread stretched out, expand or extend. Eka= One, single. Pada= Foot and the meaning of Asana is pose, seat or posture.
Focusing Chakra: – The Wisdom Chakra (Manipura chakra)
-Steps And Benefits
Steps of Urdhva Prasarita Eka Padasana
First of all, Lift your left arm up along with expands your right leg. Bend your torso towards the right when you breathe out. After that raise your left leg off to the floor (into the air).
After that, gently lean forward and move your torso to your right thigh. Keep your hands in resting position on the floor to manage the body weight.
Now, gently shift your body weight on your right leg while you are straightening left leg over your crown (head).
Note that, you have to rotate your hip joint and leg in a right way during performing this Asana.
Make sure that, you should keep your pelvis parallel to the ground; so that it may want to tilt towards the left for balancing your weight.
During the process, keep your both legs and knees erect, both of your knee caps facing straight direction. For keeping the lifted leg straight in the air you should push your chest towards the standing leg. Once you maintain the flexibility clasp your standing leg on the floor. Your torso descends your leg will ascend.
Hold the position about 30 to 60 seconds. Gently breathe out and slowly put down your leg on the floor and get back to the standing position.
Imitate the same process with your opposite leg.
(Beginner may use the support of wall for assisting lifted leg. Relax your neck and gaze towards your knee and keep in mind that not to strain your back. Raise your leg as much as you can).
Benefits of Standing split Pose
Standing Split Pose improves your balance stimulates your kidneys and liver.
Urdhva Prasarita Eka Padasana Give relief in Fatigue, headache, anxiety, mild depression, and insomnia.
Improves your focusing power. Stretches and strengthens your hamstrings, calves, quads, and groin.
Remove the tension from your cervical spine and good Yoga pose for your spine also.
NOTE
High or low blood pressure person, first concern your doctor. Avoid Urdhva Prasarita Eka Padasana (Standing Split Pose), in a migraine, low back pain, hip injury, ankle also in knee and shoulder injury. Take deep breathing during each step. Immediately don’t press or push yourself for performing the full standing split. Put on comfortable clothing before practicing any asana. Try to practice Pranayama and meditation after the asana.
73
Ustrasana
Ustrasana
Ustrasana
{Camel Pose}
-Steps And Benefits
Ustra literally means camel and Asana means the pose. Hence the name is Camel Pose. Ustrasana makes spine flexible and provides strength to it.
SANSKRIT NAME: Ustrasana
ENGLISH NAME: Camel pose
Technique of Ustrasana (Camel Pose)
Sit on the floor stretching your leg and keeping your spine erect keeping palms on the ground side by the buttocks.
Bend your leg by the keens and sit on your heels placing the buttocks between the heels, the right big toe overlapping the left.
Kneel on floor keeping your knees in line with the shoulders and sole of the feet facing the ceiling.
Keep your hand on thighs.
Inhale and arch your back and place your palms on the heels of the feet.
Keep your arms straight.
Do not strain your neck keep it neutral. Let your neck be free.
Stay in this final position for couple of breaths or as much longer as you can.
Breathe out and slowly come to the normal position withdrawing your hands from the feet.
Benefits of Ustrasana (Camel Pose)
Ustrasana Stretches the anterior muscles of the body.
Improves flexibility of spine and strengthens it.
Camel Pose Improves digestion
Gives relaxation to the lower back.
Useful as an initial practice for back bending.
Indigestion
Low back ache.
Cervical spondylitis
Reduces abdomen fat.
Thyroid and parathyroid.
Menstrual problems.
Contraindications: –
People suffering from severe back and neck injury, high or low blood pressure, migraine or other severe headache should perform this asana or posture under the guidance of a yoga therapist or expert. Else better to avoid the practice.
74
Utkatasana
Utkatasana
Utkatasana
{Chair Yoga Pose}
-Steps And Benefits
“Utkata” is a Sanskrit word, which means frightening, intense, furious, wild or heavy and the meaning of asana is to seat, pose or posture. Utkatasana (Chair Yoga Pose) is a simple pose, in this, you have to imagine that you are sitting in the chair and your body posture look like as you are sitting in the chair.
Steps of Utkatasana (Chair Pose)
At first get into the pose of Tadasana.
Big toes of your feet ought to touch each other and heels ought to be kept little apart.
Your lower gut (lower belly) ought to be sucked in a little to bolster your spine. Move your shoulder bones down and keep your midsection (chest) open and push out over your shoulders.
At that point, take a full breath and raise your arms over your head. (You can also put your arms up along with the palms joint together, or keep your palms parallel to each other).
Keep your arms in front of your ears or at the same level or before your ears.
Now, keep your lower ribs towards your pelvis. At that point, exhale (breathe out) and twist your knees.
Attempt to make your thighs as parallel to the ground as could be expected under the circumstances. The knees ought to come out in front of your feet.
Your torso ought to incline (lean) a little forward over your thighs till your torso makes a right point with the upper part of the thighs.
Your inward thighs ought to be parallel to each other and the thigh bones ought to be squeezed to the heels.
Keep the closures of your shoulders firm. Convey your tailbone down to the ground and towards your pubis to prolong the lower back.
Stay in this posture for 30 seconds to sixty seconds.
Inhale and keep your knees straight. After that exhale and bring down your hands to the normal position.
Repeat the process around 3 to 5 times.
In Utkatasana pose, you can keep your hands in 3 different ways,
diagonally with palms join together
Straight in forward direction
upward directions at the level of your ears with palms join together
The Benefits of Utkatasana (Chair Pose)
Chair Pose stretches spine, hips and your chest muscles.
Chair Yoga Pose strengthens the immune system and gives relieves back pain and joint pain.
This asana gives the stomach organs a decent back rub Furthermore. Invigorates the stomach and the heart.
Daily practice grants a feeling of equalization in the body.
Utkatasana strengthened your torso and lower back.
This Yoga Pose tones the legs, muscles in the knee, the ankles, and the thighs.
Chair Pose reduces weight, especially from the buttocks.
Follow- Up Poses: – Uttanasana, Palm tree pose (Tadasana)
Other Names: –Fierce Pose, Lightning bolt Pose, Hazardous Pose
NOTE
Utkatasana should be avoided if you are suffering from headaches, Arthritis, severe knee pain, sprained ankle low B.P. and in damaged ligaments. Avoid this pose in lower back pain, periods and shoulder injury. Perform Asana and Pranayama in a right manner under the supervision of an expert person.
75
Uttana Shishosana
Uttana Shishosana
Uttana Shishosana
{Extended Puppy Pose}
-Steps And Benefits
In term of Sanskrit, meaning of Uttana is “intense or extended,” and the meaning of Shisho is “puppy,” asana means “seat”, “pose” or “posture.” Basically this Asana also known as “Extended puppy pose”. Uttana Shishosana gets its name from its close resemblance to a stretching puppy or dog. This Asana is looks like a stretching dog or puppy, from this it got its name.
Uttana Shishosana (Extended Puppy Pose) is an easy and less complex forward twists that everyone can rehearse in yoga session. This Asana is a good stress buster. One thing keep in your mind that this pose is not viewed or considered as a remedial pose in yoga. Uttana Shishosana (Extended Puppy Pose) resemble the ideal blend of Adho Mukha Svanasana(Downward facing dog) and Balasana (Child Pose), and can be utilized as a variety of either. This pose is also referred to as Melting Heart Pose; this posture actually welcomes the heart to melt down toward the ground, extending the spine in both directions.
This pose is recommended when one wants to relax the body and the mind. It is considered a great stress buster.
Steps of Uttana Shishosana (Extended Puppy Pose)
Come into the Tabletop Position, your shoulders should stack over wrists.
Your hips should stack over to your knees, and keep your feet tops on the mat.
Now slowly keep your hands in front of you, lower down your chest towards the floor or ground.
You have to keep your hips over your knees and keep some distance between your arms shoulder distance.
After that slowly down your forehead to the floor.
Now activate your arms by squeezing (pressing) into the palms of your hands.
Raise your elbows and forearms far away from the ground.
After that draw your shoulder blades onto your back and keep your hips up high toward the roof or ceiling.
Draw your neck to relax and inhale into your back, extending your back (spine) in both directions.
Stay in the pose and breath (inhale and exhale) 6 to 12 times.
After that slowly release the pose and get back into the tabletop position.
Benefits of Extended Puppy Pose(Uttana Shishosana)
It stretches your shoulders and spine.
It fortifies the body.
It makes your spine flexible.
It reduces the symptoms of chronic stress, insomnia and tension.
Stretches and strengthens your hips, upper back and arms
A learner who thinks that it’s difficult to perform the Uttana Shishosana ought to remember this tip. In order to remain in this pose for a longer time along with to support the knees, lower back, a learner ought to put either a rolled blanket or a big pillow in the middle of your calves and thighs.
NOTE
In case of knee injuries or leg injuries don’t perform this Pose. First of all master in basic Asana then go for next level. Benefits are relying on the daily basis of your practice. Keep smiling while you perform Asana, stretch or bend as much as you can. If you feel uncomfortable in any asana during holding then release the pose. Always consult an expert person and doctor also before starting any Asana and Pranayama.
76
Utthan Pristhasana
Utthan Pristhasana
Utthan Pristhasana
{Lizard Pose}
-Steps and Benefits
Utthan Pristhasana is made from the two combinations “Utthan Pristha”; and it is a Sanskrit word. In this Utthanstands for stretch out and the meaning of Pristha is the page of a book or Back of the body and Asana represents seat, pose or posture. While performing this pose, your body looks like the position of the Lizard. So that’s why this pose is called Lizard pose. It is a simple to do asana for learners and this Yoga pose is one of the vital poses in the Surya Namaskar (Sun Salutation). Utthan Pristhasana opens your chest, shoulders, and Hip and it has many variations.
Lizard Pose is a basic level Yoga Pose that stretches and strengthens your inner hamstrings, groin.
Steps of UTTHAN PRISTHASANA (LIZARD POSE)
First get into the position of Adho Mukha Svanasana (Downward facing dog pose) on the floor or yoga mat.
Keep your right foot in between your hands, your foot is little wider than your shoulders (for this place your foot heel-toe in the direction of the edge of the yoga mats).
After that, keep your hips towards forward and down.
Then, gently walk towards to your hands until it comes down onto your forearms. Now place your forearms on the floor along with keeping your chest open.
Now, slowly lengthens your spine and draw your shoulder blades together out of your back.
Place your right knee towards the middle line and look straight.
Maintain the pose around 30 to 60 seconds. After that release your position.
Repeat the same process with your alternate leg. Try to repeat the pose 3 times with your both legs; this will give you better output (result).
By practicing Utthan Pristhasana at least thrice (by both sides) will bring the better results.
You can use a block or folded blanket for support and keep your forearm on this block. In Any yoga Asana please focus on your breathing. You can also place your leg in between your hands, instead of your forearms side. You can also let down your left knee for support to the floor if you are uncomfortable.
BENEFITS OF LIZARD POSE (UTTHAN PRISTHASANA)
Utthan Pristhasana opens your chest, shoulders, hip flexors, groins, and hamstrings.
Calms your mind and best stress buster.
Helps to open the hamstrings, hip flexors, and groins.
Lizard Pose Makes your inner thigh muscles and quadriceps stronger.
Good for your neck; it gently massages your internal organs.
Lizard Pose is a simple Asana but very effective for your body, mind and soul.
This Yoga pose is very good for your hip opening.
NOTE
In the condition of lower back pain, sciatica, forearm pain avoids this Asana. Try to practice all the Yoga Asana in the morning with empty stomach. Guidance is necessary for all the Asana, so perform all the yogic activities in front of the expert trainer.
While practicing listen to your body, and don’t go beyond over your capabilities.
77
Svadhishthana Chakra (Sacral Chakra)
Svadhishthana Chakra (Sacral Chakra)
Svadhishthana Chakra (Sacral Chakra)
Svadhisthana chakra is shown as having six petals, bearing the Sanskrit letters ba, bha, ma, ya, ra, and la. The seed sound in the centre is vam. The tattwa for the element of Water is shown as a silver crescent.
Svadhishthana (Sanskrit: ???????????, IAST: Sv?dhi??h?na, English: "where your being is established." "Swa" means self and "adhishthana" means established.) or the sacral chakra, is the second primary chakra according to Hindu Tantrism. This chakra is blocked by fear especially the fear of death.
Representation
Svadhisthana is illustrated as a white lotus (Nelumbo nucifera). It has six vermilion-colored petals inscribed with syllables: ?? ba?, ?? bha?, ?? ma?, ?? ya?, ?? ra? and ?? la?. Inside this lotus is a white crescent moon which represents the water region presided over by the deity Varuna.
The seed mantra, located in the innermost circle, is a moon-white ?? va?. Above the mantra that is within the bindu, or dot, is the deity Vishnu. He is dark blue and wears a yellow dhoti. He holds a conch, a mace, a wheel and a lotus. He wears the shrivatsa mark, and the kaustubha gem. He is seated either on a pink lotus, or on the divine eagle Garuda.
His strength is the goddess Rakini. She is black, dressed in red or white and seated on a red lotus. She is commonly depicted with one face and two arms, holding a sword and a shield, or two faced and four armed, and holds a trident, lotus, drum and vajra, or an arrow, skull, drum and axe.
Some schools teach that the divinities of the Sv?dhishth?na Chakra are Brahm? and Sarasvat?. Brahm? is the creator of the Universe and Saraswati personifies knowledge.
Characteristics
The six petals represent the following modes of consciousness, also known as vrittis: affection, pitilessness, feeling of all-destructiveness, delusion, disdain and suspicion.
Svadhisthana is associated with the unconscious and with emotion. It is closely related to the Muladhara in that Muladhara is where the different samskaras (potential Karmas) lie dormant, and Svadhisthana is where these Samskaras find expression. It is associated with the element of water, the sense of taste and the act of procreation.
Svadhisthana contains unconscious desires, especially sexual desire. It is said, that to raise the kundalini shakti (energy of consciousness) above Svadhisthana is difficult. Many saints have had to face sexual temptations associated with this chakra.
One who meditates on Svadhisthana is believed to obtain the following siddhis: freedom from enemies, the status of a lord among yogis, eloquence and clarity ("words flowing like nectar in well-reasoned discourse"), loss of fear of water, awareness of astral entities and the ability to taste anything desired for oneself or others.
Association with the body
Svadhisthana is located two finger-widths above the Muladhara chakra (Sanskrit: ???????, IAST: M?l?dh?ra, English: "root support") or root chakra which is located in the coccyx (tailbone). Its corresponding point in the front of the body (i.e. its kshetram) is barely below the belly button.
It is connected with the sense of taste, (the tongue) and with reproduction (the genitals).
It is often associated with the testes and ovaries. They produce the hormones testosterone or estrogen, which influence sexual behaviors. They are stored in areas where genetic information lies dormant, in the same way that samskaras lie dormant within Svadhisthana.
Svadhisthana chakra with the ocean of samskara, the moon of bindu chakra, the sky from anahata and the stars.
Practices
Practices in kundalini yoga to control and balance the energy in Svadhisthana chakra include vajroli mudra (contraction of the genitals), ashvini mudra (contraction of the anus), and various asanas and pranayamas.
Comparisons
The equivalent chakra in the Vajrayana tantra systems of Tibet is called the "Secret Place" four fingers below the navel. It is red in colour, with 32 downward pointing spokes. Meditation on this point produces great bliss.
According to certain interpretations of Sufism, the spiritual body of a man is defined as an interconnected system (Lataif-e-sitta), in which there is an energy center called the nafs. According to Lataif-e-sitta, the nafs is just below the navel. The nafs incorporates all the elements of man's 'lower self,' which is tamed in order to attain closeness to Allah.
Western occultists make the kabbalistic association of Svadhisthana with the Sephirah Yesod. Yesod is also associated with the sexual organs. Its function in the tree of life is to gather the different energies that have been created in the descent of the tree downwards and distribute them to Malkuth, the material world, where the energy can find physical expression.
Alternative names
Tantra: Adhishthana, Bhima, Shatpatra, Skaddala Padma, Wari Chakra
Vedas (late Upanishads): Medhra
Sacral chakra
78
Anahata Chakra ( Heart Chakra)
Anahata Chakra (Heart Chakra)
Anahata
Anahata (Sanskrit: ?????, IAST: An?hata, English: "unstruck") or heart chakra is the fourth primary chakra, according to Hindu Yogic, Shakta and Buddhist Tantric traditions. In Sanskrit, anahata means "unhurt, unstruck, and unbeaten". Anahata Nad refers to the Vedic concept of unstruck sound (the sound of the celestial realm). Anahata is associated with balance, calmness, and serenity.
Etymology
In Sanskrit Anahata means "sound produced without touching two parts" and at the same time it means "pure" or "clean, stainless". The name of this chakra signifies the state of freshness that appears when we are able to become detached and to look at the different and apparently contradictory experiences of life with a state of openness (expansion). Normally we are not used to the effect produced by the confrontation of the two opposite forces. At the level of Anahata chakra appears the possibility to integrate the two opposite forces and obtain the effect (sound, in this case), without the two forces being confronted (without touching of the two parts). This energy is specific to cooperation and integration, which brings peace and a new perspective in a world which, up to this level (considering only the energies specific to the first three centres of force: Muladhara, Swasdhistana and Manipura) was made only of a more or less conscious confrontation between opposite forces. The name Anahata suggests, in fact, the synergetic effect of the interaction of energies at this level.
Description
Location
The heart chakra is located in the central channel of the spine near the heart, with its kshetram
Appearance
Anahata is represented by a lotus flower with twelve petals. Inside there is a smoky region at the intersection of two triangles, creating a shatkona. The shatkona is a symbol used in Hindu Yantra, representing the union of male and female. Specifically, it is meant to represent Purusha (the Supreme Being) and Prakriti (Mother Nature) and is often represented by Shiva and Shakti. The deity of this area is Vayu, who is smoke-like and four-armed, holding a kusha and riding an antelope (this chakra's animal).
Seed mantra
The seed syllable is the dark-grey mantra "yam". In the bindu (or dot) above the syllable is the deity Isha. Isha is bright white or blue in color. He has either one or five faces, with three eyes on each face. He may have two, four or ten arms. He is clad in a tiger skin, holds a trident and drum, grants blessings, and dispels fear. His shakti is Kakini, who is shining yellow or rose-coloured. She has a number of variations: one, three or six faces; two or four arms; and holds a variety of implements (occasionally a sword, shield, skull or trident). She is seated on a red lotus.
Petals
The twelve petals are inscribed with the following Sanskrit syllables. (Note: In some representations the syllables or else the petals themselves are colored vermillion.)
kam
kham
gam
gham
ngam
cham
chham
jam
jham
nyam
tam
tham
The syllables may be thought as matching twelve vrittis or divine qualities of the heart as follows.
bliss
peace
harmony
love
understanding
empathy
clarity
purity
unity
compassion
kindness
forgiveness
Even more commonly, systems of understanding identify these vrittis as corresponding with various reflexive modifications away from the indifferentiated divine mind, each one considered as arising from spiritual ignorance, as below.
asha: wish, desire, hope
cinta: thoughtfulness, anxiety
cesta: effort
mamta: possessiveness, fondness
dhamba: arrogance, vanity
viveka: discrimination
vikalata: languor
ahamkara: conceit, egoism, pride
lolata: covetousness, avarice
kapatata: duplicity, hypocrisy
vitarka: indecision, argumentativeness
anutapa: regret, burning misery
William Enckhausen defines half of these vrittis as spiritual ignorances and half spiritual developments. "Half the 12 vrttis of the Anahata are 'positive', growth promoting vrttis and the other half are 'negative' or at most neutral, self-justifying defense tendencies that perpetuate the ego's limited boundaries instead of expanding and refining them. There is still a limited and bounded sense of self, but with the potential to discriminate between vice and virtue. There is also still the boundary of self and not self to be overcome, although not as marked as in the Manipura and Svadhistana. Harmony, balance, and proportion are key elements in this fulcrum that is the Anahata to help determine what is growth-promoting and virtuous (self, or good for the self) and what is vice, or inappropriate for spiritual self-growth (not self). Enckhausen's translations follow.
hope
worry
endeavor
affection
vanity
discernment
depression
self-identity
selfishness
duplicity
contention
compunction
Function
Anahata is considered to be the seat of the Jivatman and Parashakti. In the Upanishads, this is described as a tiny flame inside the heart. Anahata is named as such because sages were believed to hear the sound (Anahata – comes without the striking of two objects together). It is associated with air, touch and the actions of the hands.
Anahata is associated with the ability to make decisions outside the realm of karma. In Manipura and below, man is bound by the laws of karma and fate. In Anahata one makes decisions ("follows one's heart") based on one's higher self, not the unfulfilled emotions and desires of lower nature. As such, it is known as the heart chakra. It is also associated with love and compassion, charity to others and psychic healing. Meditation on this chakra is said to bring about the following siddhis (abilities): he becomes a lord of speech, he is dear to women, his presence controls the senses of others, and he can leave and enter the body at will.
Hrit (Hridaya, Surya) chakra
Immediately below Anahata (at the solar plexus or, sometimes, on the near left side of the body) is a minor chakra known as Hrit (or Hridaya, "heart"), with eight petals. It has three regions: a vermilion sun region, within which is a white moon region, within which is a deep-red fire region. Within this is the red wish-fulfilling tree, kalpa vriksha, which symbolises the ability to manifest what one wishes to happen in the world.
Hrit chakra is sometimes known as the Surya (sun) chakra, which is located slightly to the left below the heart. Its role is to absorb energy from the sun and provide heat to the body and the other chakras (to Manipura in particular, to which it provides Agni' (fire).
Associations with the body
Anahata is said to be near the heart. Because of its connection to touch (sense) and actions, it is associated with the skin and hands. In the endocrine system, Anahata is said to be associated with the thymus.
Practices
In Yogic practices, anahata is awakened and balanced by asanas, pranayamas and the practice of ajapa japa (japa, without the mental effort normally needed to repeat the mantra) and purified by bhakti (devotion).
There are also special Concentration practices for awakening the An?hata Chakra.
Comparisons with other systems
Tibetan Buddhism
The heart wheel in Tibetan Buddhism is the location of the indestructible red-and-white drop. At death, the winds of the body dissolve and enter this drop, which then leads the body into Bardo (the intermediate stage) and rebirth. The heart wheel in this model is circular, white and has eight petals (or channels) reaching downwards. These channels divide into three wheels (mind, speech and body) and go to 24 places in the body. They again divide into three and then into 1,000, producing 72,000 channels (known as Nadi) throughout the body.
The heart wheel is important in meditation; in the lower tantras, the mantra is recited from the heart. It is recited verbally and then mentally; then, in the heart, a tiny moon disc and flame are imagined from which the mantra rings. In the higher tantras (the Anuttarayoga Tantra of the Sarma schools) or the Inner Tantras of the Nyingma school, the practitioner attempts to dissolve the winds and drops into the central channel at the level of the heart to experience the Yoga of Clear Light; this is a practice of the Six Yogas of Naropa. In Tibetan Buddhism there is a chakra, the Fire Wheel, above the heart and below the throat.
Sufism
Sufis have a system of Lataif-e-sitta at a number of points on the body; at the heart, there are three positioned horizontally. On the left side of the chest is the Qalb (the heart); the Ru? is on the right side of the chest, and the Sirr (innermost heart) is between them.
The Qalb is called the heart of the mystic; it is caught between the downward pull of the lower nafs, and the upward pull of the spirit of Allah and may be blackened by sin. It may be purified by reciting the names of God. The Ru? is the centre of the spirit, the breath of Allah; when awakened, it counteracts the negative pull of the nafs. The Sirr is the innermost heart, where Allah manifests his mystery to himself.
Qigong
In Qigong, the middle Dantian (one of the three furnaces that transform energy in the body) is in this region. The middle Dantian transforms qi energy into shen (spiritual energy). This is also not a correct location of a Dantian. The Dantian is located on the Anterior of the body, not the posterior, as is this chakra.
79
Vishuddha Chakra (Throat)
Vishuddha Chakra ( Throat)
Vishuddha Chakra
Vishuddha (Sanskrit: ???????, IAST: Vi?uddha, English: "especially pure"), or Vishuddhi, or throat chakra is the fifth primary chakra according to the Hindu tradition of tantra. Endocrine: Thyroid. The residing deity of this chakra is Panchavaktra shiva, with 5 heads and 4 arms, and the Shakti is Shakini.
Description
Location
Vishuddha is positioned at the throat region, near the spine, with its Kshetram or superficial activation point in the pit of the throat. Due to its position, it is known as the throat Chakra.
Appearance
According to Hindu tradition, this chakra is described as having a "white color" with sixteen "purple" or "smoke-colored petals." Within the pericarp is a sky-blue downward pointing triangle containing a circular white region like the full moon. This represents the element of akasha or "aether." This region is represented by the deity Ambara, who is also white in color and is depicted with four arms, holding a noose and a goad. He makes the gestures of granting boons and dispelling fear while seated upon a white elephant. The silver crescent is the lunar symbol of nada, pure cosmic sound. The crescent is symbolic of purity, and purification is a vital aspect of Vishuddha Chakra.
Seed Mantra
The Bija Mantra is the syllable??ha?, and is written in white upon the chakra. In the Bindu, or point above the mantra, resides the deity Sadashiva, who has 5 faces, representing the spectrum of smell, taste, sight, touch, and sound and 10 arms. The right half of his body is a white Shiva, and the left half of the body is a golden Shakti. He is holding a trident, chisel, sword, vajra, fire, a great snake, a bell, a goad, and a noose, and is making the gesture of dissipating fear. He is clad in a tiger skin. His Shakti is Shakini, who is shining white, seated on a red lotus, and with five faces, three eyes each, and four-armed, with a bow and arrow, noose, and goad.
Petals
Vishuddha has 16 purple petals upon which are written the 16 Sanskrit vowels in golden;
? a
? ?
? i
? ?
? u
? ?
? ?
? ?
? ?
? ?
? e
? ai
? o
? au
?? ?
?? ?
NB: Some vowels listed above do not strictly correspond to the grammatical definition of a Sanskrit vowel, specifically? ?, ?? ?, and ?? ?. See Sanskrit Phonology for details.
The petals correspond to the Vittis of the mantra Ong [Aum], the Sama-mantras, the mantras Hung, Phat, Washat, Swadha, Swaha, and Namak, the nectar Amrita, and the seven musical tones.
Function
Vishuddha chakra is known as the purification center, where the nectar amrita drips down from the Bindu chakra and is split into a pure form and a poison. In its most abstract form, it is associated with higher discrimination and is associated with creativity and self-expression. It is believed that when Vishuddha is closed, a person undergoes decay and death. When it is open, negative experiences are transformed into wisdom and learning. The success and failure in one's life are said to depend upon the state of this chakra, whether it is polluted or clean. The feeling of being guilty is given as the most prominent reason for this chakra to block the Kundalini energy moving upwards. It is associated with the element Akasha, or Ether, and the sense of hearing, as well as the action of speaking.
Meditation upon this chakra is said to bring about various siddhis or occult powers: vision of the three periods, past, present and future; freedom from disease and old age; destruction of dangers; and the ability to move the three worlds.
Lalana chakra
Closely related to Vishuddha is a minor chakra, located in the roof of the mouth, called Lalana. It is described as having 12 red or white petals that correspond to the virtues of respect, contentment, offense, self-control, pride, affection, sorrow, depression, purity, dissatisfaction, honor and anxiety. Inside is a red circular moon region, which acts as a reservoir for the nectar Amrit. When Vishuddha is inactive, this nectar is allowed to run downwards into Manipura and consumed, resulting in physical degeneration. Through practices such as khechari mudra, however, the nectar can be made to enter Vishuddha, where it is purified, and becomes a nectar of immortality.
Associations with the body
This chakra is located in the neck and the throat. Due to its association with hearing, it is related to the ears, and due to its association with speaking, it is associated with the mouth.
Vishuddha is often associated with the thyroid gland in the human endocrine system. This gland is in the neck, and produces hormones essential for growth and maturation. Excessive stress, namely fear and fear from speaking out, are said to affect the throat chakra, and thyroid problems may occur. Singing is a harmless and beneficial way of stimulating the throat chakra, whereas rubbing or hitting the throat area is not and can be harmful.
Practices
In Kundalini yoga, Vishuddha can be opened and balanced through practices including asanas (such as shoulder-stand), pranayama, Jalandhara Bandha (throat lock), and Khecar? mudr?. This chakra can be cleaned or opened by meditation or vocalisation.
There are also special Meditations with Specific Influence on the Vishuddhi Chakra.
Comparisons with other systems
The throat wheel is an important center in the Highest Yoga traditions of Vajrayana. It is described as being circular, blue, with 16 upward-pointing petals or channels. It is of particular importance for the practice of dream yoga. Correctly meditating upon it before going to sleep is thought to produce lucid dreams, within which one can continue to practice yoga.
Western occultists make various differing Kabbalistic associations with Vishuddha. Some associate it with the hidden sephirah Da'at, where "wisdom" and "understanding" are balanced in the supernal realm by the aspect of "knowledge", a tangible idea which is then expressed, leading to the act of the creation. Others associate it with the sephirah Chesed and Geburah (mercy and strength) which are intimately associated with morality and the concept that both expansion, as expressed by Chesed, and limitation, as expressed by Geburah, are necessary for the creation of individual beings. In terms of ethics, this is expressed by the yamas and niyamas (do's and do not's) of yoga.
In the system of the Sufi Lataif-e-sitta, there are no Lataif in the throat, but there are three in the region of the heart that are arranged horizontally and not vertically. They are the Qalb, or heart, which is the battleground between the lower forces of the Nafs and the higher forces of the Ruh, or spirit; the Ruh, which is said by some to be situated on the righthand side of the chest; and Sirr, or secret, which is between them both in the middle of the chest.
In Taoism, the position of Lalana chakra in the roof of the mouth corresponds with a point known as "The Heavenly Pool".
In Hindu astrology or jyotish, the graha (planet) ruling the throat chakra is Buddha or Mercury. Afflicted Mercury, combust (conjunct with Sun) or conjunct with Saturn, in the native's birth chart can show problems related to the throat chakra, namely communication and the thyroid gland, especially during the Buddha dasha or antardasha (planetary period or subperiod of Mercury).
Ajna (Sanskrit: ?????,IAST: ?jñ?, IPA: [a???a?]), guru chakra or third-eye chakra, is the sixth primary chakra in the body according to Hindu tradition. It is supposedly a part of the brain which can be made more powerful through meditation, yoga and other spiritual practices just as a muscle is. In Hindu tradition, it signifies the subconscious mind, the direct link to the brahman. While a person's two eyes see the physical world, the third eye is believed to reveal insights about the future. The third eye chakra is said to connect people to their intuition, give them the ability to communicate with the world, or help them receive messages from the past and the future.
Location
The Ajna chakra is located in the brain, directly behind the center of the eyebrows. The location makes it a sacred spot where Hindus apply a vermilion bindi to show reverence for it.
Appearance
Ajna is described as a transparent lotus flower with two white petals, said to represent the nadis (psychic channels) Ida and Pingala, which meet the central Sushumna nadi before rising to the crown chakra, Sahasrara. The letter "ham" (??) is written in white on the left petal and represents Shiva, while the letter "ksham" (????) is written in white on the right petal and represents Shakti.
Inside the pericarp of the flower is the hakini Shakti. It is depicted with a white moon, six faces, and six arms holding a book, a skull, a drum, and a rosary, while making the gestures associated with granting boons and dispelling fears. The downward-pointing triangle above her contains a white lingam. This triangle, along with the lotus flower, can represent wisdom. In some systems the deity Ardhanarishvara, a hermaphrodite form Shiva-Shakti, resides within the lingam and symbolizes the duality of subject and object.This sixth chakra of our energy body is also connect with sixth layer of aura which known as celestial layer of aura science.
Seed syllable
The seed syllable of Ajna is Ksham and the more well known, Om, or "Pranava Om", which is believed to be the basic sound of the world and contains all other sounds. It is considered the supreme sound of the universe. The B?ja mantras are monosyllabic seed sounds which, when they are spoken aloud, activate the energy of the chakras in order to purify and balance the mind and body. The energy resonates in the chakra associated with the mantra, helping the speaker become aware of their body's needs.
Function
Ajna translates as "authority" or "command" (or "perceive") and is considered the eye of intuition and intellect. Its associated sense organ is the brain. When something is seen in the mind's eye, or in a dream, it is being seen by Ajna. It is a bridge that links gurus with disciples while allowing mind communication between two people. Meditation upon Ajna supposedly grants siddhi, or occult powers, to quickly enter another body at will and to become omniscient. The beholder of these powers realizes unity with Brahman, who has the ability to create, preserve, and destroy the three worlds.
As Hindus believe that spiritual energy from the environment enters their body through the Ajna chakra, they take great care to protect it with spiritually positive and protecting forces. The various religious marks on the foreheads of Hindus, for example bindis, are the spiritual gifts of their respective forms of the Hindu gods.
Directly above Ajna is a minor chakra known as Manas. This chakra is responsible for sending sense perceptions to the higher chakras. Manas has six petals, one for each of the five senses and one for sleep. These petals are normally white but take on the color of the senses when activated by them, and are black during sleep. It is associated with the parietal eye of a juvenile bullfrog.
Practices
Exercises for the ?gy? Chakra are
Breathing Practice for the Clarification and Resolution of Problems
Trataka - Concentration on a Point or on the Flame of a Candle
?sanas, Pr?n?y?mas, Mudr?s that work specifically on the ?gy? Chakra
Shambh?vi Mudr? (Mudra of Lord Shiva)
Bhramar? Pr?n?y?ma
?tm? Chintana and Manana
There are also special Meditations on the ?gy? Chakra.
Comparisons with other systems
In Tibetan Buddhism this chakra is at the end of the central energy channel, which runs up the body to the top of the head,and then over and down, terminating at the forehead. The two side channels continue inward towards the two nostrils and end there. This center is frequently depicted as the third eye in artwork and is used in various meditations. There is also a forehead center above the third eye, which corresponds to the position of Manas, one of the ten chakras in the Mahayoga tantra traditions.
In qigong, the highest Dantian is located at this chakra's superficial location. This is one of three furnaces that converts the different types of energy in the body. In this Dantian, the spiritual shen energy is converted into wuji, the infinite space of void.
Within the system of Lataif-e-sitta, there is a Lataif known as Khafi, or arcane subtlety, in the same position. This is thought to be related to mystical intuition. According to the Kabbalah, there are two sephirot located on the sixth level, associated with the left and right parts of the face. They are called Chokmah (wisdom) and Binah (understanding); it is at these points that the two side pillars of mercy and severity end, while the central pillar carries on rising to kether, the crown.
In the Vedas: Baindawa-Sthana, Bhru chakra, Bhruyugamadhyabila, and Dwidala.
In the Puranas: Dwidala, and Trirasna.
81
Sahasrara Chakra (Crown of Head)
Sahasrara Chakra ( Crown of Head)
Sahasrara Chakra (Crown of Head)
Sahasrara (Sanskrit: ???????, IAST: Sahasr?ra, English: "thousand-petaled") or crown chakra is generally considered the seventh primary chakra, according to most tantric yoga traditions.
Description
Appearance
The Sahasrara is described as a lotus flower with 1,000 petals of different colors. These petals are arranged in 20 layers, each layer with approximately 50 petals. The pericarp is golden and within it a circular moon region is inscribed with a luminous triangle, which can be either upward- or downward-pointing.
Function
Often referred to as a thousand-petaled lotus, it is said to be the most subtle chakra in the system, relating to pure consciousness, and it is from this chakra that all the other chakras emanate. When a yogi is able to raise his/her kundalini, energy of consciousness, up to this point, the state of Nirvikalpa Sam?dhi is experienced.
Practices
Exercises for the Sahasr?ra Chakra are:
Shirsh?sana
Vriksh?sana
Khatu Pranam
Singing OM
Kriy? Yoga
There are also special Meditations on the Sahasr?ra Chakra.
Associated chakras
In some schemes of chakras, there are actually several chakras, which are all closely related, at the top of the head. Rising from Ajna. we have the Manas chakra on the forehead, which is closely associated with Ajna. Above Manas there are Bindu Visarga at the back of the head; Mahanada; Nirvana, which is located on the crown. Guru; and the Sahasrara proper, located above the crown.
Bindu Visarga
The Bindu Visarga is located at the back of the head, in a place where many Brahmins keep a tuft of hair. It is symbolized by a crescent moon on a moonlit night, with a point or bindu above it. This is the white bindu, with which yogis try to unite the red bindu below. It is said to be the point through which the soul enters the body, creating the chakras as it descends and terminating in the coiled kundalini energy at the base of the spine. It is often described as the source of the divine nectar, or amrita, though this is sometimes said to come from either ajña chakra or lalita chakra. This nectar falls down into the digestive fire (samana) where it is burnt up. The preservation of this nectar is known as "urdhva retas" (literally: upward semen). The white drop is associated with the essence of semen, while the red bindu is associated with menstrual fluid.
This chakra is sometimes known as the Indu, Chandra, or Soma Chakra. In other descriptions, it is located on the forehead - white, with 16 petals - corresponding to the vrittis of mercy, gentleness, patience, non-attachment, control, excellent-qualities, joyous mood, deep spiritual love, humility, reflection, restfulness, seriousness, effort, controlled emotion, magnanimity and concentration.
Mahanada
The name of this chakra means "Great Sound", and it is in the shape of a plough. It represents the primal sound from which emanates all of creation.
Nirvana
This chakra is located on the crown of the head. It is white in color and possesses 100 white petals. It marks the end of the sushumna central channel. It is responsible for different levels of concentration: dharana, dhyana and savikalpa samadhi.
Guru
The Guru Chakra is located above the head, just below Sahasrara proper. It is white, with 12 white petals, upon which is written guru. It contains a circular moon region, within which is a downward pointing triangle containing a jeweled altar, with the crescent moon below and circular bindu above. Inside the bindu is the seat, near which are the gurus footstools, upon which are the gurus feet. This position is considered very important in Tibetan tantric practice of deity yoga, where the guru or deity is often visualized as above the crown, bestowing blessings below (for example in the Vajrasattva purification meditation).
Higher levels
Within Sahasrara, there are yet more levels of organization. Within the triangle begins a series of ever higher levels of consciousness: Ama-Kala, the First Ring of Visarga, Nirvana-Kala, and Nirvana Shakti, which contains the Second Ring of Visarga. From here, Kundalini becomes Shankhini, with 3-and-a-half coils. The First Coil of Shankhini wraps around the Supreme Bindu, the Second Coil of Shankhini wraps around the Supreme Nada, the Third Coil of Shankhini wraps around Shakti, and the Half-Coil of Shankhini enters into Sakala Shiva, beyond which is Parama Shiva.
Ama-Kala
Ama-Kala is the experience of samprajnata samadhi.
Visarga
Visarga is symbolized by two small rings, one of which is inside Ama-Kala, and the other of which is below Supreme Bindu, which represents the transition from samprajnata samadhi to the oneness of asamprajnata samadhi.
Nirvana-Kala
Here Kundalini absorbs even the experience of samadhi, through the power of supreme control (Nirodhika-Fire).
Nirvana-Shakti to Parama Shiva
Here Kundalini passes into the supreme void, which is the experience of asamprajnata or nirvikalpa samadhi, and becomes Shankhini. Shankhini wraps around and absorbs the Supreme Bindu, which is the void; then the Supreme Nada; then Shakti; and then unites with and absorbs Sakala Shiva; before finally being absorbed into Parama Shiva, which is the final stage of nirvikalpa samadhi.
Association with the body
Sahasrara is related to the crown of the head. It is typically associated with the fontanelle and the intersection of the coronal and sagittal sutures of the skull. Various sources will relate it to the pineal gland, hypothalamus or the pituitary gland although these are often given instead as locations of Ajña Chakra.
Comparisons with other systems
The crown wheel is important within the Anuttarayoga Tantra tradition of Buddhist Vajrayana. It is triangular, with 32 petals or channels that point downwards, and within it resides the white drop or white bodhicitta. Through meditation, the yogi attempts to unite this drop with the red bodhicitta in the navel, and to experience the union of emptiness and bliss. It is very important in the Tantric practice of Phowa, or consciousness transference. At the time of death, a yogi can direct his consciousness up the central channel and out of this wheel in order to be reborn in a Pure Land, where he can carry on his tantric practices, or transfer that consciousness into another body or a corpse, in order to extend life.
In the West, it has been noted by many (such as Charles Ponce in his book Kabbalah.) that Sahasrara expresses a similar archetypal idea to that of Kether, in the Kabbalistic Tree of Life, which rests at the head of the tree, and represents pure consciousness and union with God.
Within the Sufi system of Lataif-e-sitta there is a Lataif called Akhfa, the "most arcane subtlety", which is located on the crown. It is the point of unity where beatific visions of Allah are directly revealed.